

- Preparing: the room has been created and people are being gathered, but the clock has not started yet.
- Started: the incident is being handled. The room moves through the NIST incident response phases (Detection and Analysis, Containment Eradication and Recovery, Post-Incident Activity).
- Resolved: the room has reached the Post-Incident Activity phase and the review is being written or is complete.
- Archived: the room is closed and read-only. It can be reopened at any time.
War Rooms are a licensed feature. If the section does not appear in your navigation menu, your license does not include it. Contact us to enable it.
Navigation
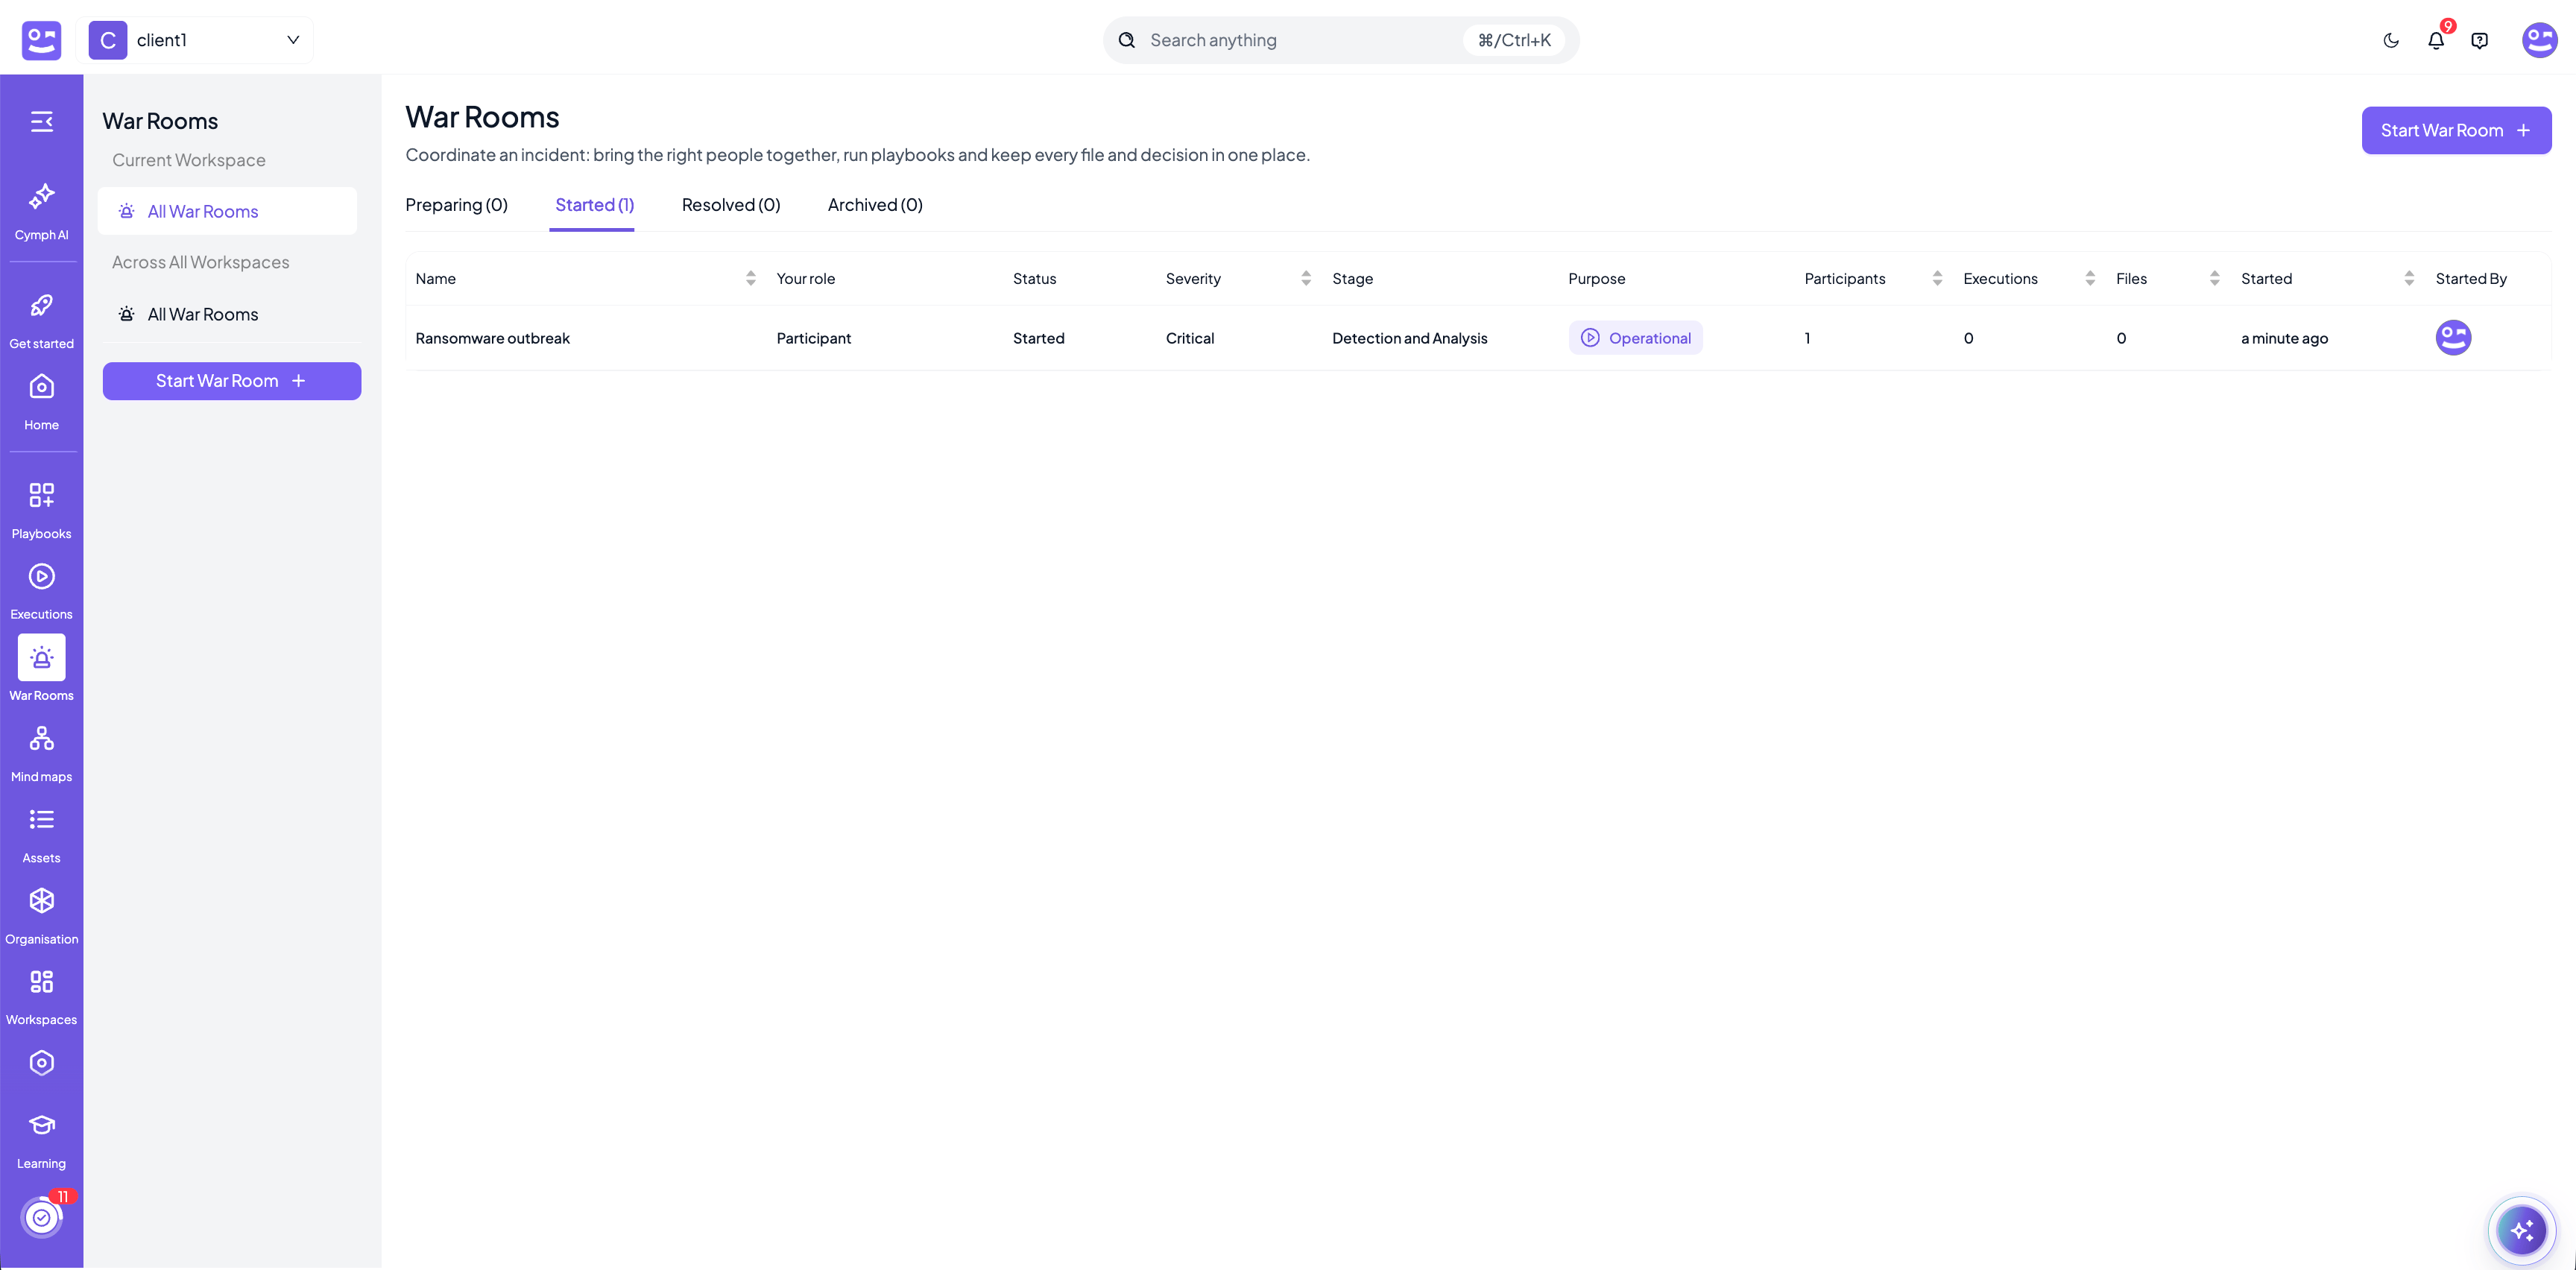
War Rooms have their own entry in the navigation menu. Selecting it opens the War Rooms navigator, which has two entries:- Current Workspace → All War Rooms: the rooms that belong to the workspace you currently have open.
- Across All Workspaces → All War Rooms: every room you can see in any workspace, plus every room you take part in as a participant or guest, even if you are not a member of that workspace.
The War Rooms page
The War Rooms page lists rooms grouped by their state in four tabs: Preparing, Started, Resolved and Archived. The number next to each tab is the count of rooms in that state. Each row shows the following information:- Name: the name of the war room.
- Workspace (only in the Across All Workspaces view): the workspace that owns the room.
- Your role: what you are in this room. Either your incident role (for example Incident Commander or Scribe), Participant if you are seated without a role, or Guest if you were added as a guest from outside the workspace. Guests also see whether they have opened the room yet.
- Status (Archived tab only): the state the room was in when it was archived, Preparing, Started or Resolved. On the other tabs the tab itself is the status.
- Severity: Not specified, Low, Medium, High or Critical.
- Stage: the NIST incident response phase the room is currently in.
- Purpose: Operational for a real incident or Exercising & Testing for a drill. The purpose is chosen when the room is created and cannot be changed afterwards. Every execution started from an exercise room runs in exercise mode and every notification it sends is clearly marked as an exercise.
- Participants, Executions, Files: counts of the people seated in the room, the playbook executions started from it and the files uploaded to it.
- Started and Started By: when the clock started and who started the room.
Actions on the table
Hover over a row to reveal its actions next to the name:- Open: opens the war room in a new browser tab, so you can keep the list and several rooms open side by side.
- The ⋯ menu: shows a summary of the room (name and when it was started) and the actions available to you.
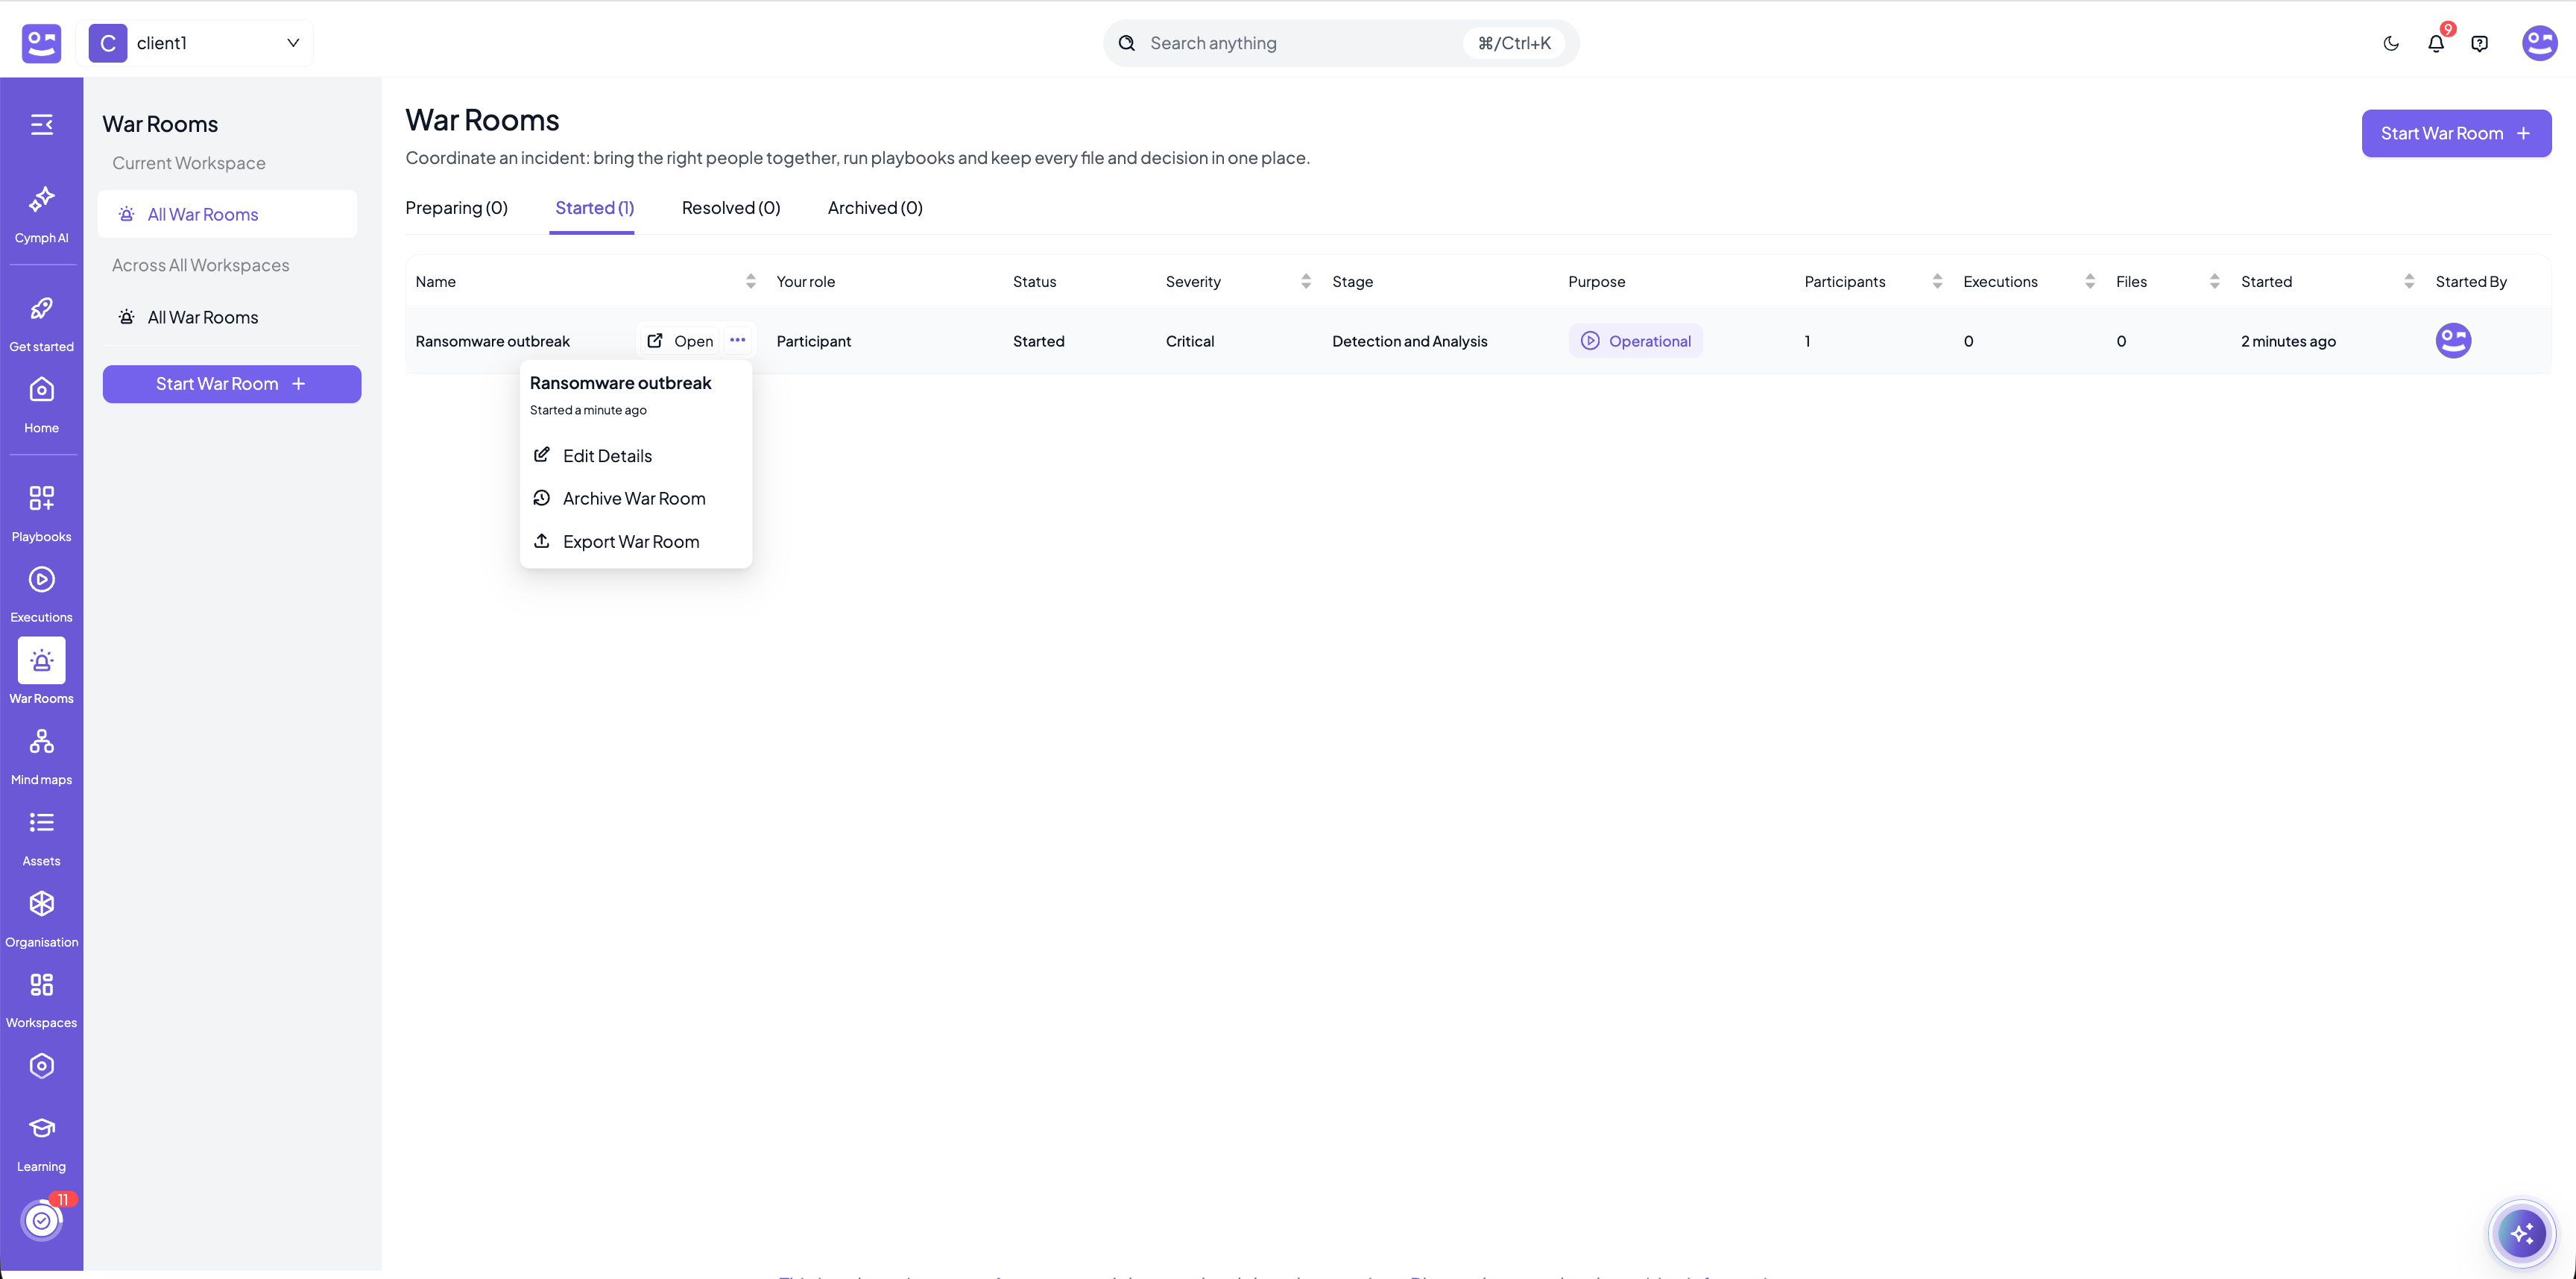
- Edit Details: change the name, description and meeting link of the room, as well as its incident details (severity, incident type, affected assets and services). Available on rooms that are not archived.
- Archive War Room: closes the room. An archived war room is read-only: nobody can add participants, upload files or start executions until it is reopened. You are asked to confirm before the room is archived. Only the Incident Commander can archive; for other participants the action is greyed out and says so on hover.
- Reopen War Room: shown instead of Archive War Room on archived rooms. Only the Incident Commander can reopen; the action is greyed out for other participants. Reopening restores the room to the state it was in when it was archived.
- Export War Room: downloads a zip archive with everything in the room: a timeline PDF with the participants, executions and the full activity log, every uploaded file together with an integrity manifest, a PDF per execution and the chat transcript. See Exporting a war room.
Every participant of a room can edit and export it; archiving and reopening are the Incident Commander’s. Guests and workspace members who are not seated in the room can only open it. Starting a new war room requires the right to create war rooms in the workspace, which comes with your workspace role.
Starting a war room
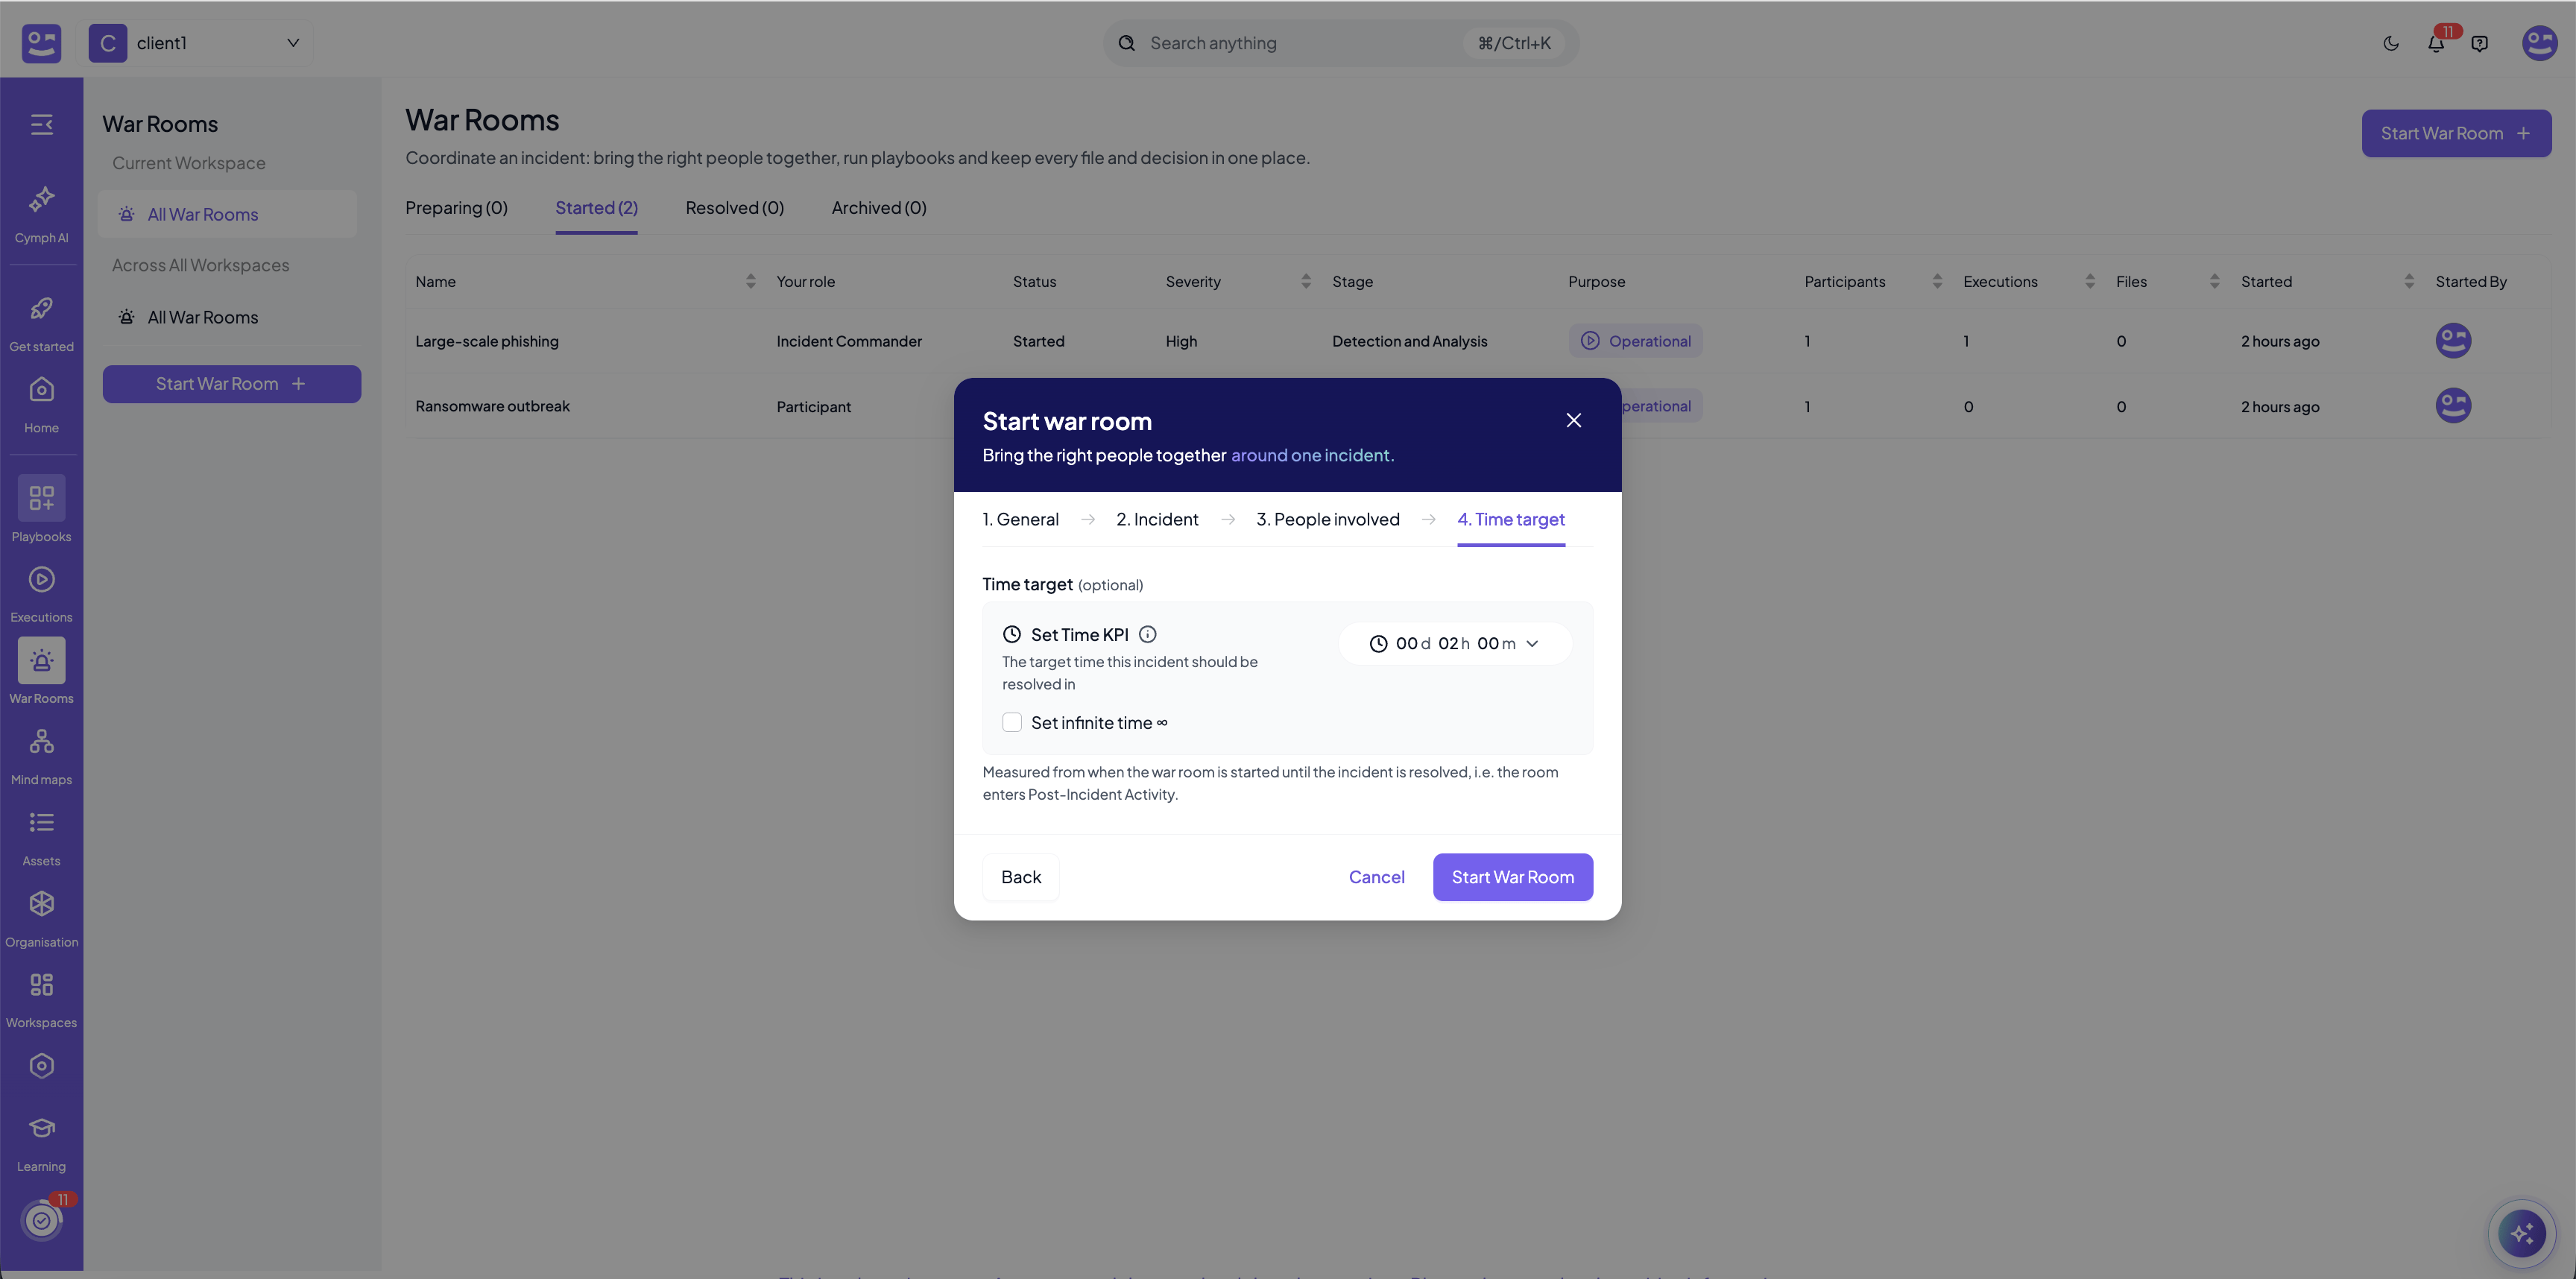
Press Start War Room, either in the navigator or at the top right of the War Rooms page. A four-step dialog collects what the room needs. Only the name and the purpose are mandatory; everything else can be filled in or changed later from inside the room.Creating the room does not start the incident clock. The room is created in the Preparing state and the clock starts when someone presses Start the room inside it.
Step 1: General
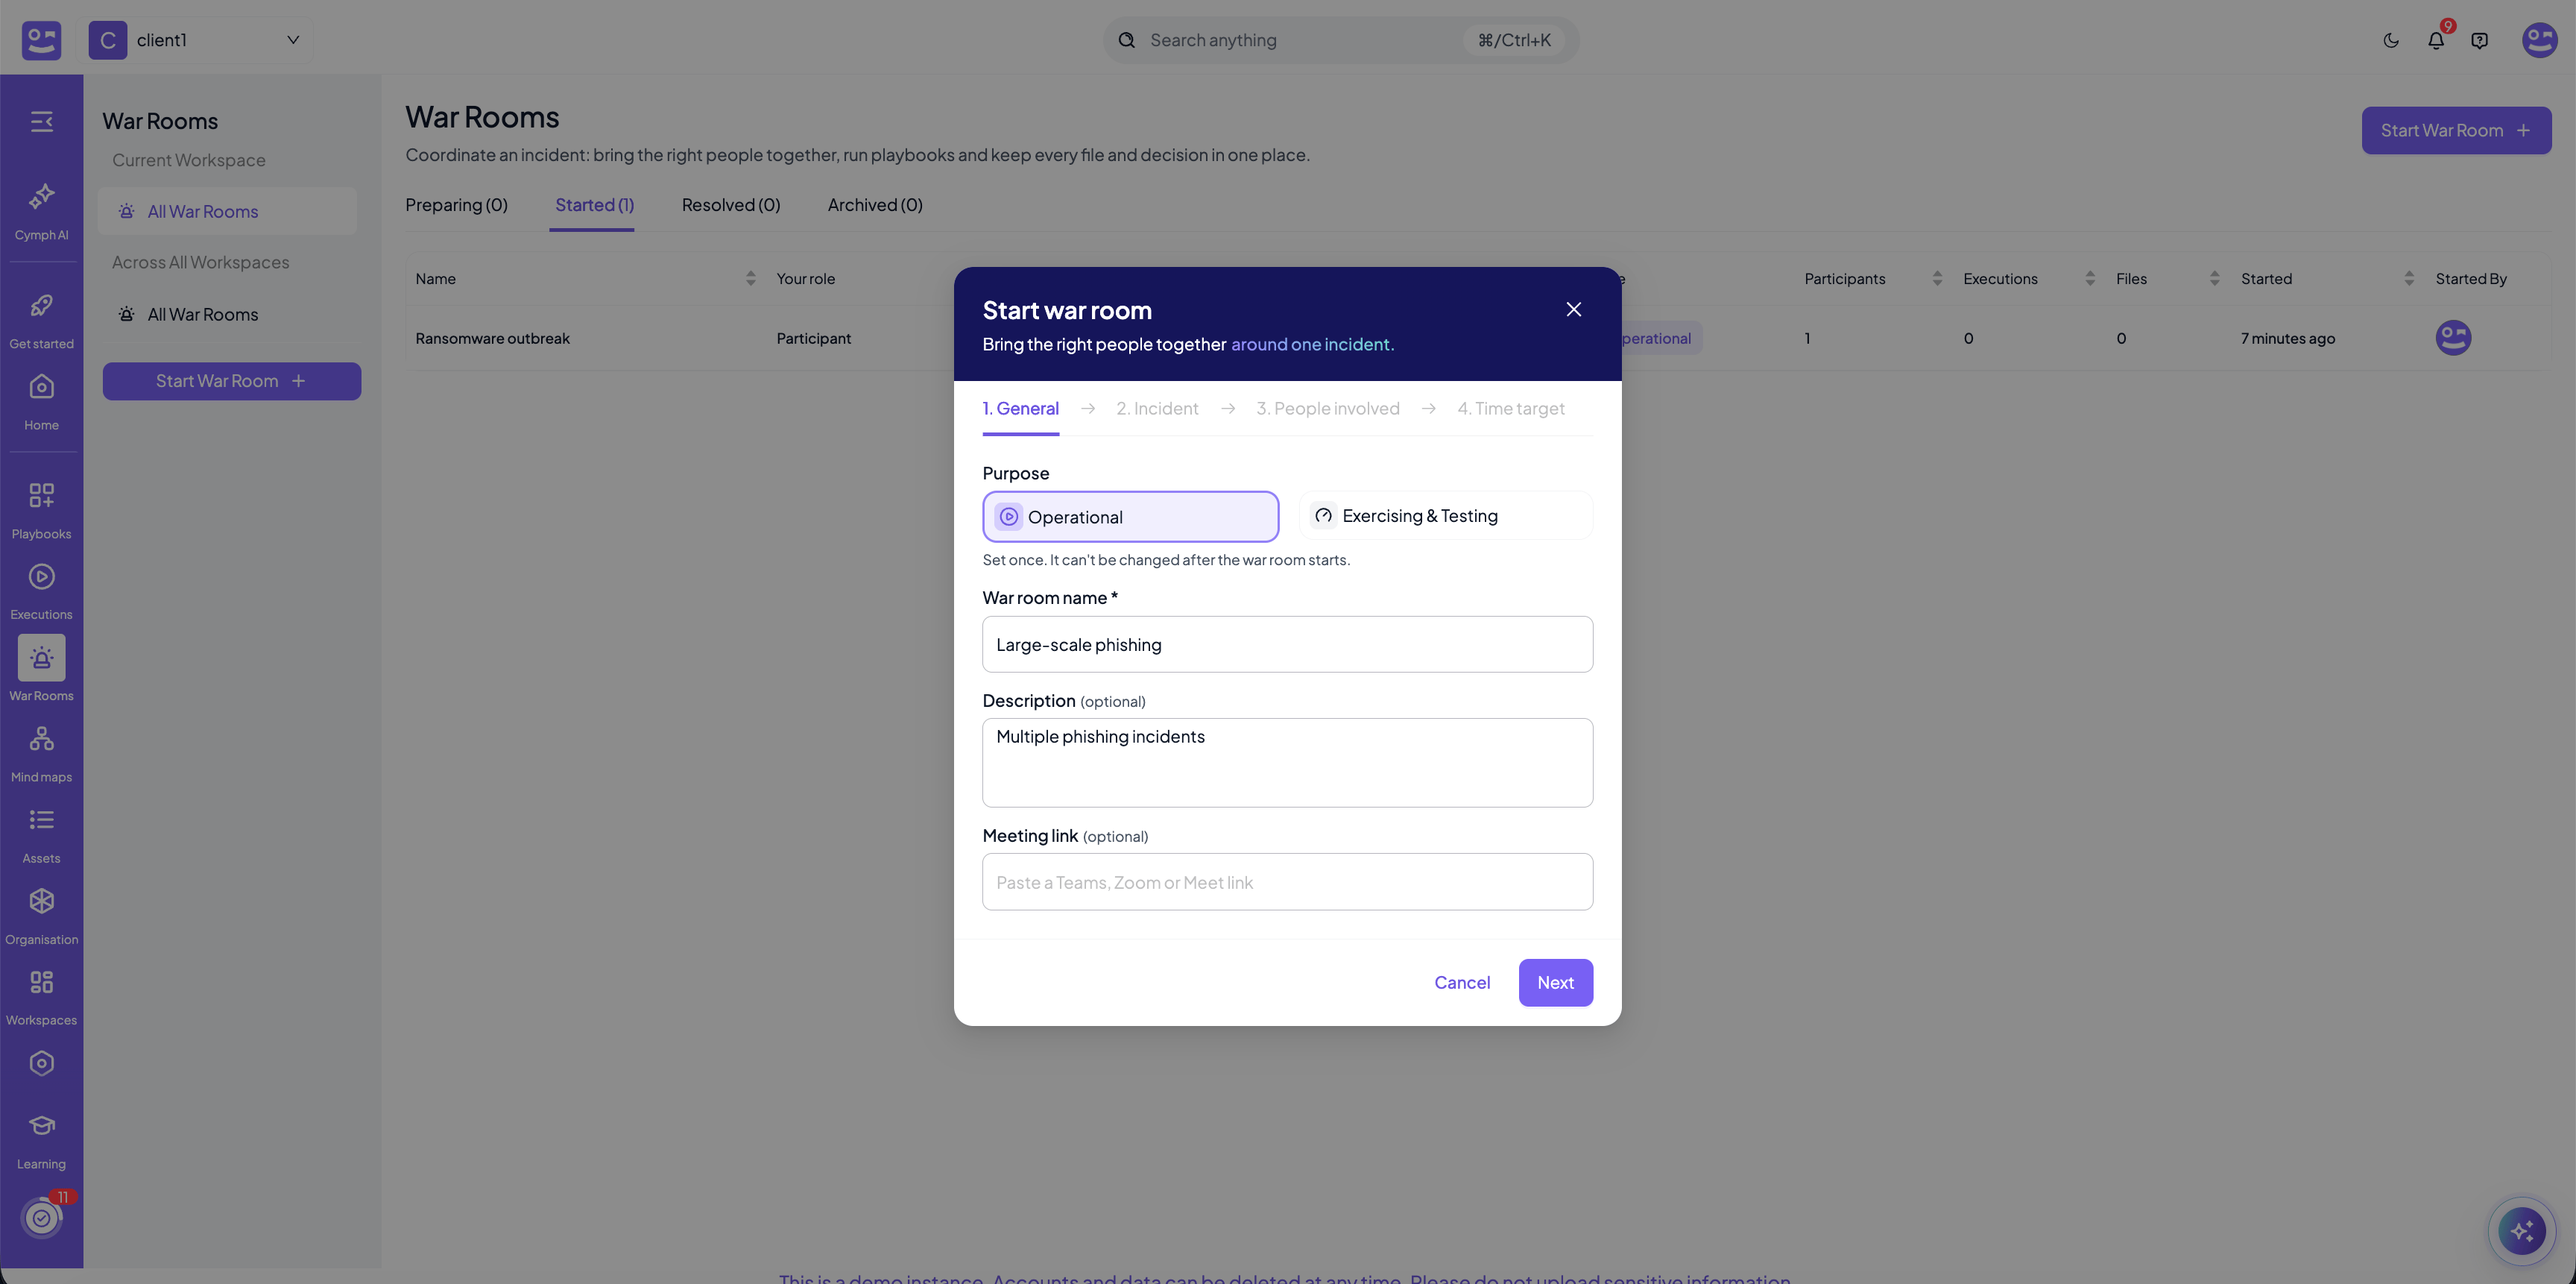
- Purpose: Operational for a real incident or Exercising & Testing for a drill. This is set once and cannot be changed after the room is created. Every execution started from the room inherits the purpose, and in an exercise room every in-app notification, email, SMS, Slack or Teams announcement and export is marked as an exercise so nobody mistakes it for a real incident. See Exercise rooms.
- War room name: the name shown in every list, notification and export.
- Description: a short summary of what is going on.
- Meeting link: a Teams, Zoom or Meet link that participants can join from the room.
Step 2: Incident
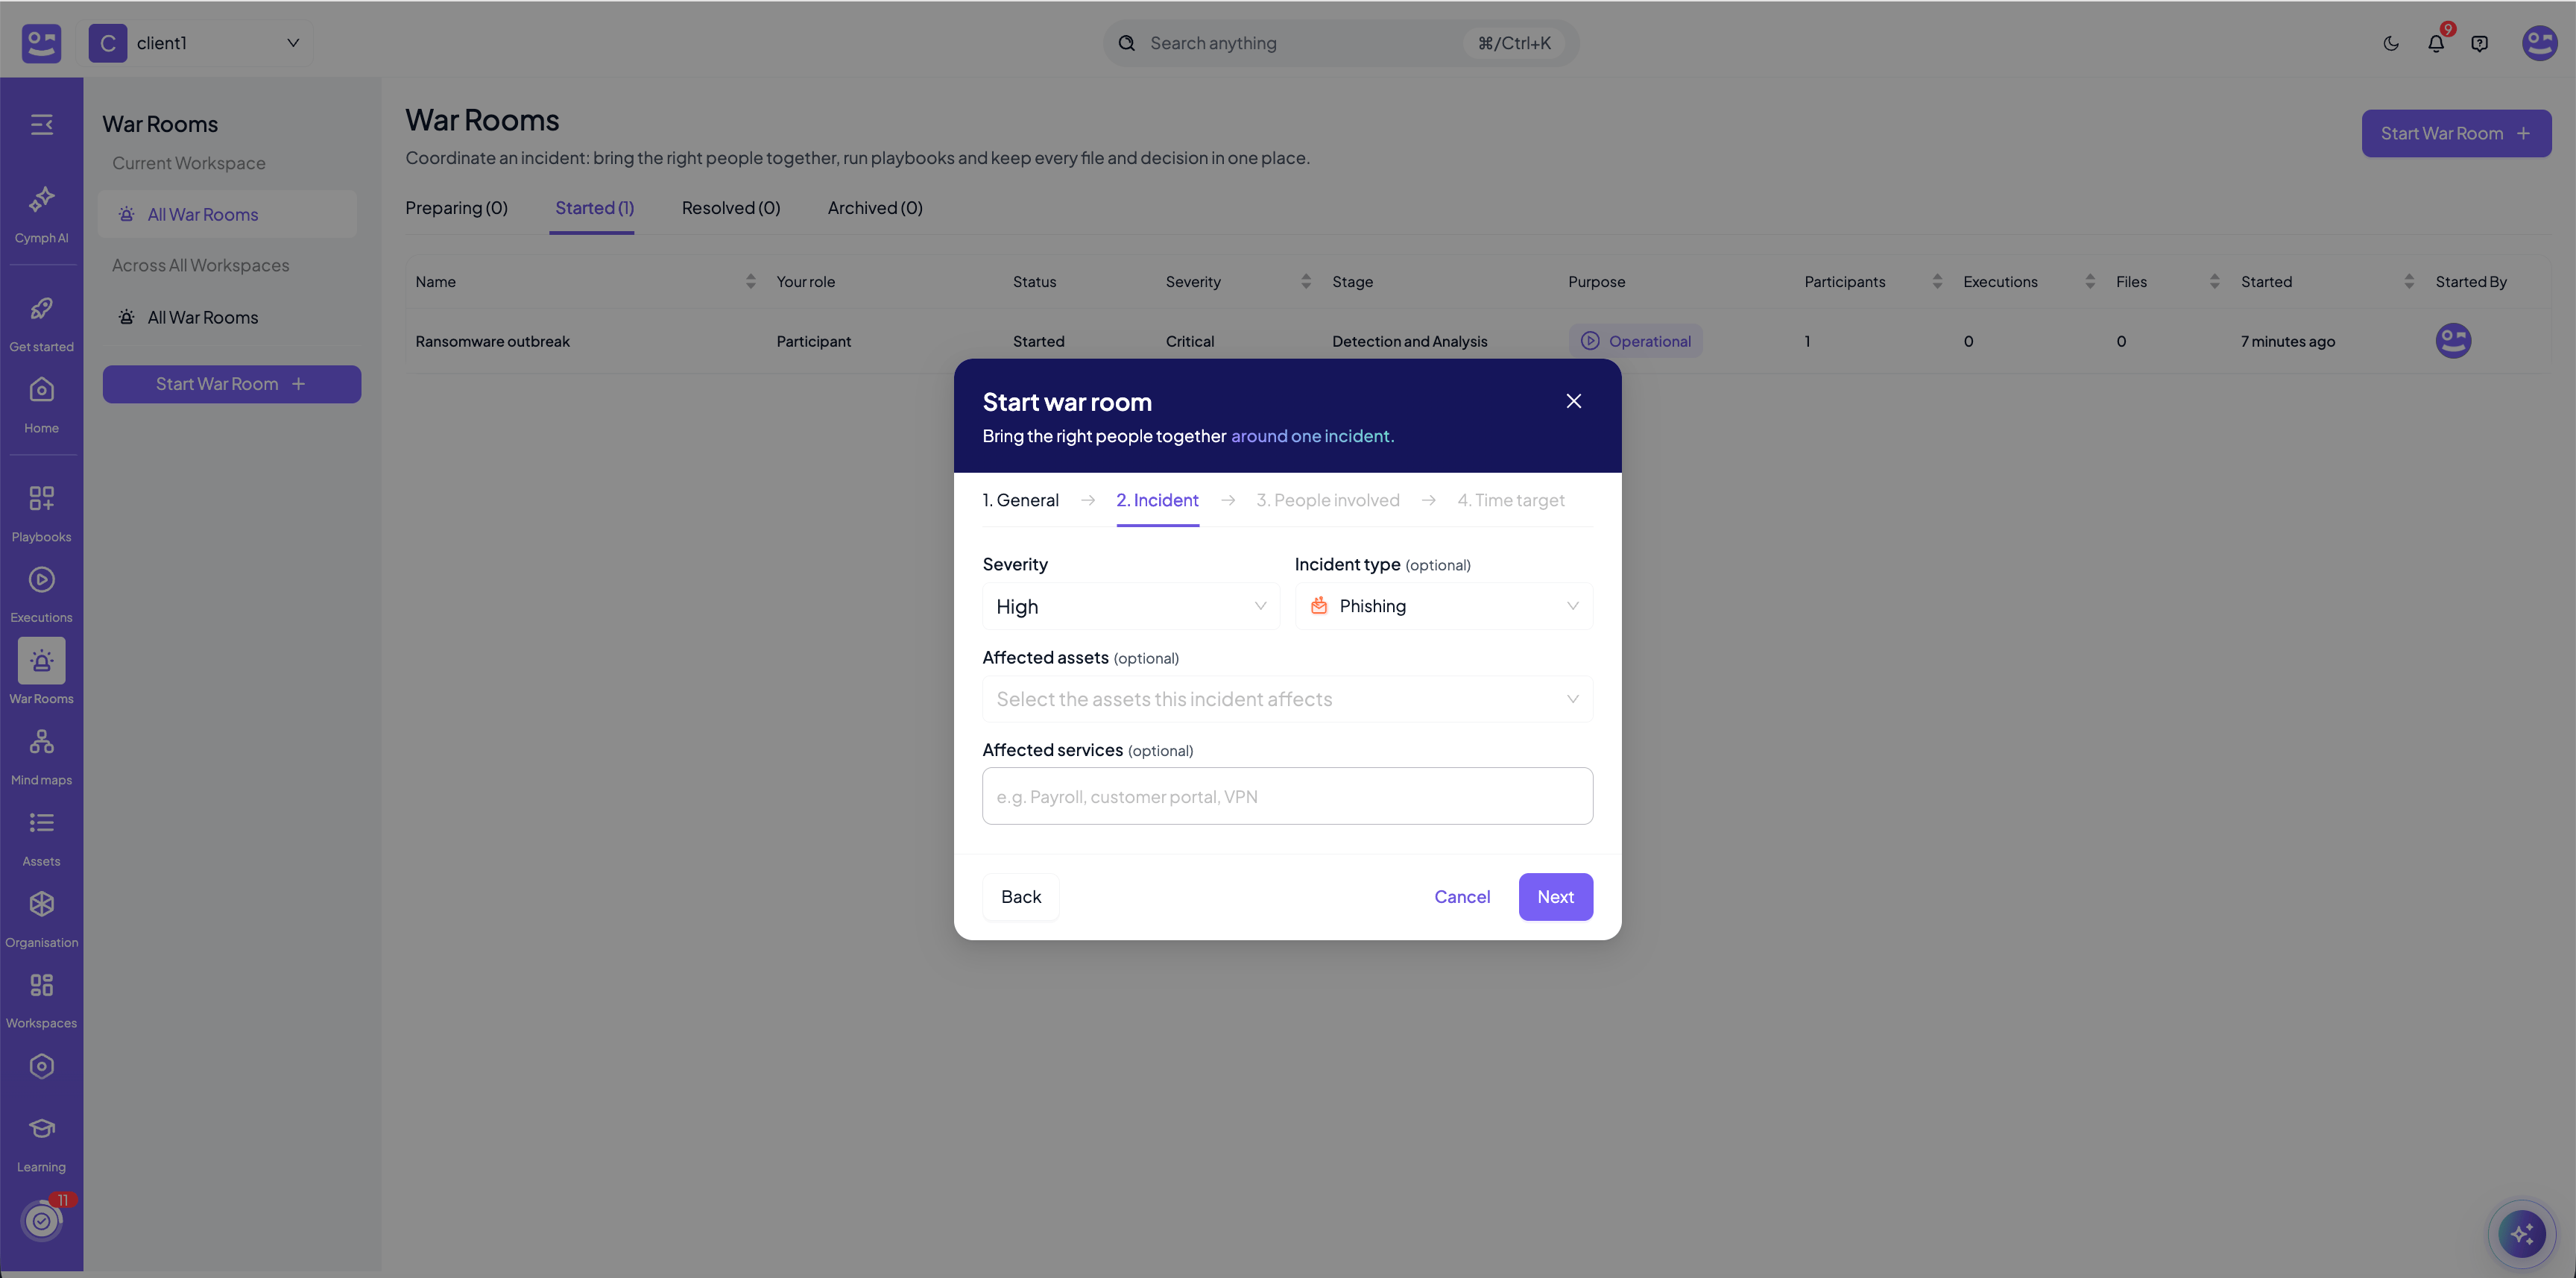
- Severity: Not specified, Low, Medium, High or Critical. It uses the same scale and colours as playbook severity.
- Incident type: the threat type being handled (for example Phishing or Ransomware), using the same list as playbooks, plus Other.
- Affected assets: assets from the workspace asset inventory that the incident touches.
- Affected services: free text for the business services affected, for example Payroll, customer portal, VPN.
Step 3: People involved
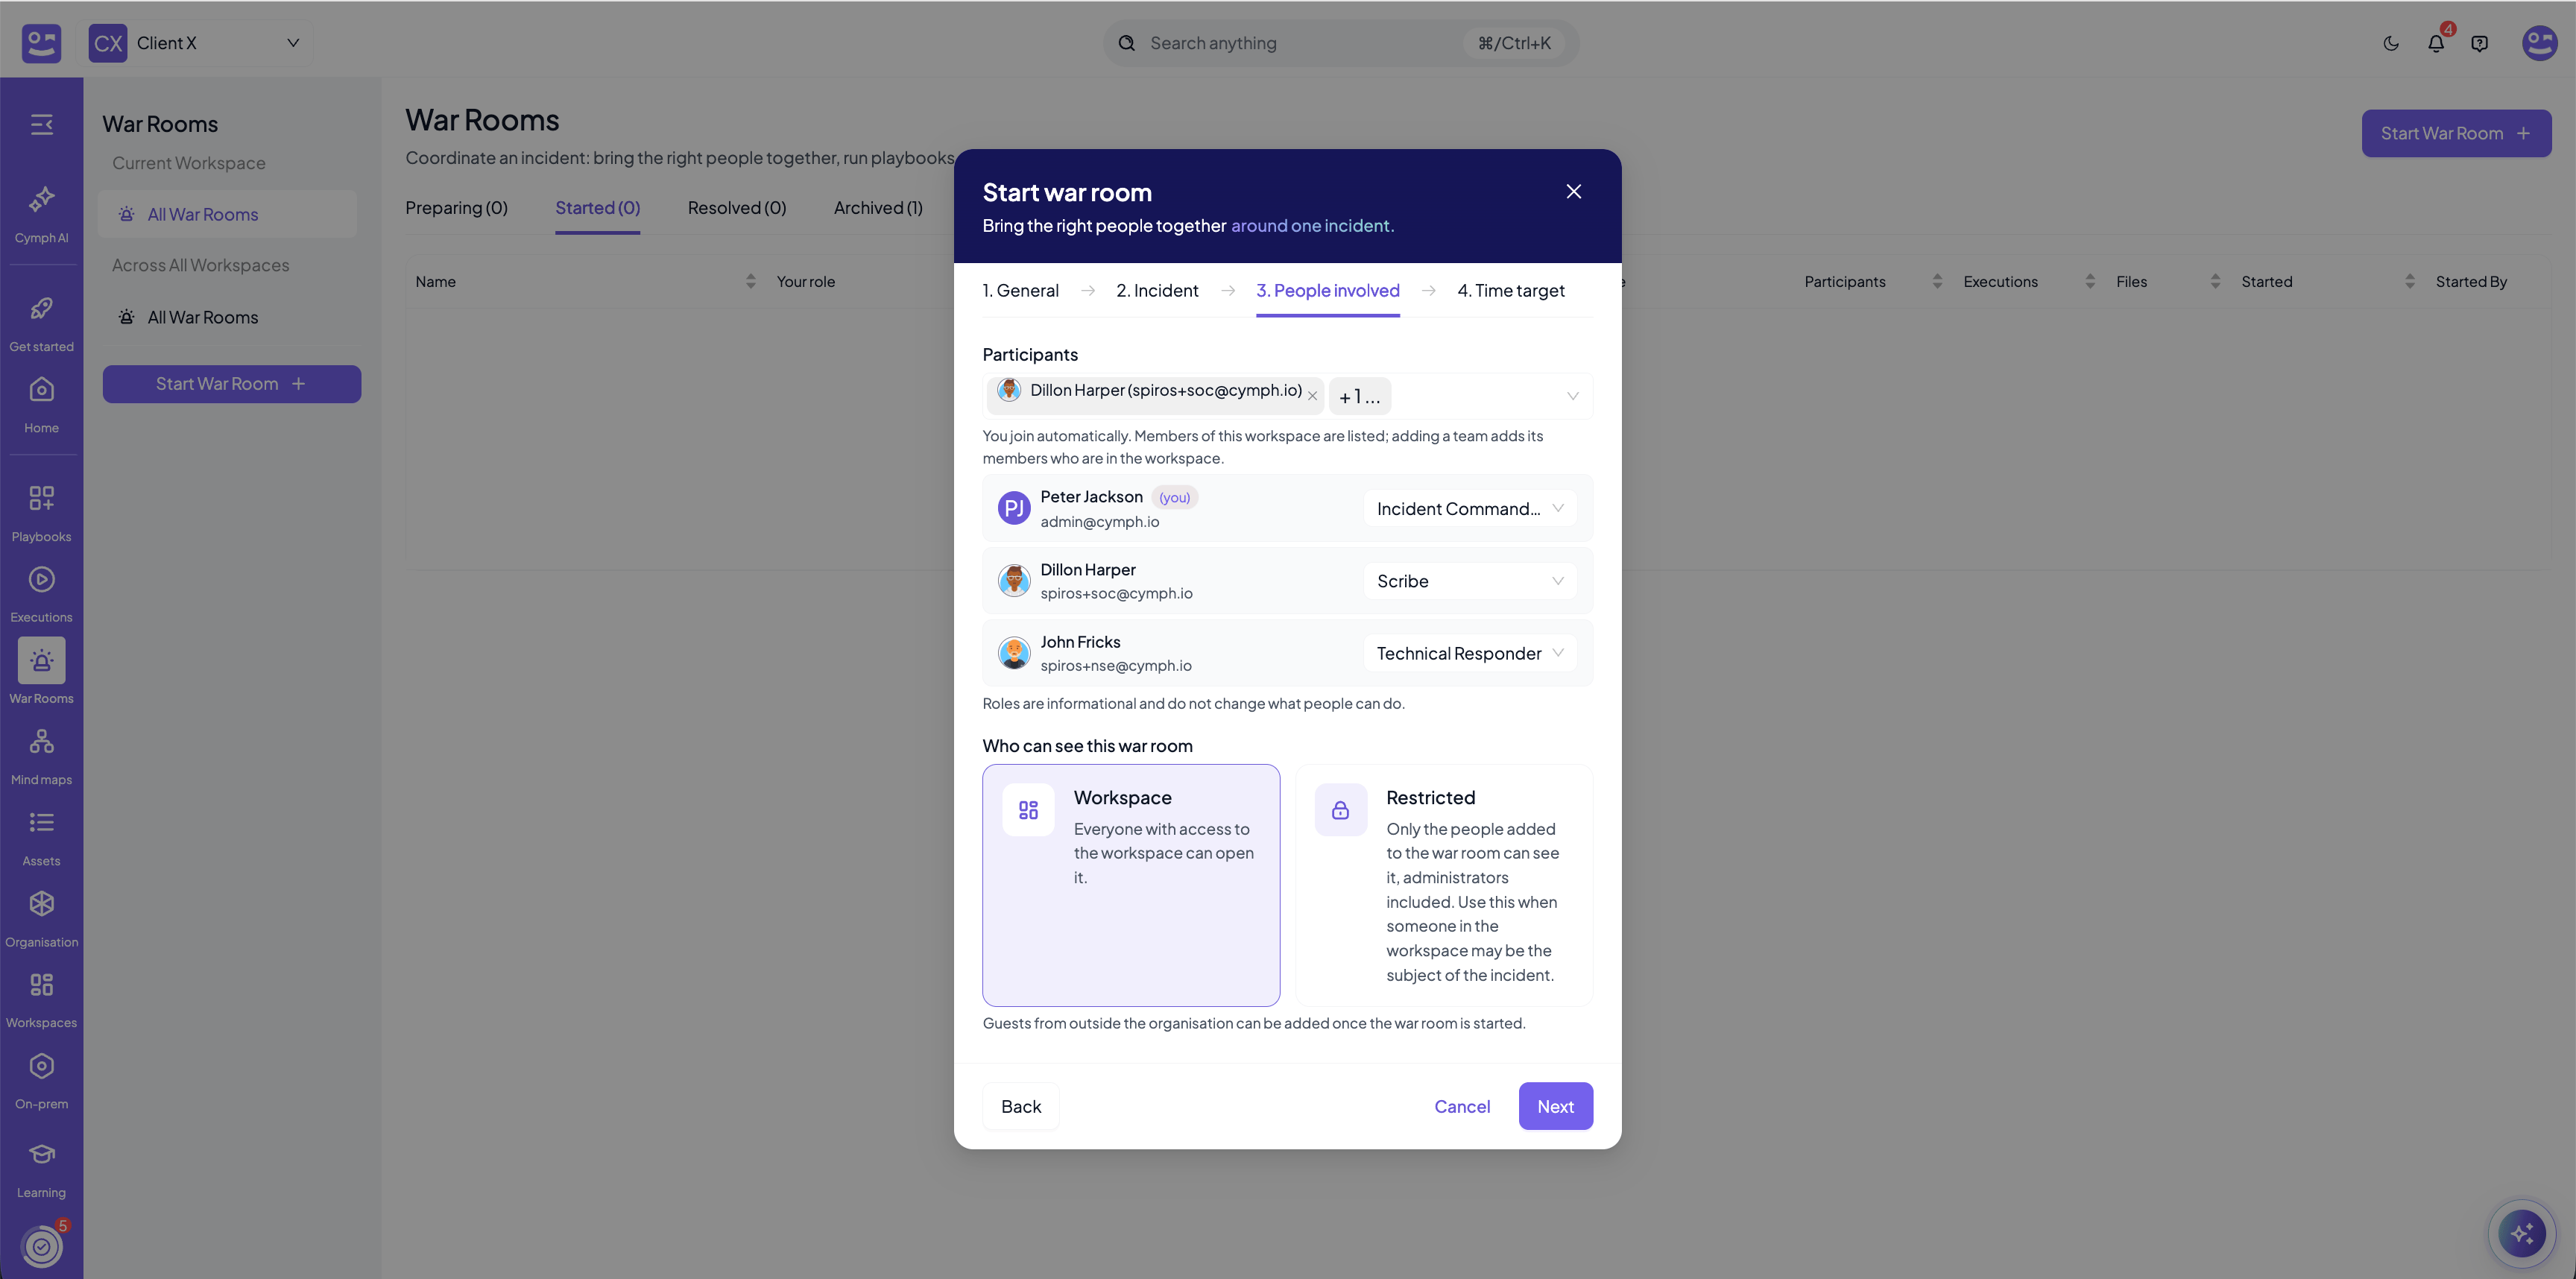
- Participants: pick members of the workspace and teams from your organisation. The list shows the people who have access to the workspace, external members included. Adding a team seats its members who belong to the workspace, each as an individual participant. You join automatically as the creator.
- Roles: each participant can be given an incident role: Incident Commander, Scribe, Comms Lead or Technical Responder. Every room has exactly one Incident Commander, and it is you unless you give the role to one of the people you invite; the room cannot be started without one. The Incident Commander commands the room (see People in the room). The other roles say who does what and do not change what people can do.
- Who can see this war room:
- Workspace: everyone with access to the workspace can open the room. People who are not seated can read it but cannot act in it.
- Restricted: only the people added to the war room can see it, administrators included. The room is hidden from the workspace list. Use this when someone in the workspace may be the subject of the incident.
Guests from outside the organisation cannot be added at this step. Once the room is started, open its Participants tab to add guests.
Step 4: Time target
The war room page
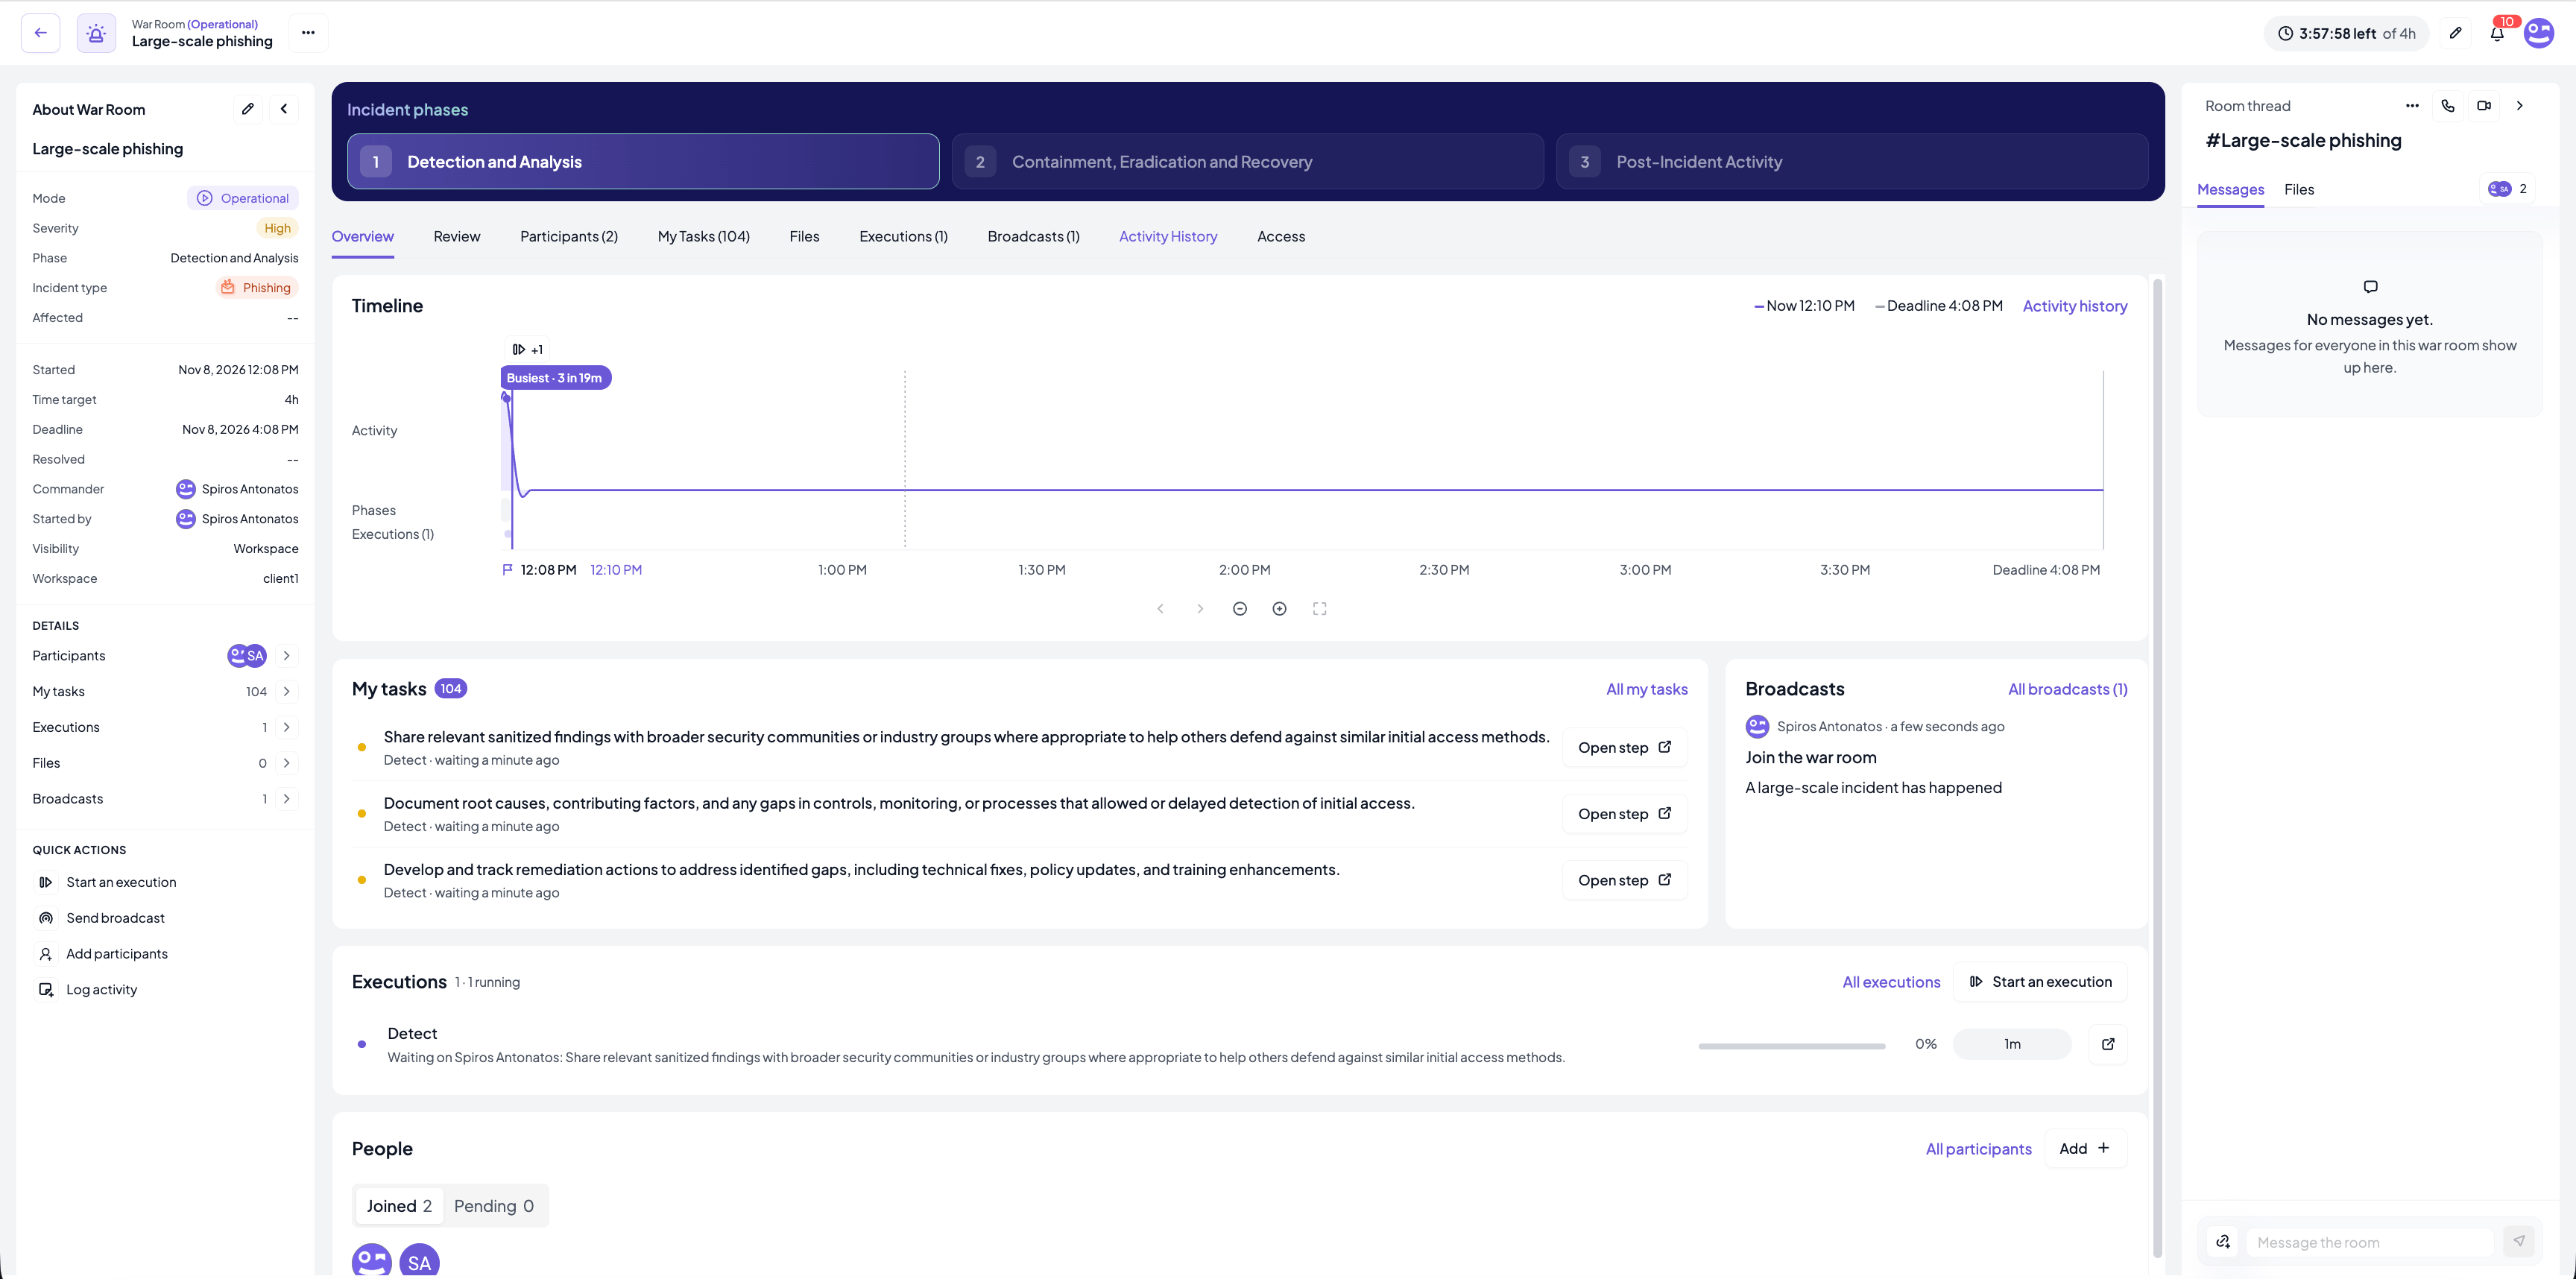
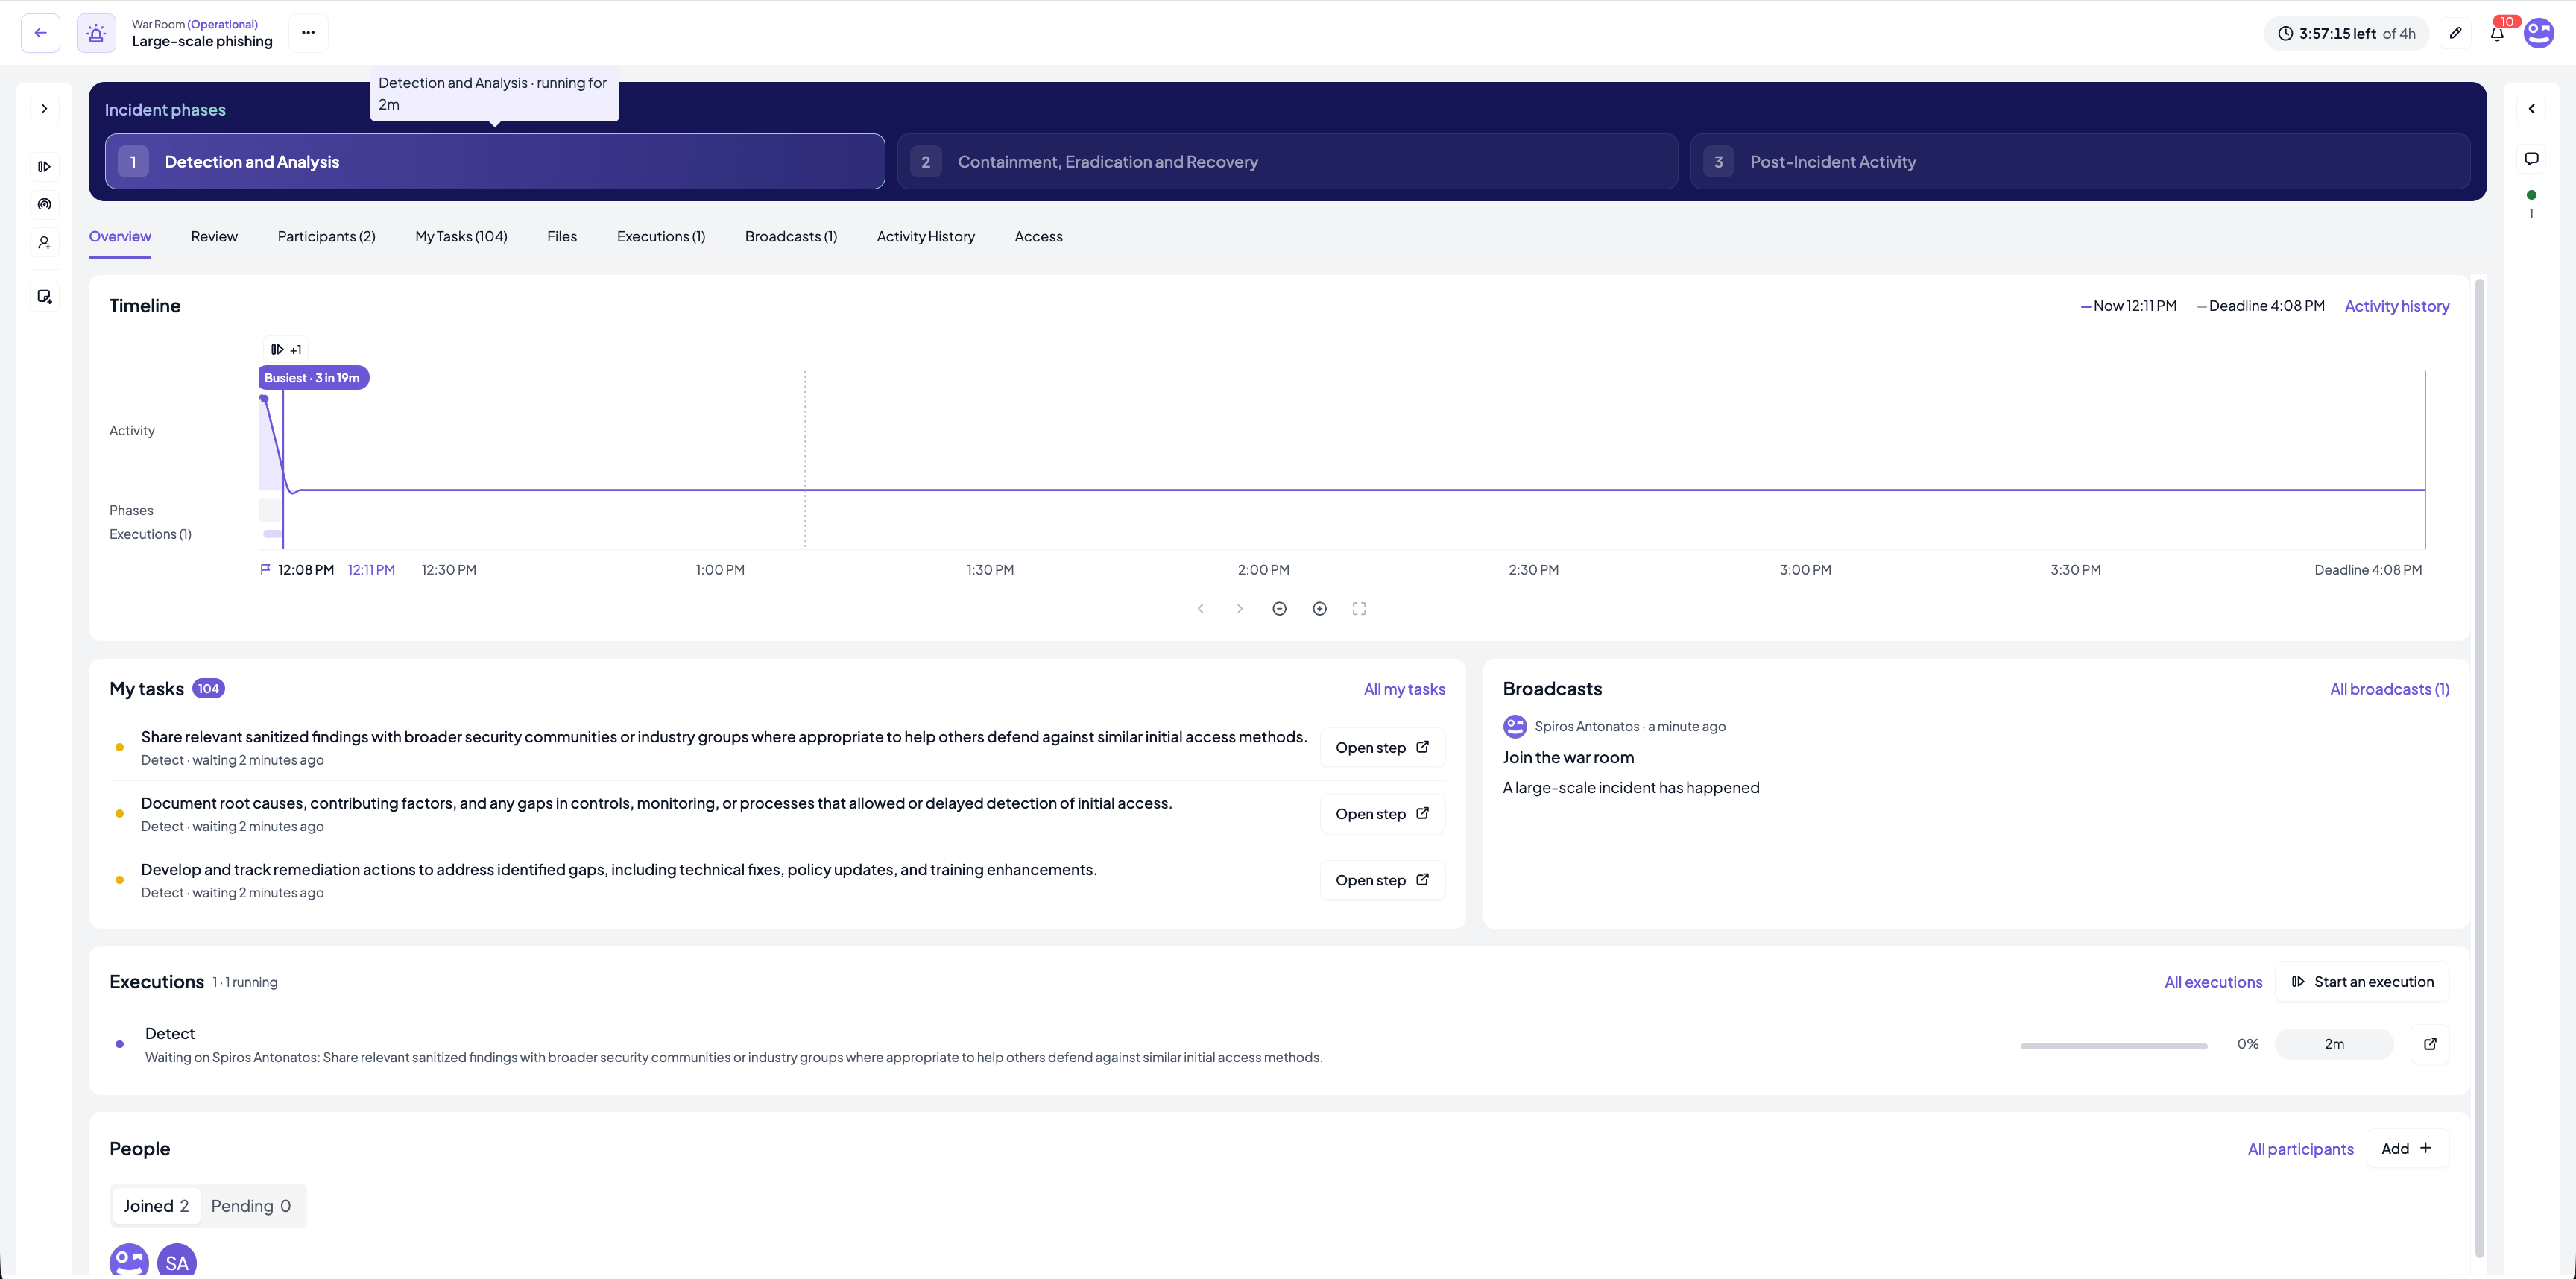
A war room opens in its own browser tab, like an execution, so you can keep several rooms and the list open at the same time. The page has five areas:- Header: the room name and purpose, the room menu, the incident clock and your notifications.
- About War Room sidebar (left): the facts of the incident, counters that jump to each tab and the quick actions.
- Incident phases panel: the three NIST phases the room moves through and the button to start the room.
- Tabs: Overview, Review, Participants, My Tasks, Files, Executions, Broadcasts, Activity History and Access.
- Room thread (right): the live chat of the room.
Preparing state
Right after creation the room is in the Preparing state. The header clock reads Not started, the Incident phases panel shows a Start the room button and the timeline is empty. Use this time to add participants, attach assets and upload what you already have. The incident clock, the time target and the phases do not run until the Incident Commander presses Start the room; other participants see the button greyed out, with the reason on hover. Executions cannot be started from a room that has not been started.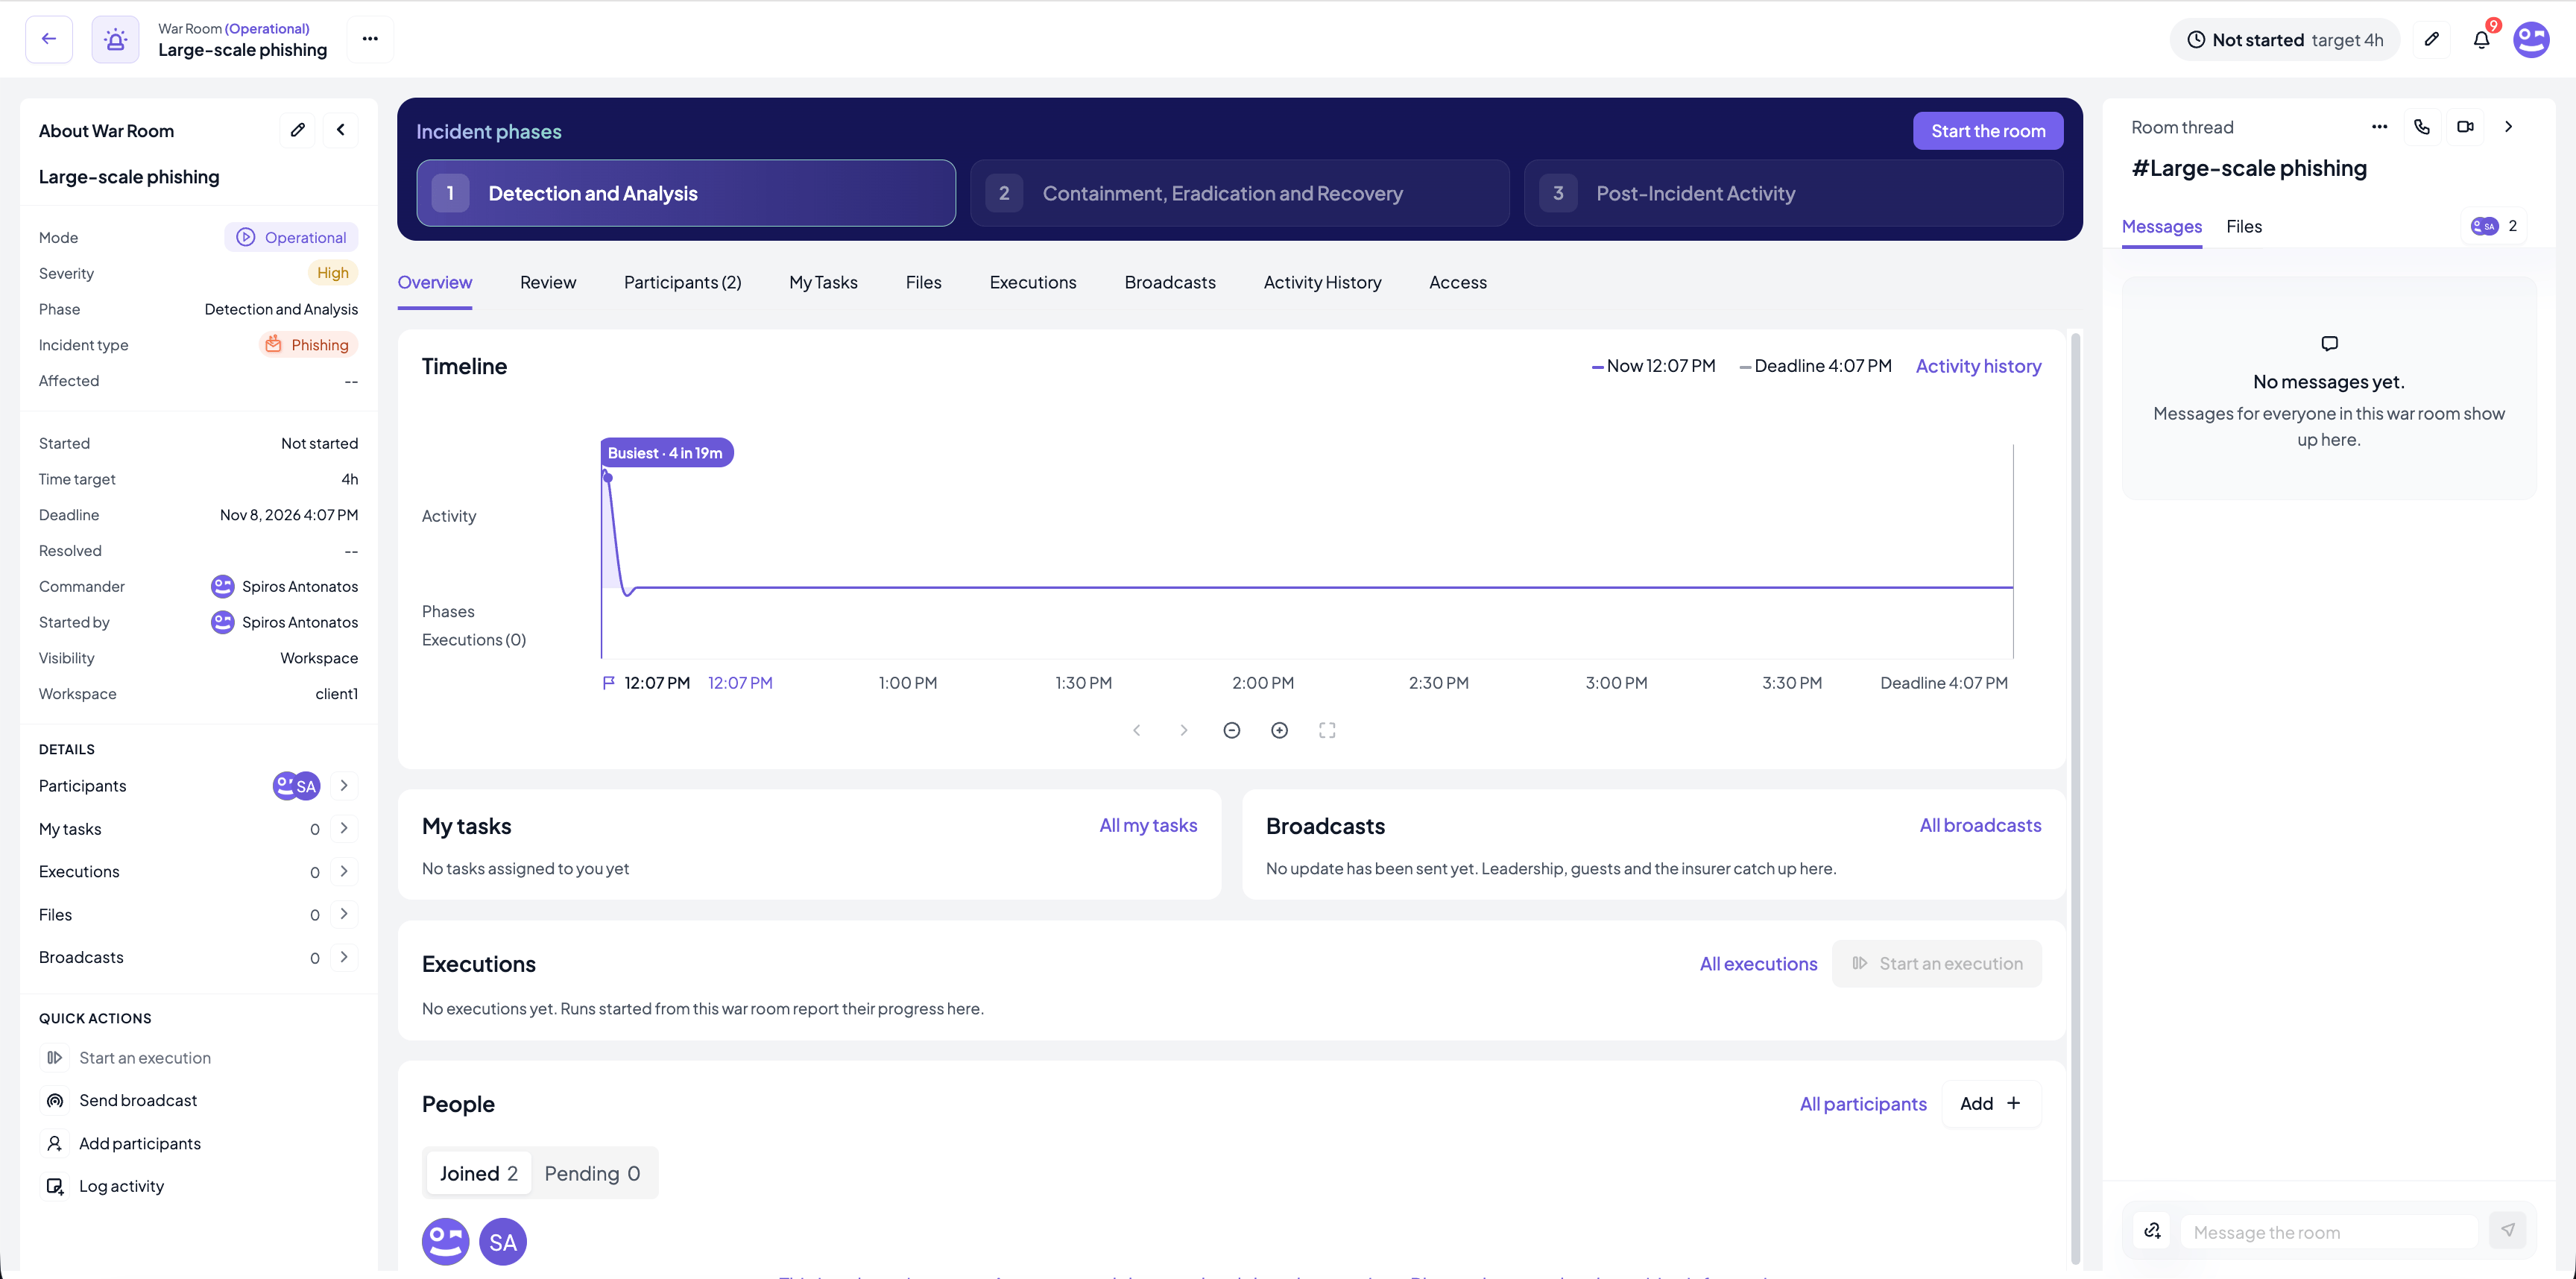
Header
From left to right the header contains:- Back: returns to the War Rooms list.
- Purpose tile and room name, with War Room (Operational) in the accent colour or War Room (Exercising & Testing) in blue above the name. An exercise room shows a different icon, and hovering it reminds you that everything the room sends out is marked as an exercise.
- ⋯ menu: the same actions as in the list, that is Edit Details, Archive or Reopen, and Export.
- Incident clock: Not started with the target while preparing, then the time left against the target (for example 3:56:47 left of 4h), turning into Over by … once the target is exceeded. The pencil next to it changes the time target.
- Notifications and your profile avatar.
About War Room sidebar
The sidebar summarises the room:- Facts: mode, severity, current phase, incident type, affected assets and services, started time, time target, deadline, resolved time, incident commander, who started the room, visibility and workspace. If a meeting link was given, a Join the bridge link appears here. The pencil at the top opens the edit dialog.
- Details: participants with their avatars and the counts of your tasks, executions, files and broadcasts. Each row opens the corresponding tab.
- Quick actions: Start an execution, Send broadcast, Add participants and Log activity.
Incident phases
Every war room follows the NIST incident response lifecycle, the one most teams already use. The panel shows the three phases, highlights the current one and, on hover, shows how long the room has been in it.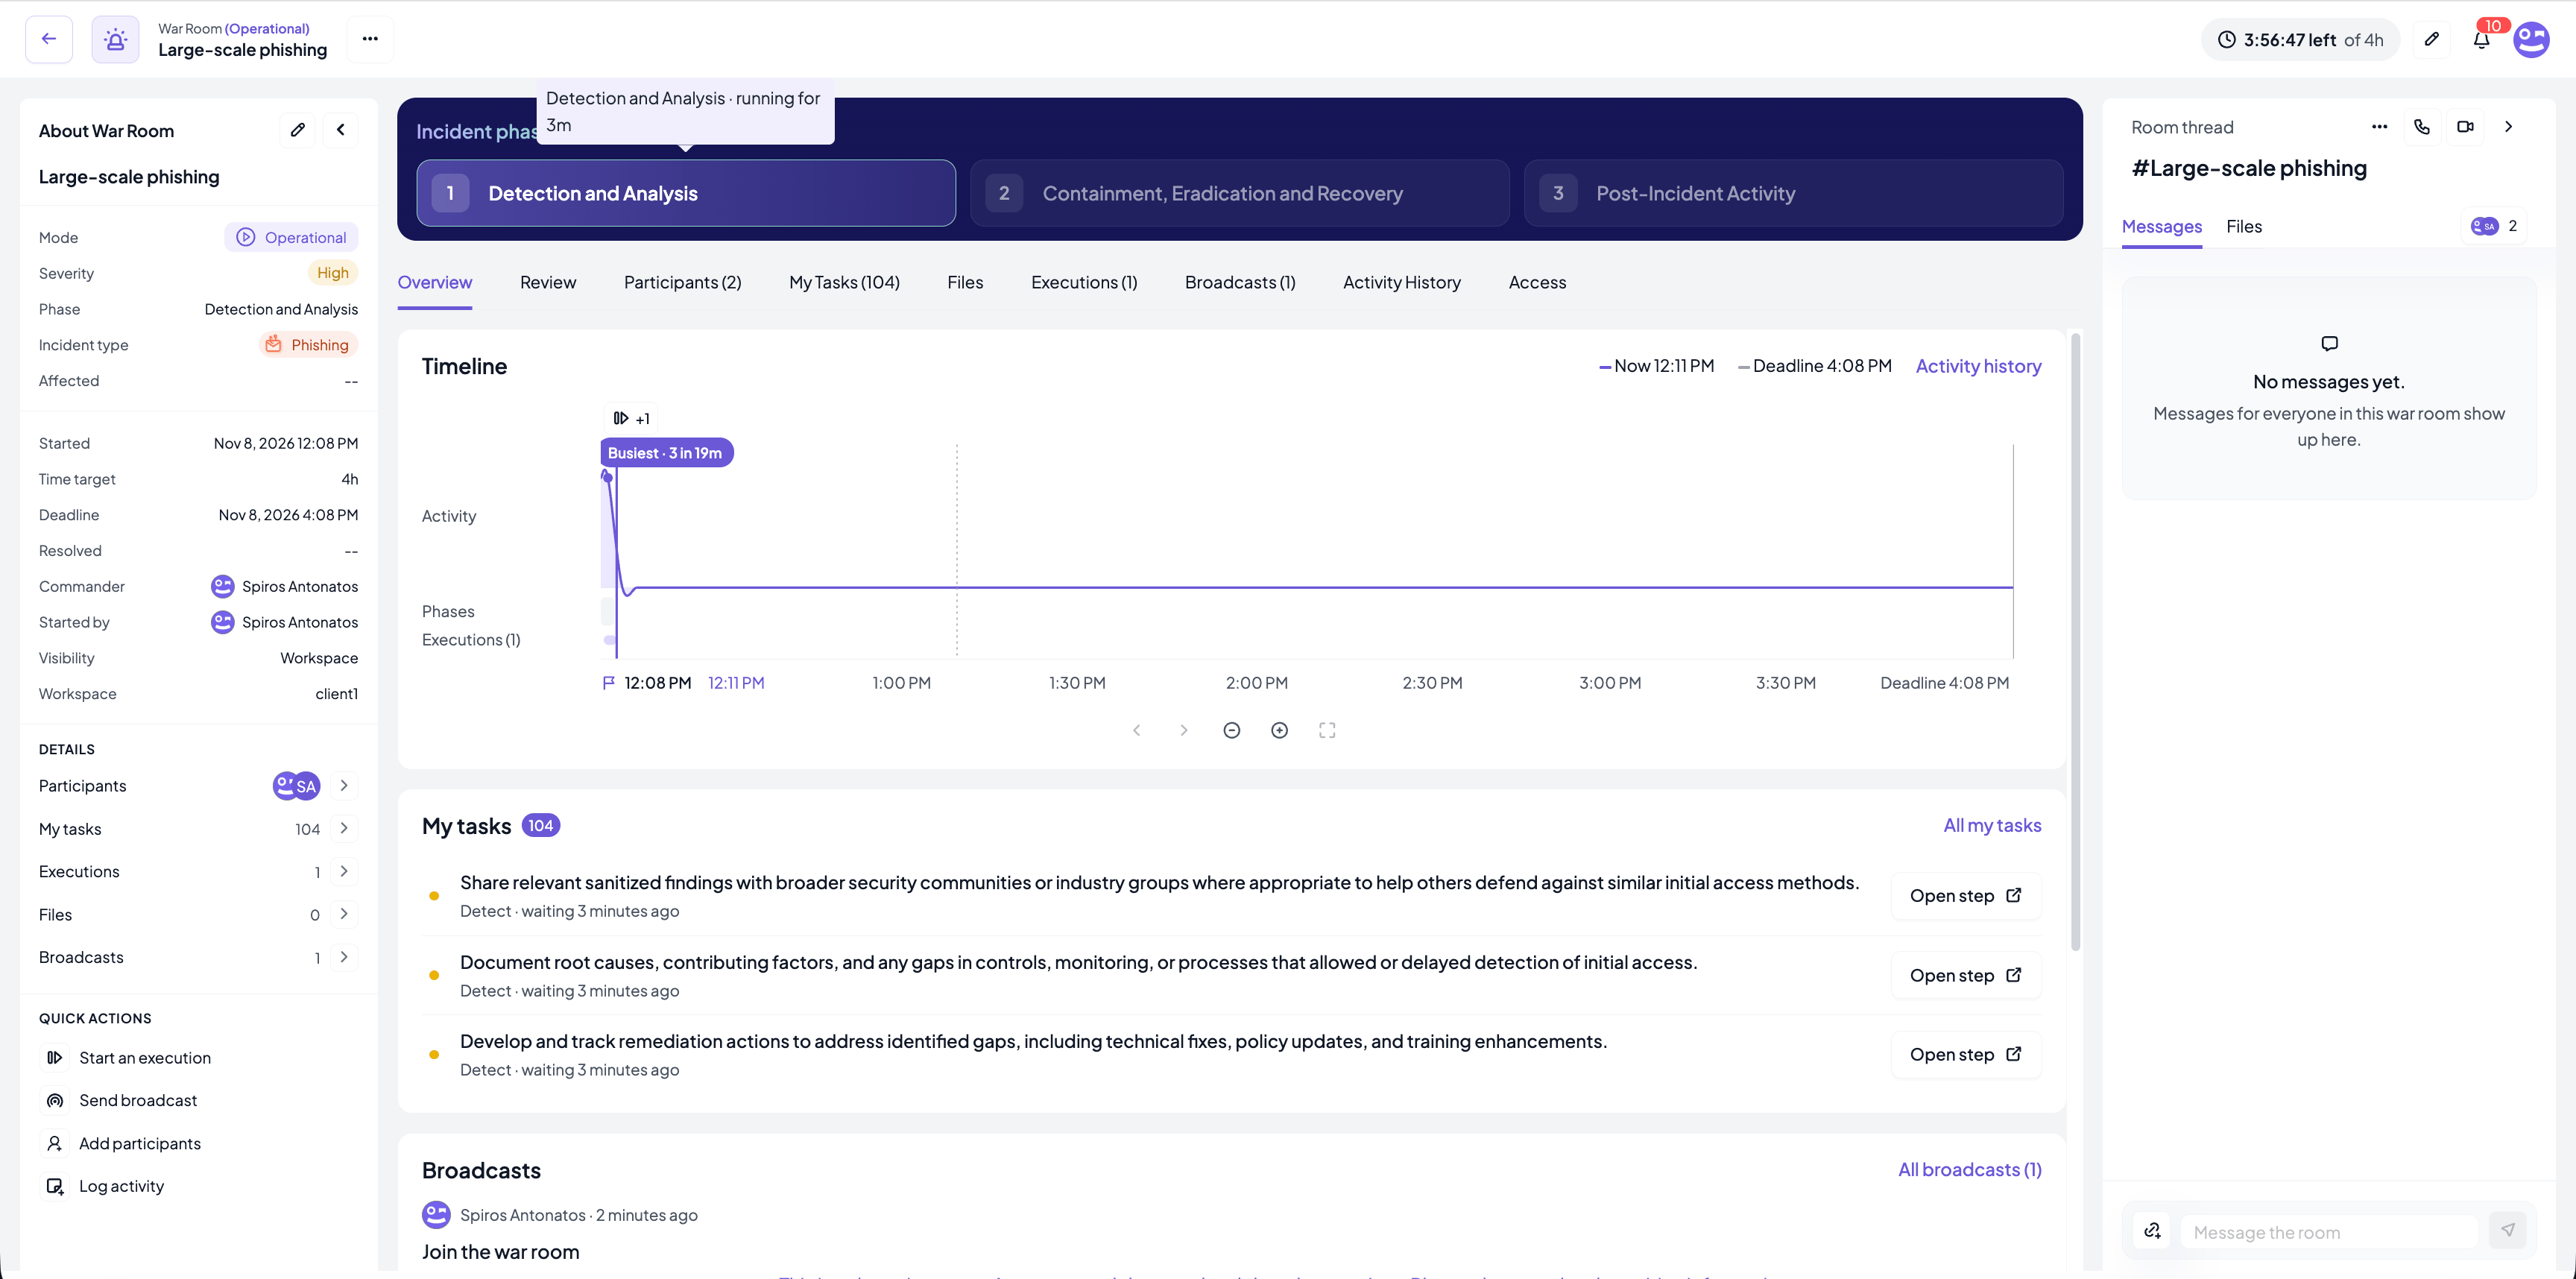
- Detection and Analysis: the room starts here when it is started.
- Containment, Eradication and Recovery: click the phase to move the room forward once the response is under way.
- Post-Incident Activity: entering this phase marks the incident as resolved. This stops the incident clock and opens the post-incident review, see Post-incident review. The room cannot enter this phase while an execution started from it is still running.
Overview tab
The Overview tab is the default view of a room and the place to check what is going on at a glance.Timeline
The timeline shows the life of the room on one time axis, from the moment it was started to the deadline:- Activity curve: how much happened in each slice of time, counting history entries, execution progress and chat messages. The busiest moment is labelled.
- Phases band: when each phase started and ended.
- Executions bars: one bar per execution started from the room. A bar turns accent-coloured once the execution is over its own time target, and a dotted vertical line marks each execution’s deadline.
- Markers above the curve: executions started and broadcasts sent. Click a marker to see what it was.
- The solid accent line is now, the solid grey line is the room deadline.
Cards
Below the timeline the overview shows four cards:- My tasks: the latest steps assigned to you across the executions of this room, each with the execution name and how long it has been waiting. Open step opens the execution at that step in a new tab. All my tasks opens the My Tasks tab.
- Broadcasts: the latest update sent to stakeholders. If the sender promised a next update and it is late, the card shows how long it is overdue with a button to send it now. All broadcasts opens the Broadcasts tab.
- Executions: one row per execution with its status, who it is waiting on and for which step, its completion bar, and its elapsed time against its time target. Start an execution launches a playbook from the room, see Executions.
- People: the avatars of everyone in the room, participants and guests, split into Opened (they have opened the room at least once) and Not opened yet. Add opens the add participants dialog.
Room thread
The panel on the right is the live chat of the room, named after it. Participants and guests can write, anyone else who can open the room can read, and an archived room keeps its thread read-only. The thread has two tabs: Messages and Files for the attachments shared in the chat. The count at the top right shows how many people are in the thread. Messages posted here count as activity on the timeline and are included in the chat transcript of the export.The voice and video call buttons next to the thread name start a call for the people in the thread. They are shown only when calls are enabled for your organisation.
People in the room
There are three ways to be in a war room:- Participants are the responders. Every participant can edit the room’s details, add people and guests, upload and manage files, log activity, write the post-incident review and export the room.
- The Incident Commander is the one participant who commands the room. Only the commander can start the room, move it through its phases (resolving the incident included), send broadcasts and move or withdraw the next-update promise, archive and reopen the room, and give roles to the others. There is exactly one commander at a time. The commander’s controls stay visible to every participant, greyed out, and say on hover who can use them, so nobody wonders where an action went.
- Guests are people from outside the workspace who get access to this room only, until a date: an incident response retainer, outside counsel, the cyber insurer, or a colleague from your organisation who is not a member of the workspace. Guests read the room, upload files and log activity. They never see files labelled TLP:AMBER+STRICT or TLP:RED.
- Onlookers are workspace members who are not seated in a room with Workspace visibility. They can open and read the room but cannot act in it.
Scribe, Comms Lead and Technical Responder describe responsibilities and do not change what a person can do. Starting executions from the room follows each person’s own right to run playbooks in the workspace, whatever their room role.
Participants tab
The Participants tab lists everyone seated in the room with their role, job title, teams, when they were added, when they first opened the room (Not opened yet until they do) and who added them.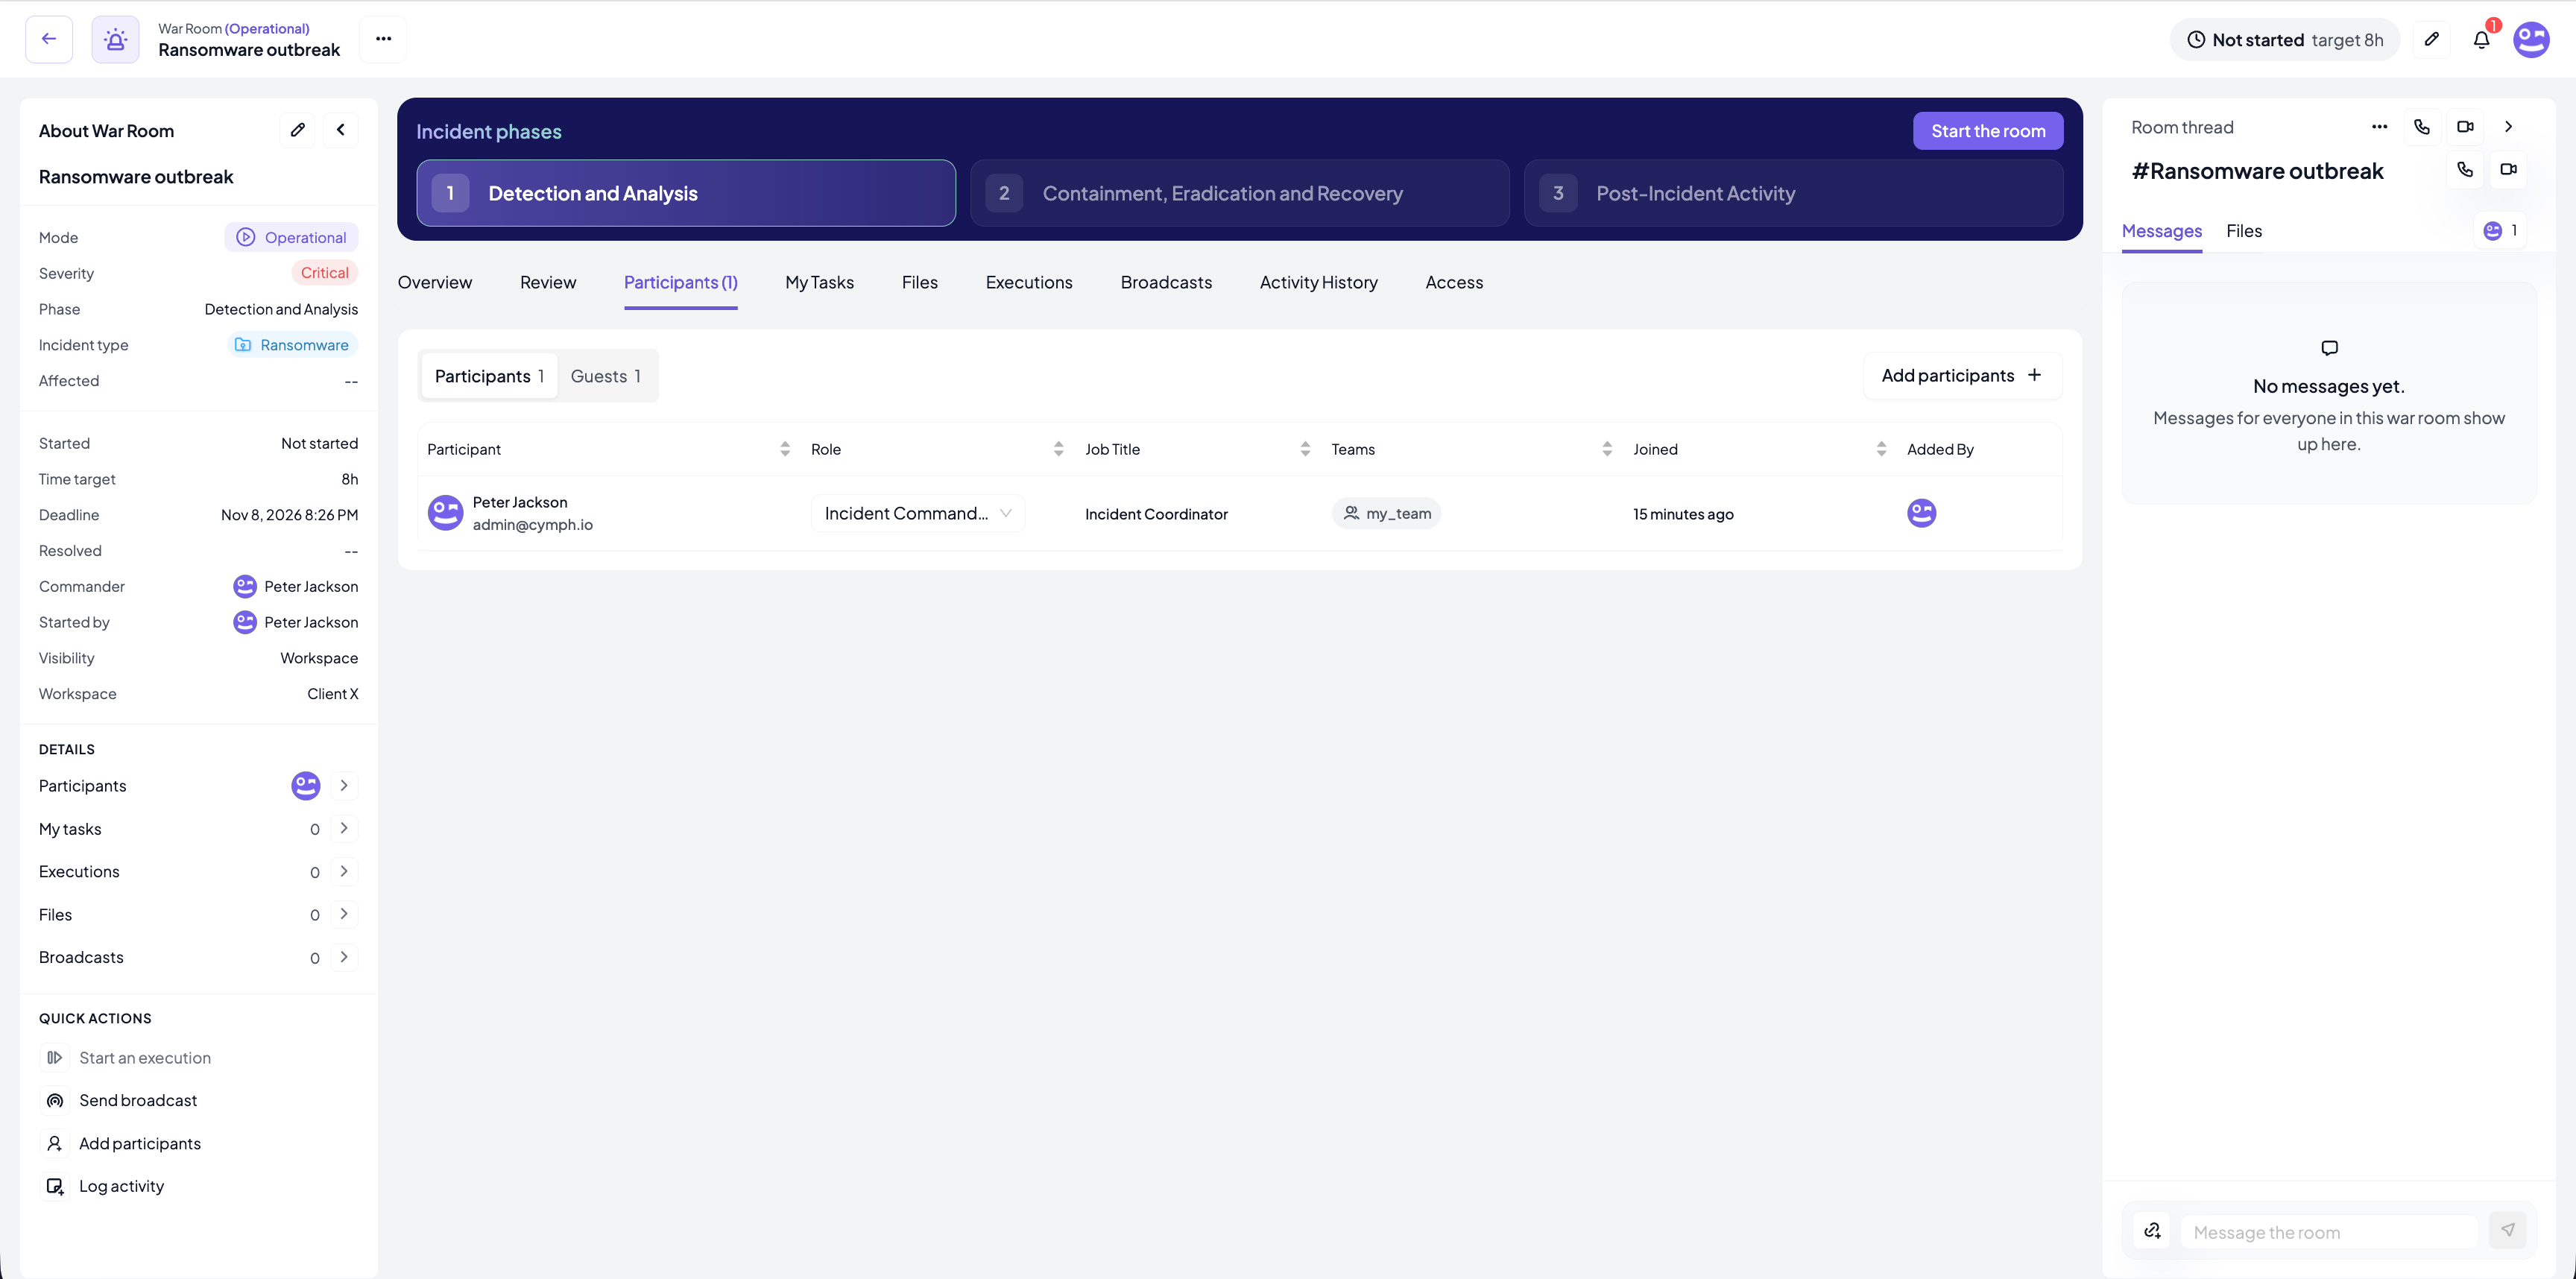
- Add participants opens the same picker as the Start war room dialog: members of the workspace and teams from your organisation. The Incident Commander can give each person a role (Scribe, Comms Lead or Technical Responder) as they join; anyone else seats them without a role. People already in the room are not listed.
- Role: the Incident Commander changes a person’s role from the select in their row. Giving someone a role notifies them.
- Handing over command: the Incident Commander picks Incident Commander on another participant’s row and confirms. That person takes command and the previous commander keeps their seat with no role. The commander cannot take another role or drop to No role directly: naming a successor is the only way out of the seat, so the room is never without command. If a room has nobody in command (for example the commander’s account was disabled), any participant can name a commander; until then the room’s phases, broadcasts and archiving are on hold.
- Remove: hover a row to reveal the remove action. You cannot remove yourself, and the Incident Commander cannot be removed before command is handed over, so a room never ends up without anyone in it. Removed people are notified.
Guests
Switch to the Guests list in the Participants tab to see who has guest access, whether they have opened the room yet, who they are (for example IR Retainer), until when their access lasts and who added them.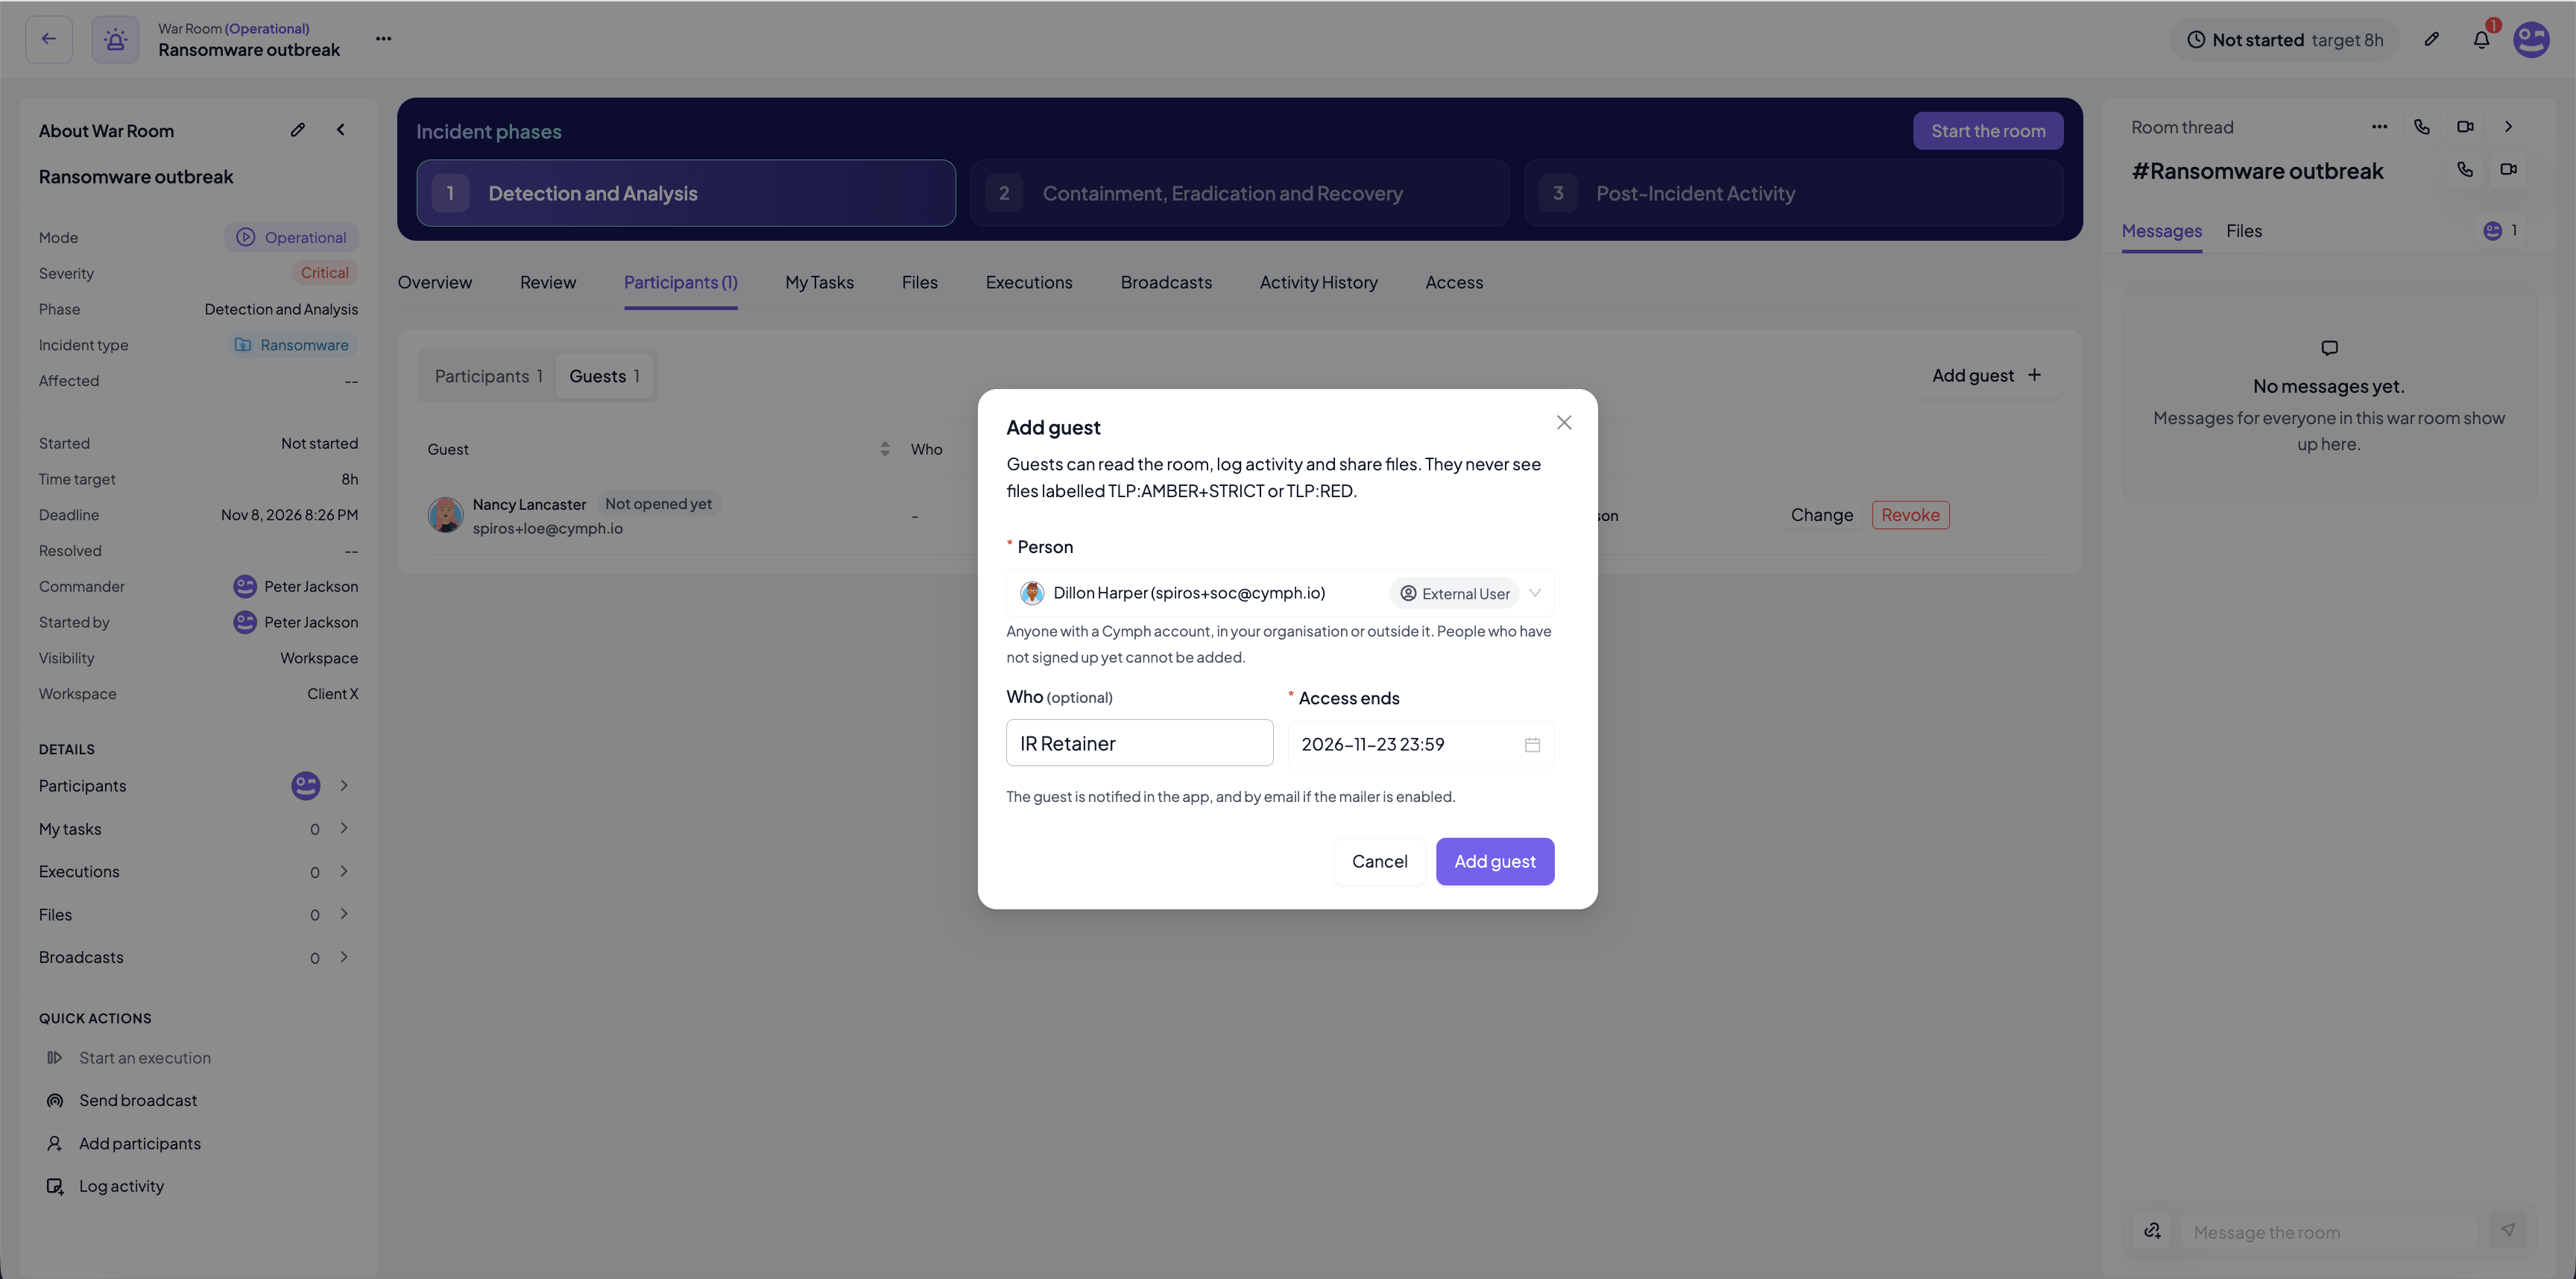
- Person: anyone with a Cymph account, in your organisation or outside it. People who have not signed up to Cymph yet cannot be added.
- Who (optional): a label for the list, for example the company or the capacity they act in.
- Access ends: the date and time the guest access expires. It cannot be more than a year away.
Access tab
The Access tab shows who can see the room and what each person can do.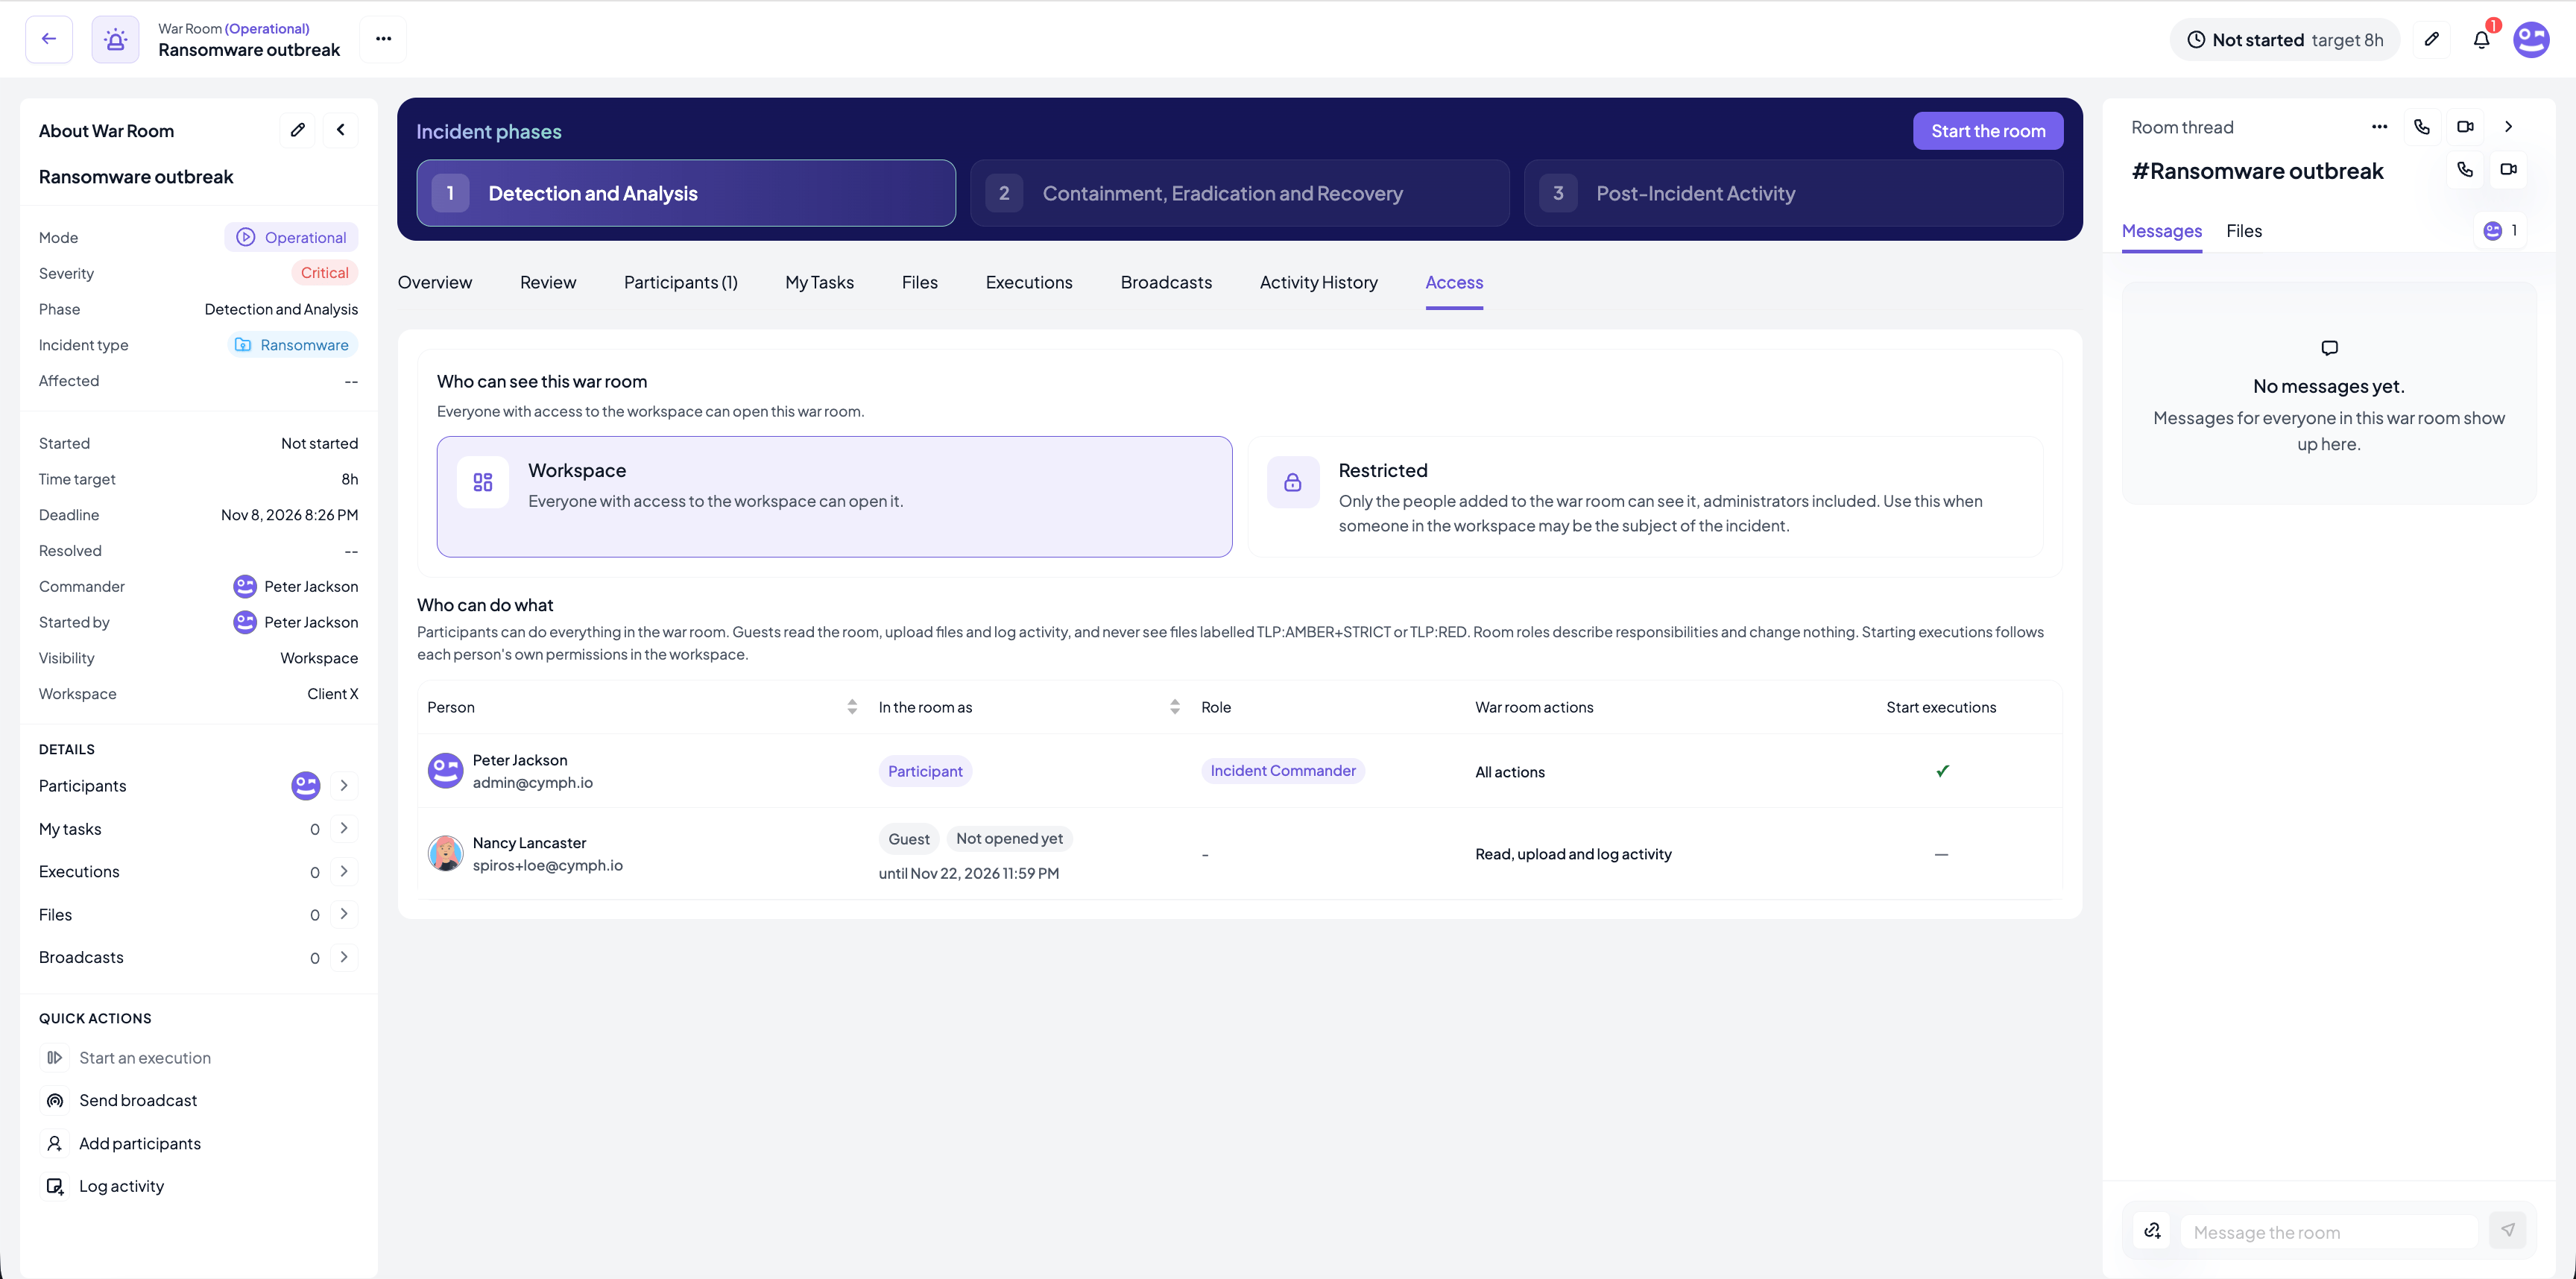
- Who can see this war room: switch between Workspace (everyone with access to the workspace can open the room) and Restricted (only the people seated and the guests can open it; it is hidden from everyone else in the workspace, administrators included). Use Restricted when someone in the workspace may be the subject of the incident. The executions started from the room follow the change. The change is recorded in the Activity History.
- Who can do what: one row per person with how they are in the room (Participant, or Guest with their status and expiry), their room role, the war room actions available to them, and whether they can start executions from the room.
My Tasks tab
The My Tasks tab lists the steps assigned to you across the executions started from this room, with the execution name, the step status and how long it has been waiting. Open step opens the execution at that step in a new tab. The count in the tab label is the number of open tasks.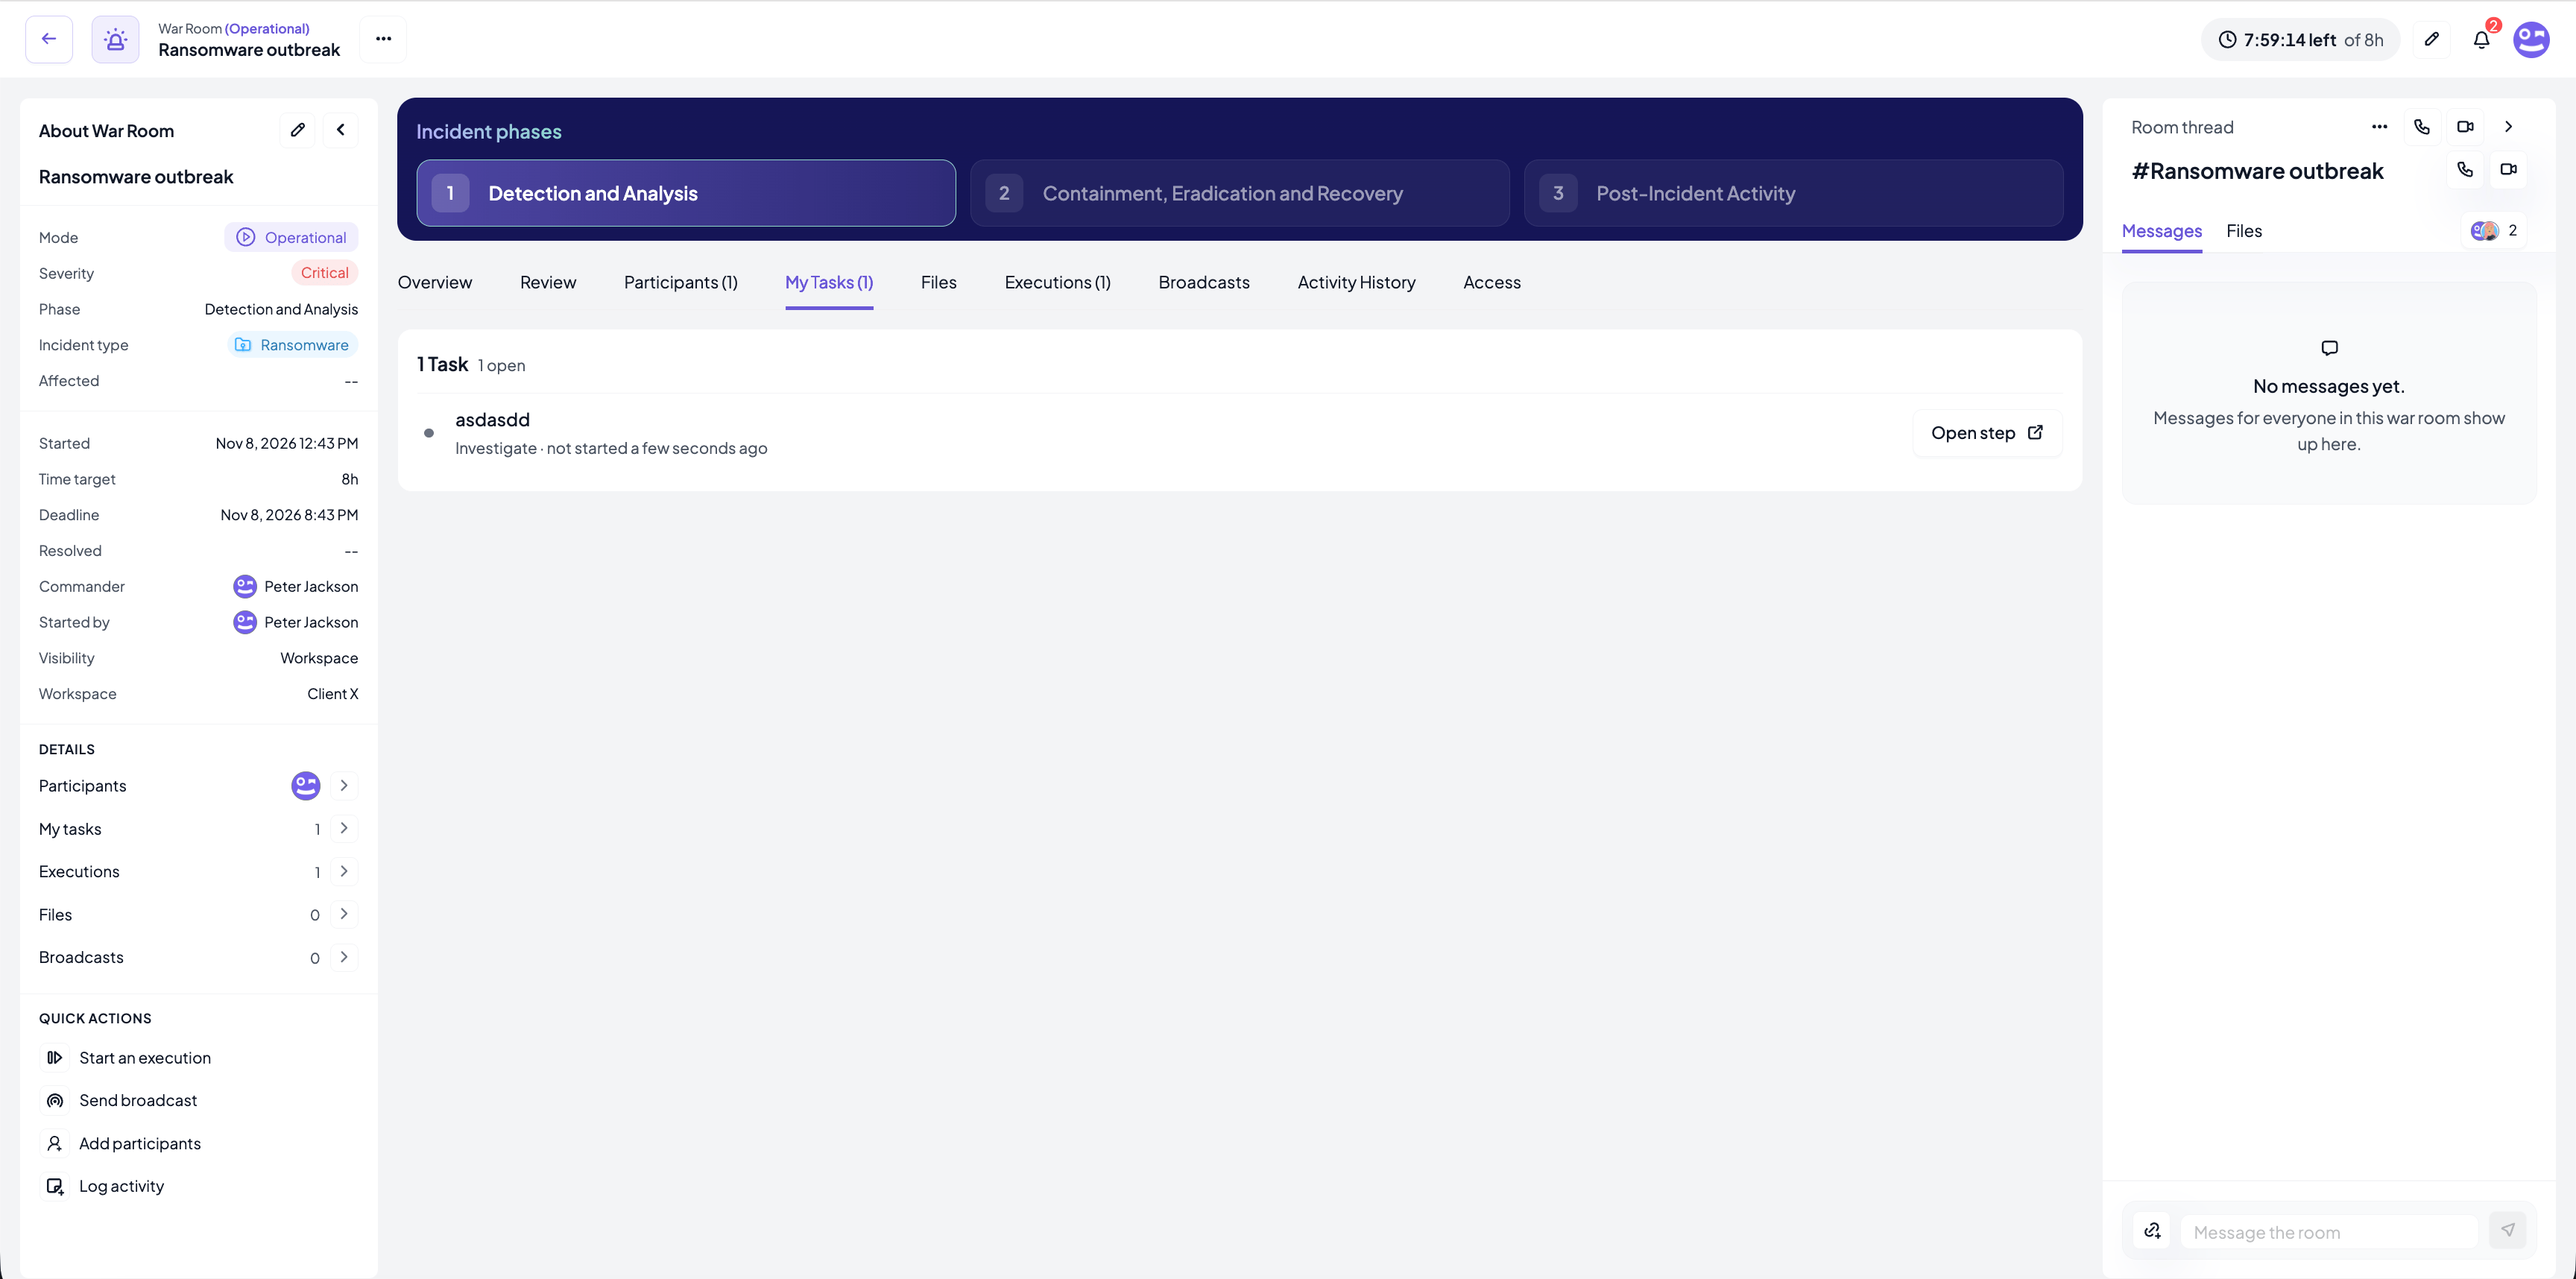
Files
The Files tab is the evidence locker of the room: indicators, screenshots, reports or anything else the team needs at hand.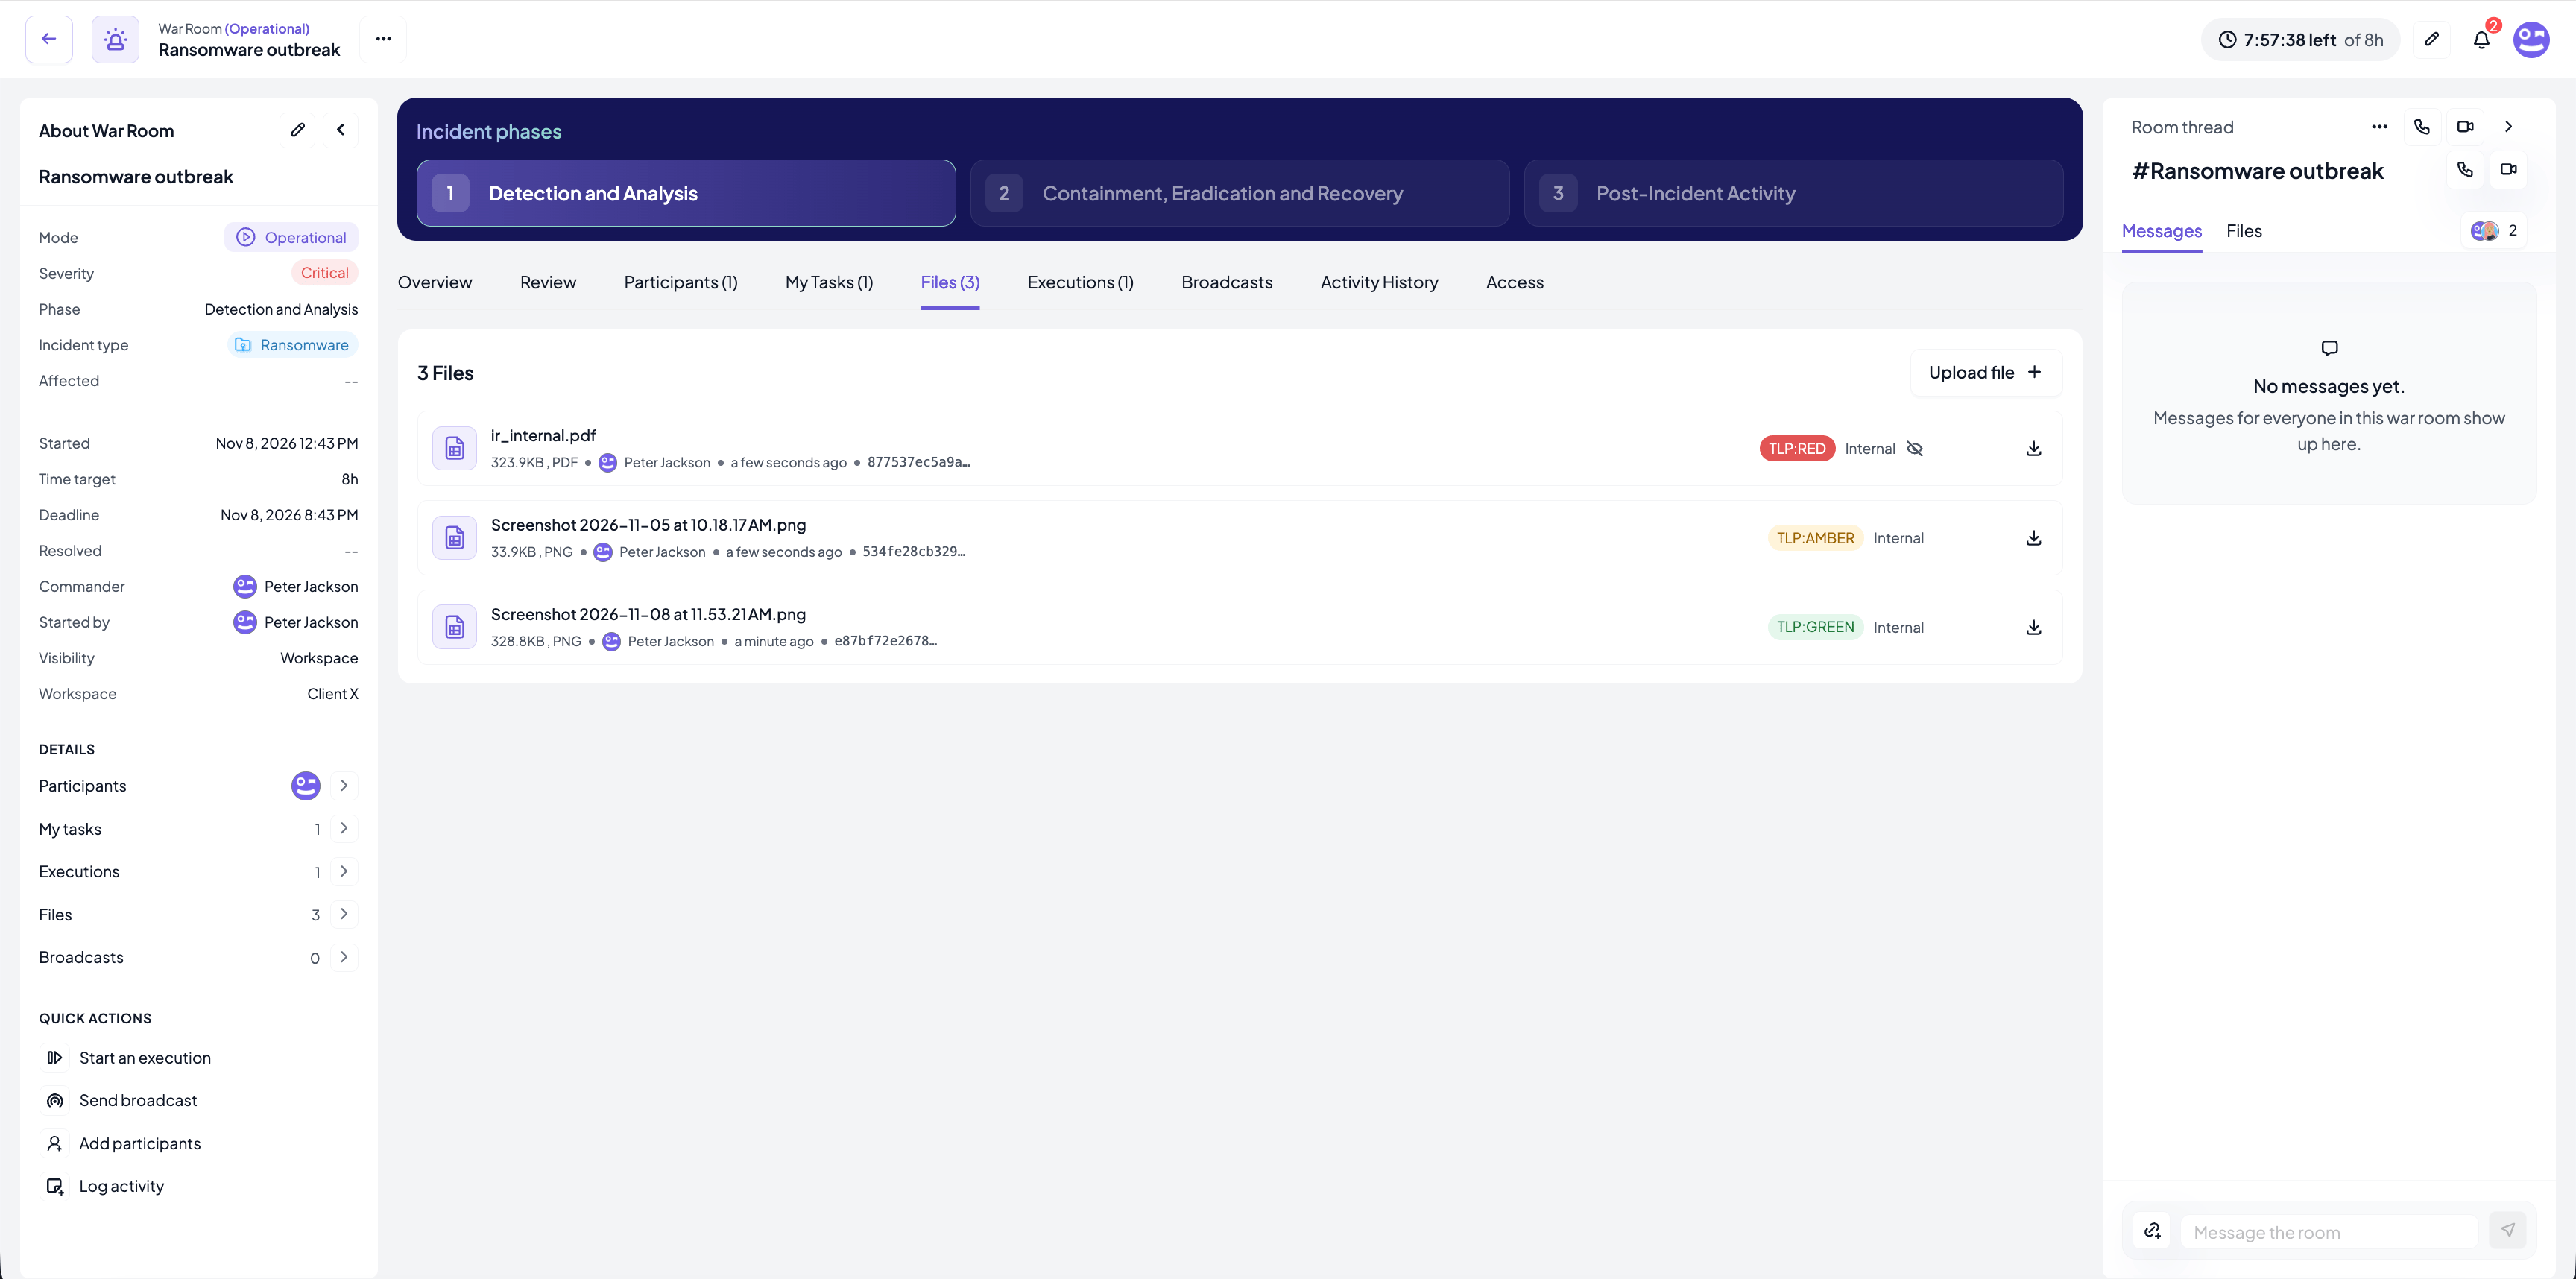
Evidence labels
Press Upload file and choose a file of up to 20 MB. Before it is uploaded you are asked for its labels: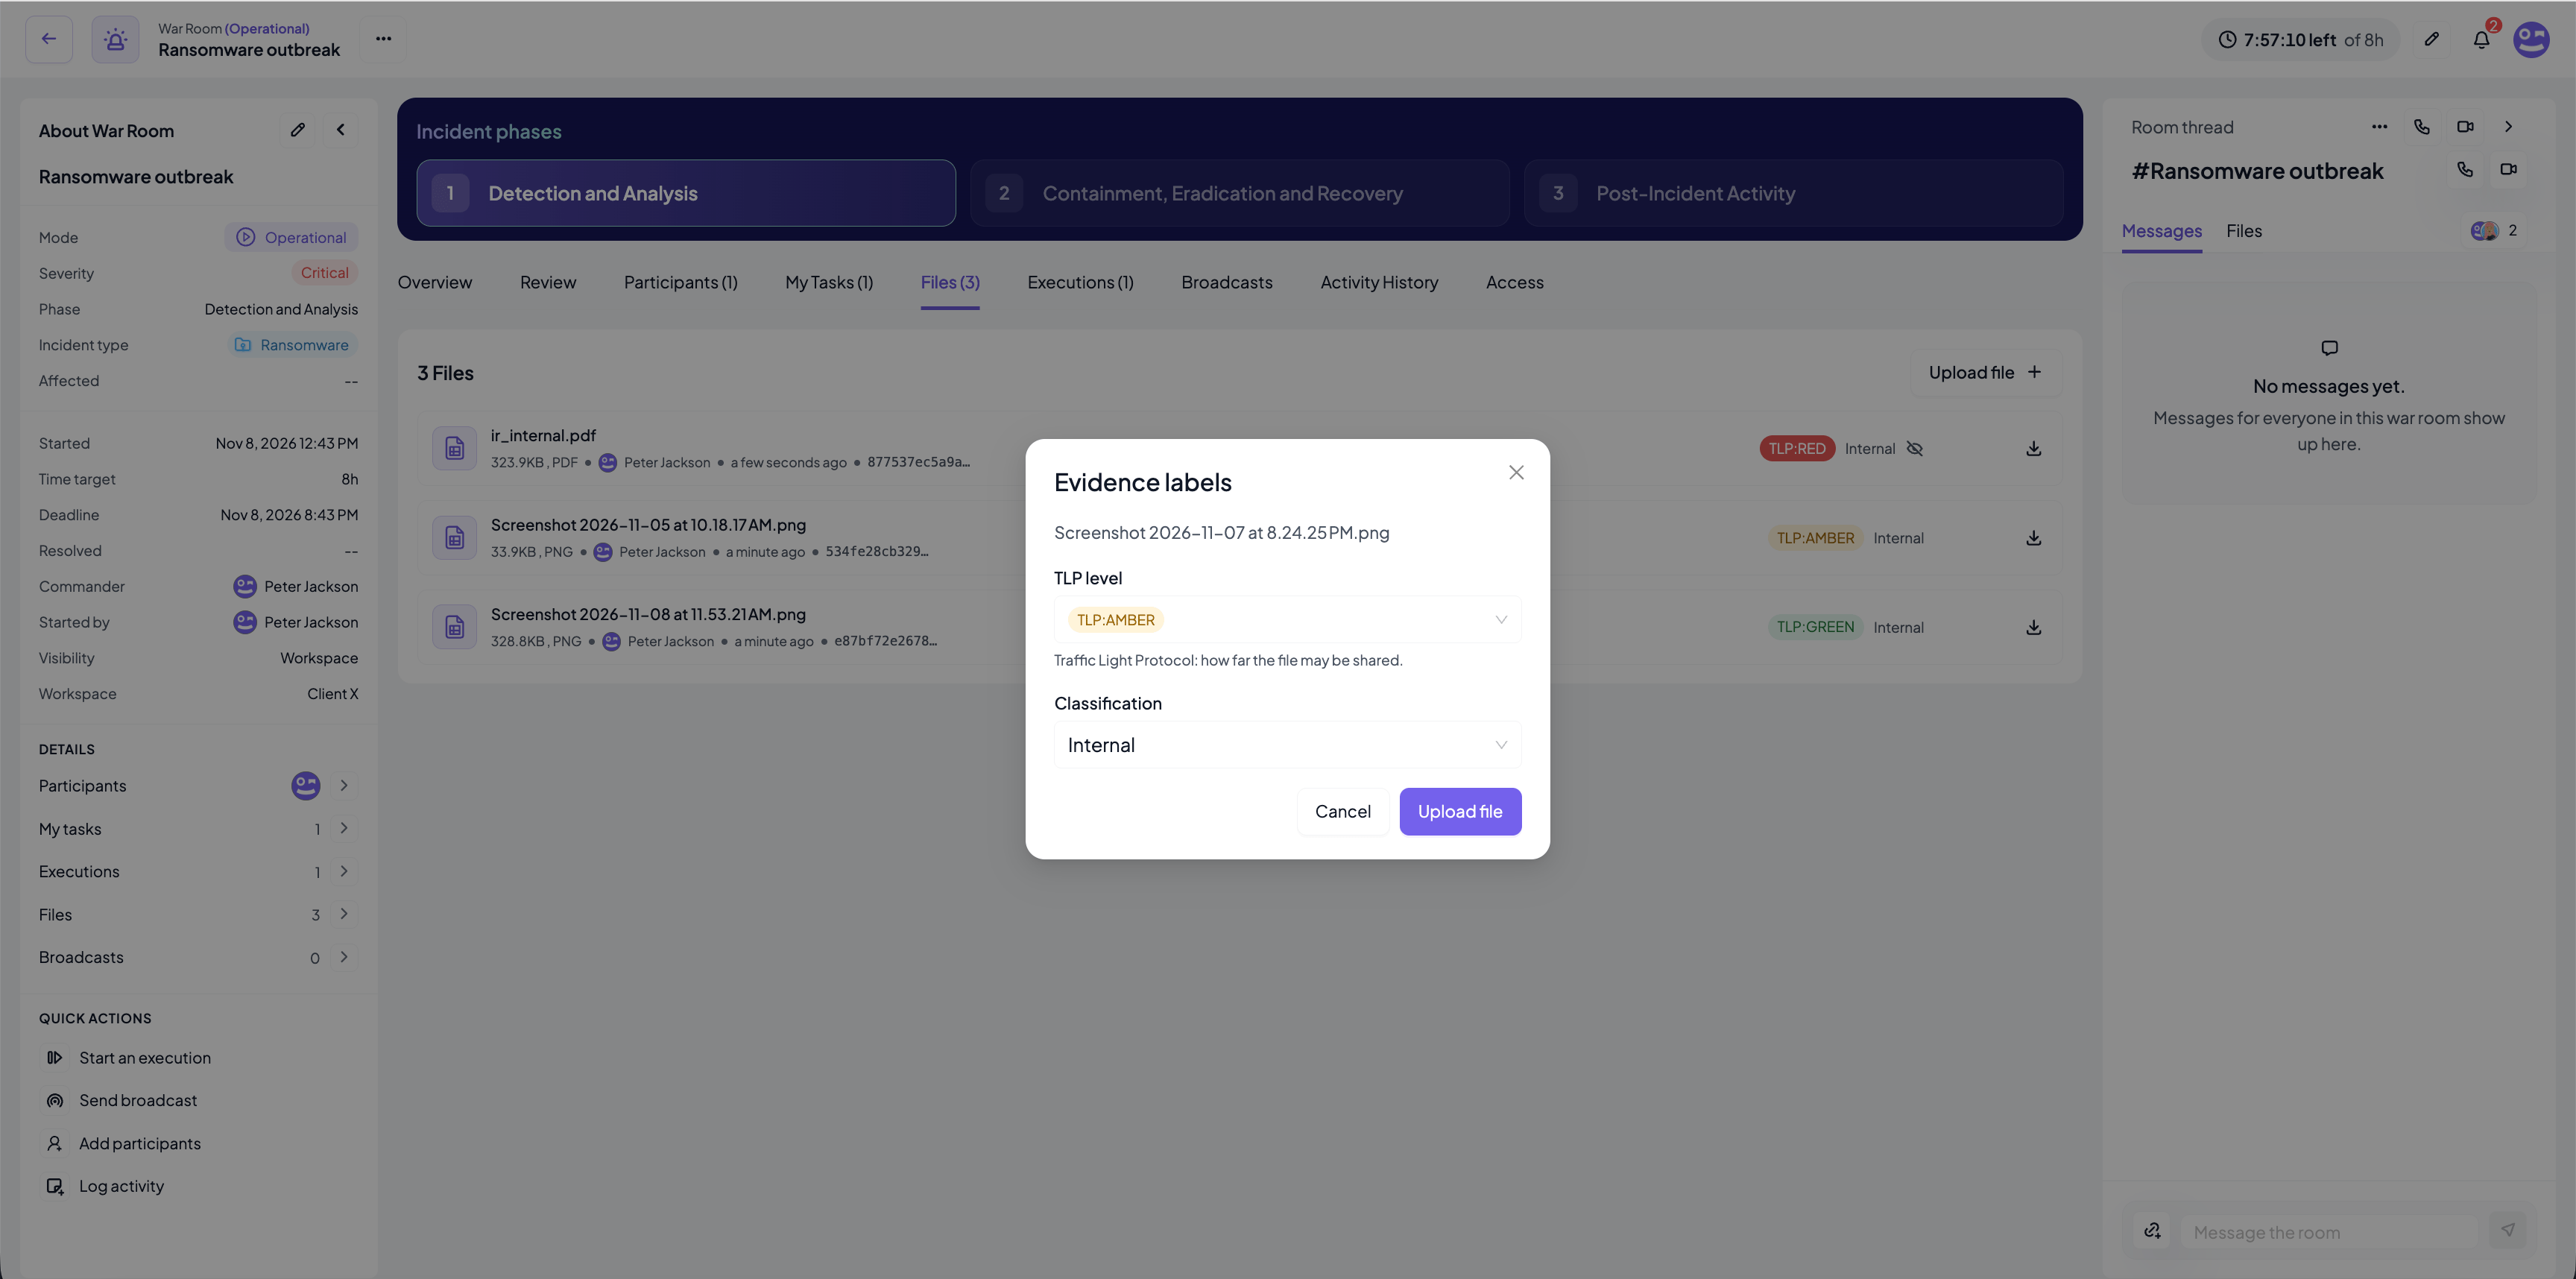
- TLP level: the Traffic Light Protocol level, how far the file may be shared. TLP:CLEAR, TLP:GREEN, TLP:AMBER (the default), TLP:AMBER+STRICT or TLP:RED. Files labelled TLP:AMBER+STRICT or TLP:RED are hidden from guests: they do not see them in the list or in the activity history, cannot download them, and cannot upload files with these labels themselves.
- Classification: Public, Internal (the default), Confidential or Restricted.
Chain of custody
Every file action is recorded in the Activity History: the upload (with the fingerprint, labels, size, type and who uploaded it), every download and the deletion. The fingerprint is taken as the file is uploaded and checked again when the room is exported, so the export states for each file whether it is still exactly the file that was uploaded. See Exporting a war room.Executions
Playbooks are run from the war room so that the work, the people and the outcome stay attached to the incident. The Executions tab lists every execution started from this room with the same columns, filters and grouping as the workspace Executions page, plus a Steps column with the steps done out of the total and how many are late. Each execution opens in a new tab.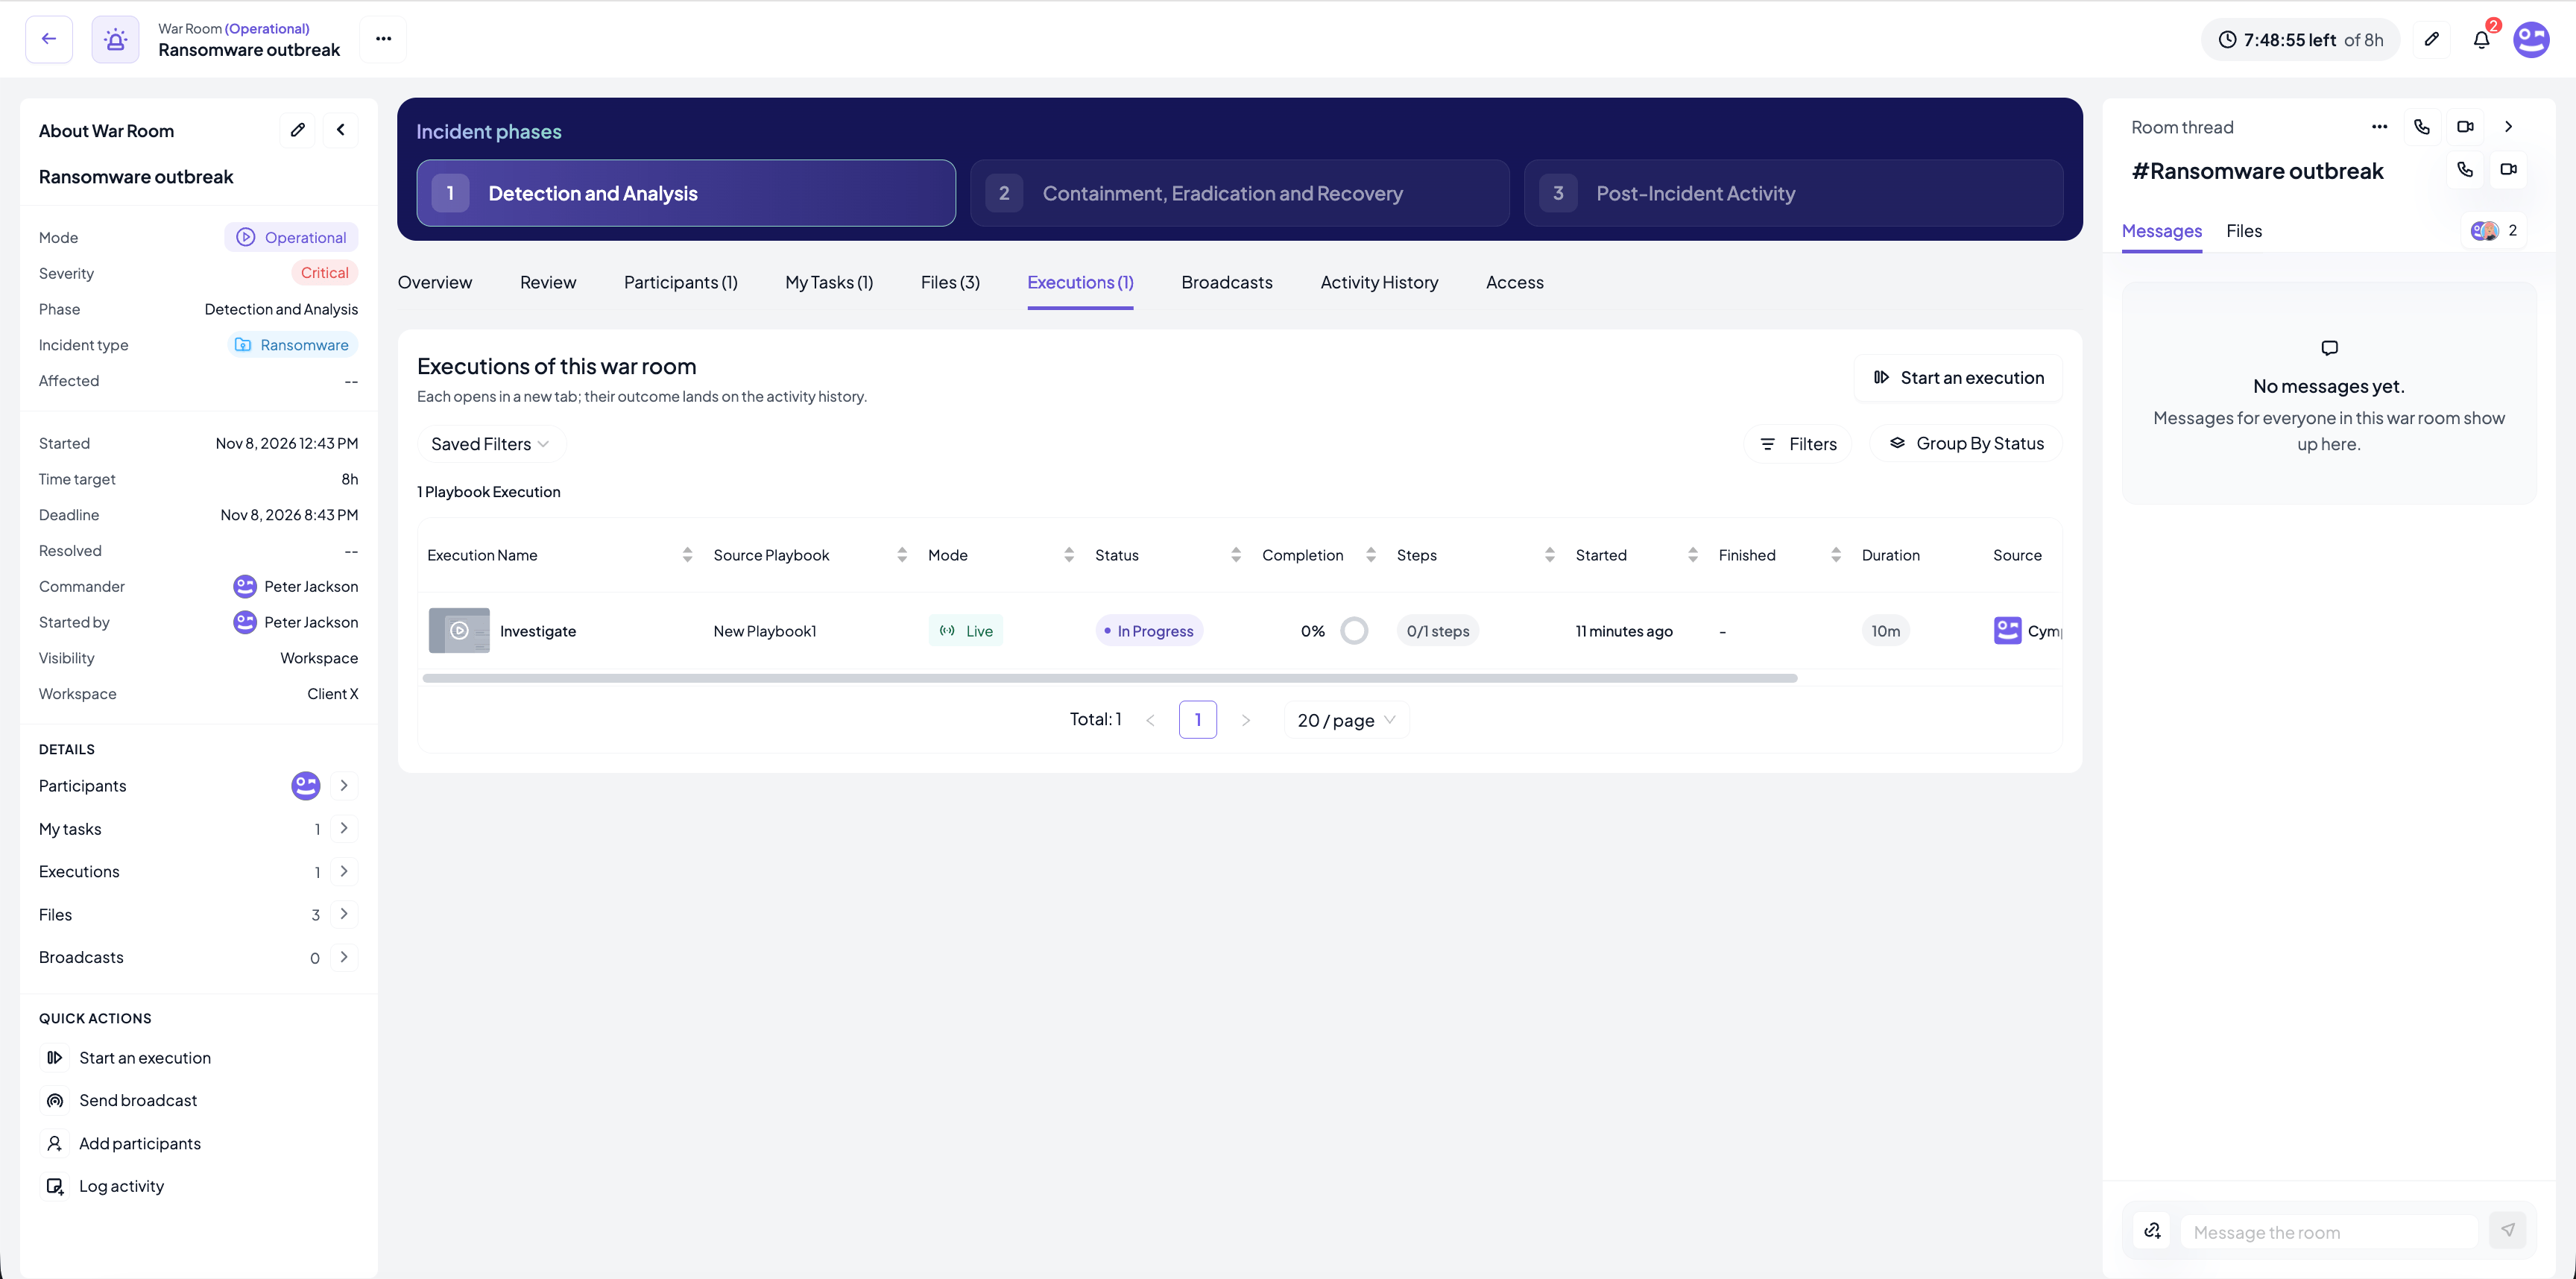
Starting an execution
Press Start an execution (in the Executions tab, the Overview card or the sidebar quick actions). The run dialog is the same as for a playbook, with three differences: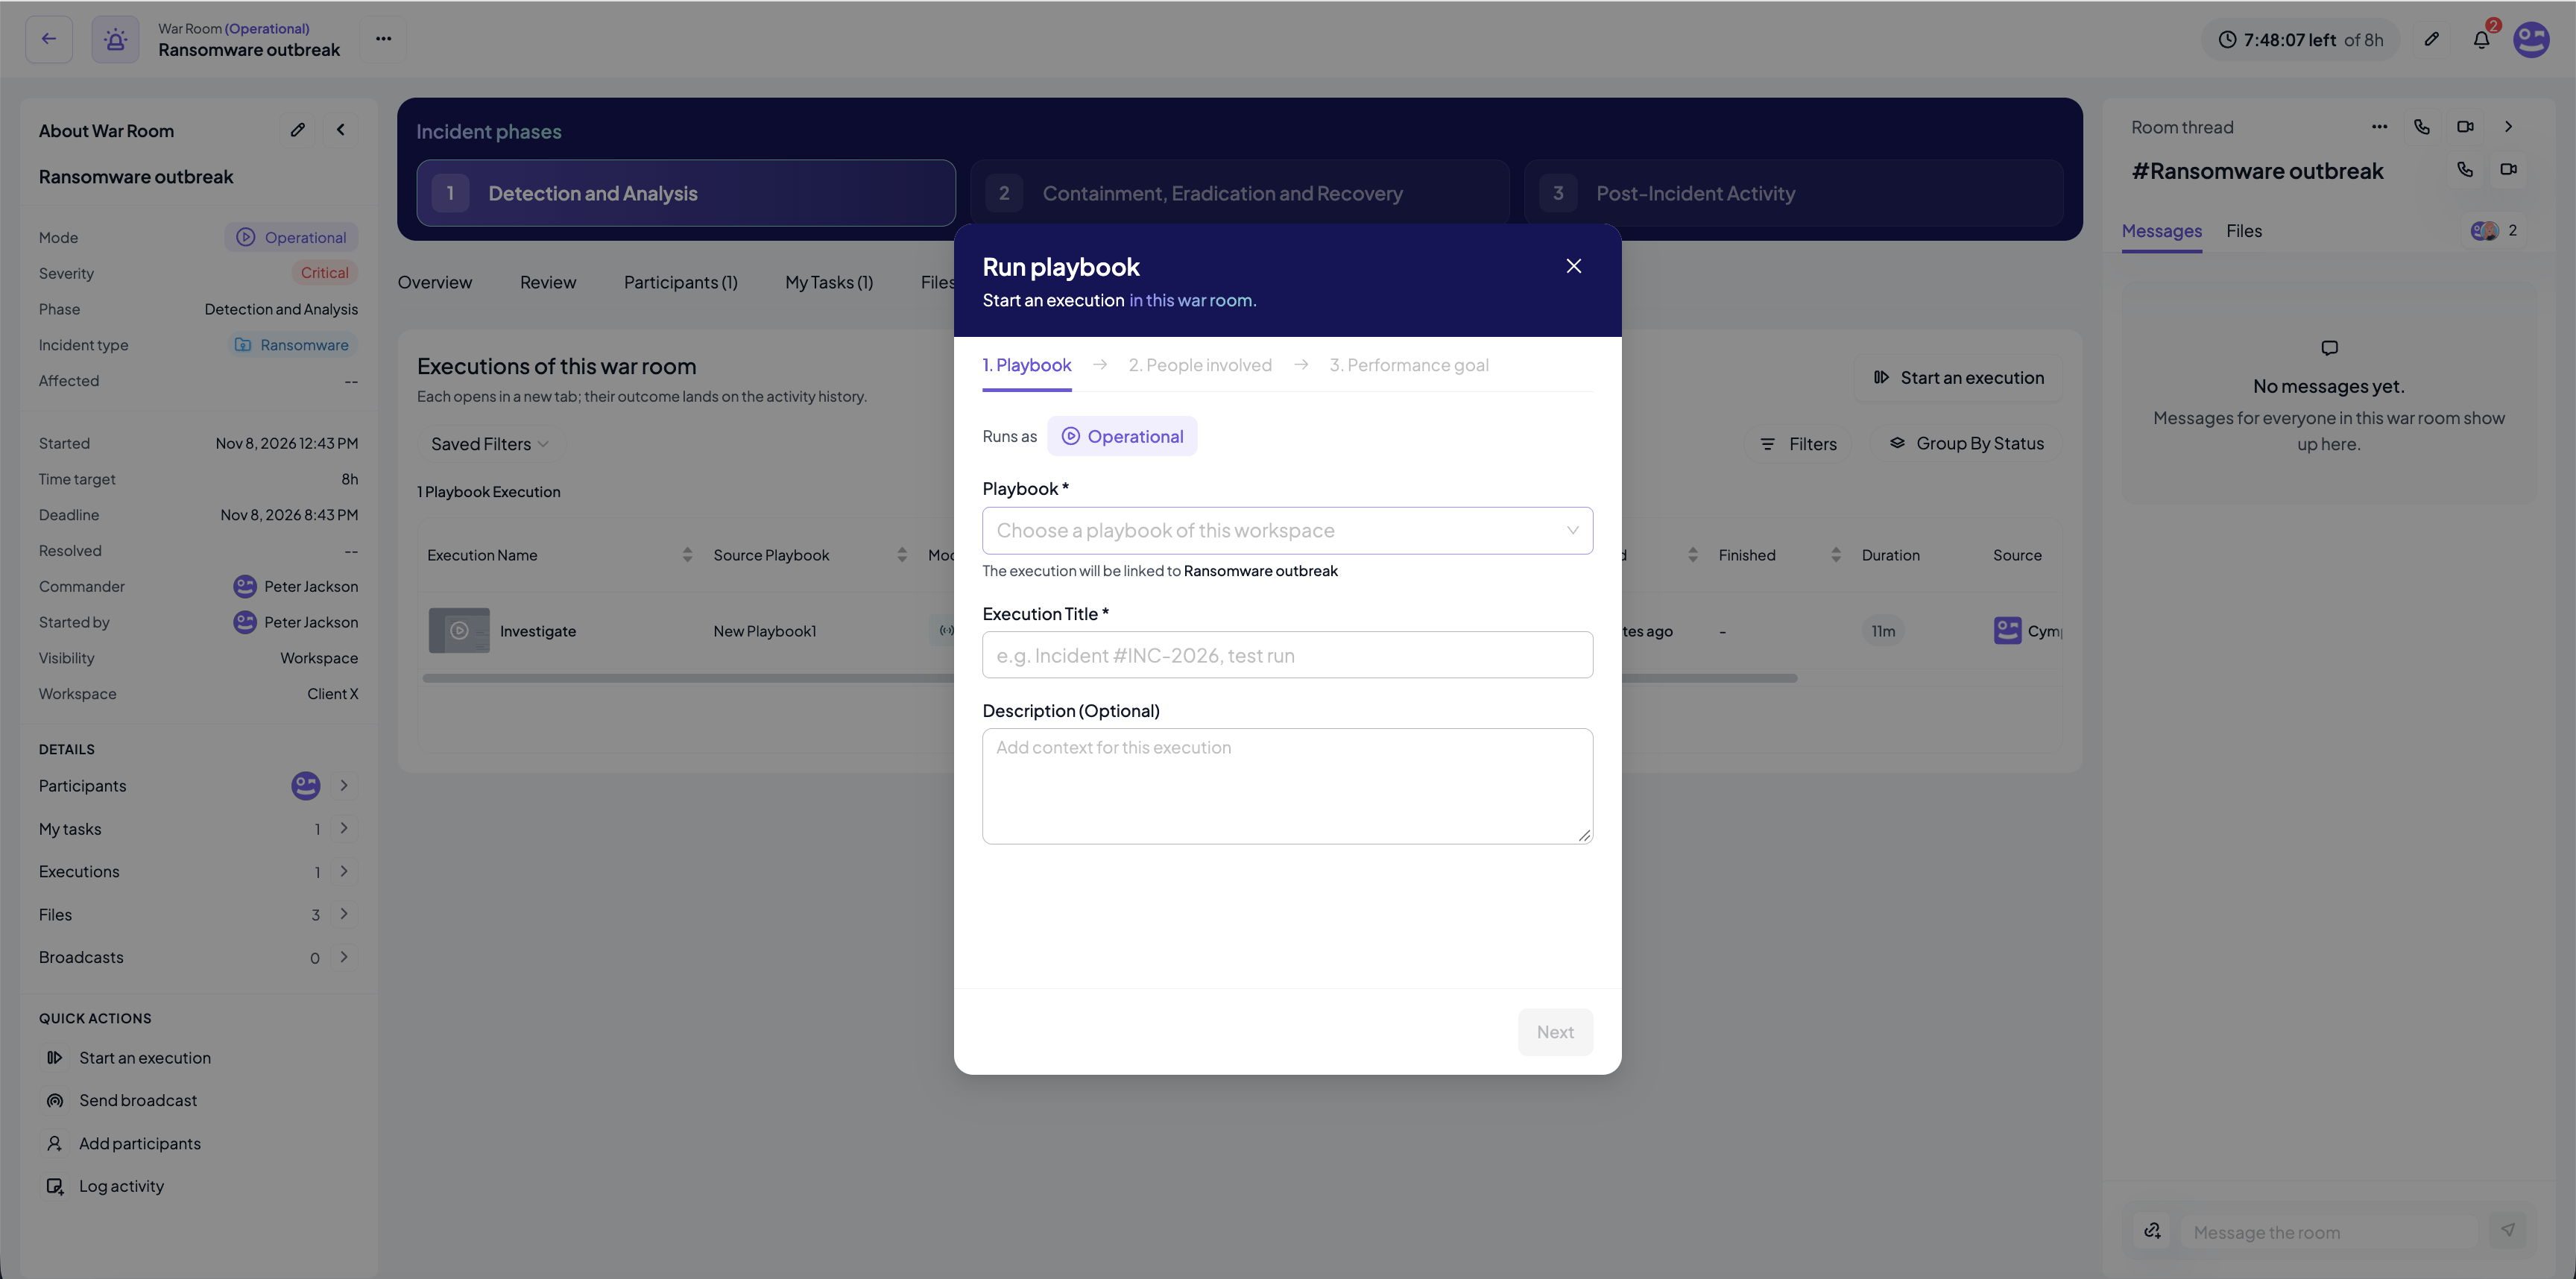
- Runs as is locked to the purpose of the room: an operational room runs operational executions, an exercise room runs exercises.
- The execution is linked to the room: it shows up in the room’s Executions tab and timeline, its final outcome lands in the Activity History, and its steps feed the My Tasks tab of each participant.
- Who can see this execution (step 2, People involved) is locked to the visibility of the room. The executions of a restricted room are restricted too: only the people seated in the room and the people holding their steps see them. See Who can see an execution.
- Add assignees to the war room (step 2, People involved, on by default): everyone who gets a step in the execution, or claims a team step, joins the war room automatically as a participant. Nobody is ever removed automatically.
Executions can only be started while the room is Started and not yet in Post-Incident Activity. The three Start an execution buttons are disabled otherwise, with a tooltip saying why. The room cannot move into Post-Incident Activity while one of its executions is still running.
Broadcasts
A broadcast is a status update sent from the room to the people who need to know: the participants, the guests, people and teams in your organisation who are not in the room, and external email addresses or phone numbers such as leadership, the insurer or a regulator. Every broadcast is recorded in the Activity History and included in the export, so the communication trail of the incident is complete.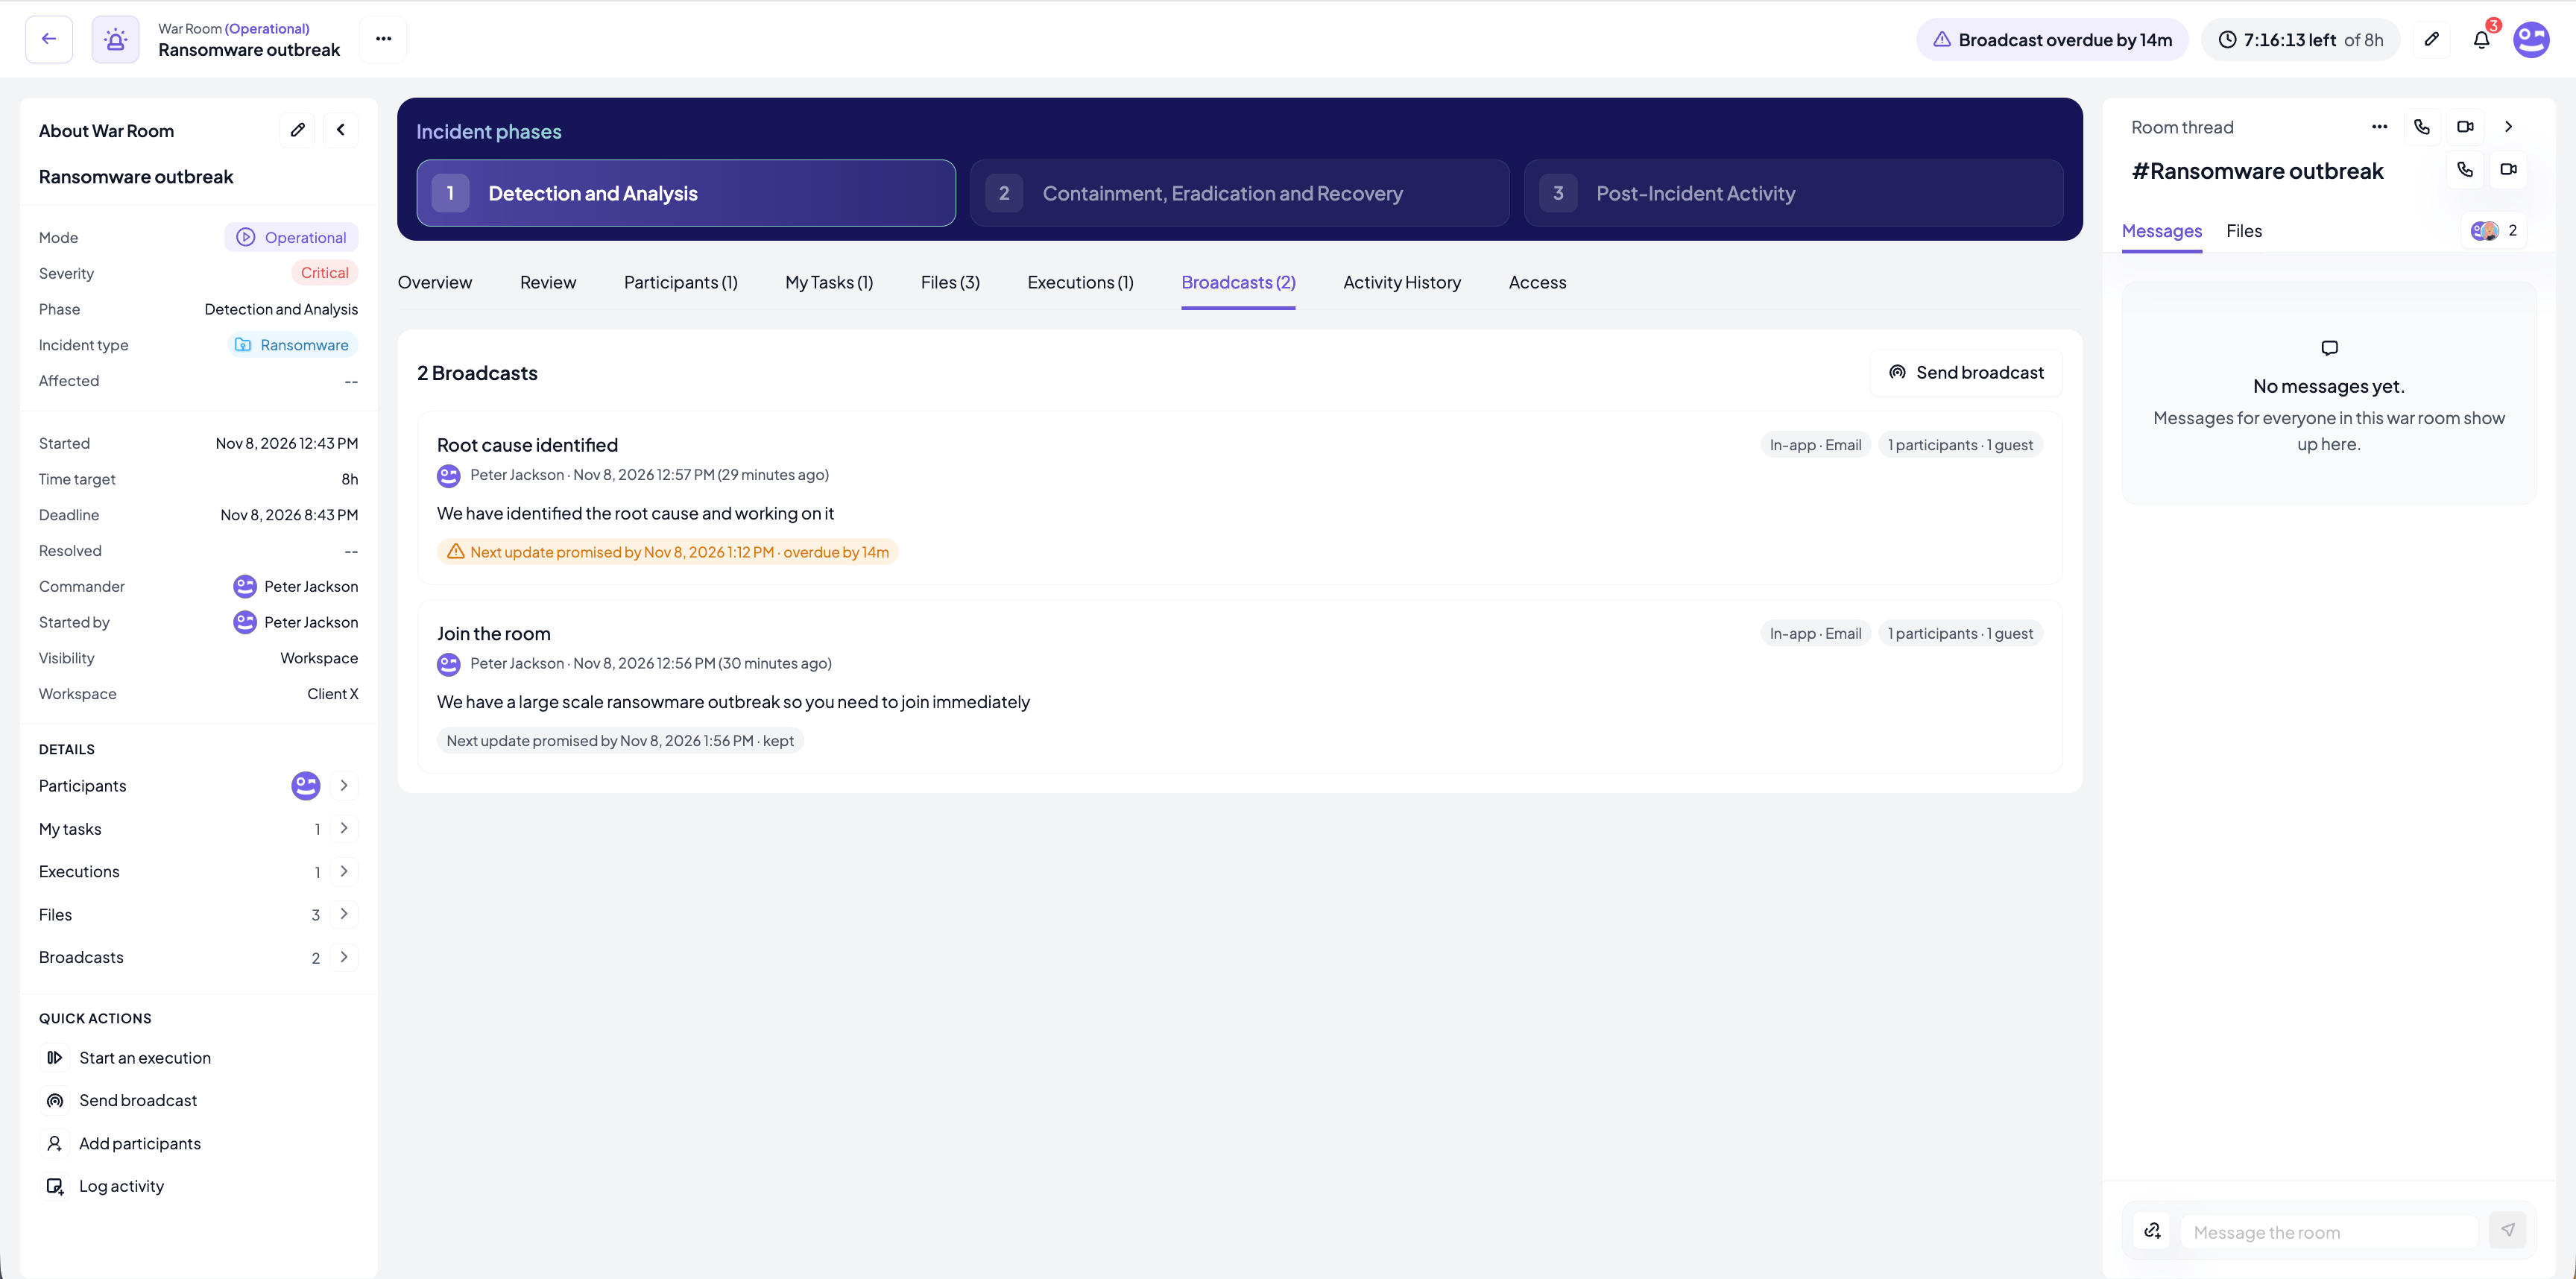
Sending a broadcast
Press Send broadcast in the tab, in the Overview card or in the sidebar. The dialog has two steps.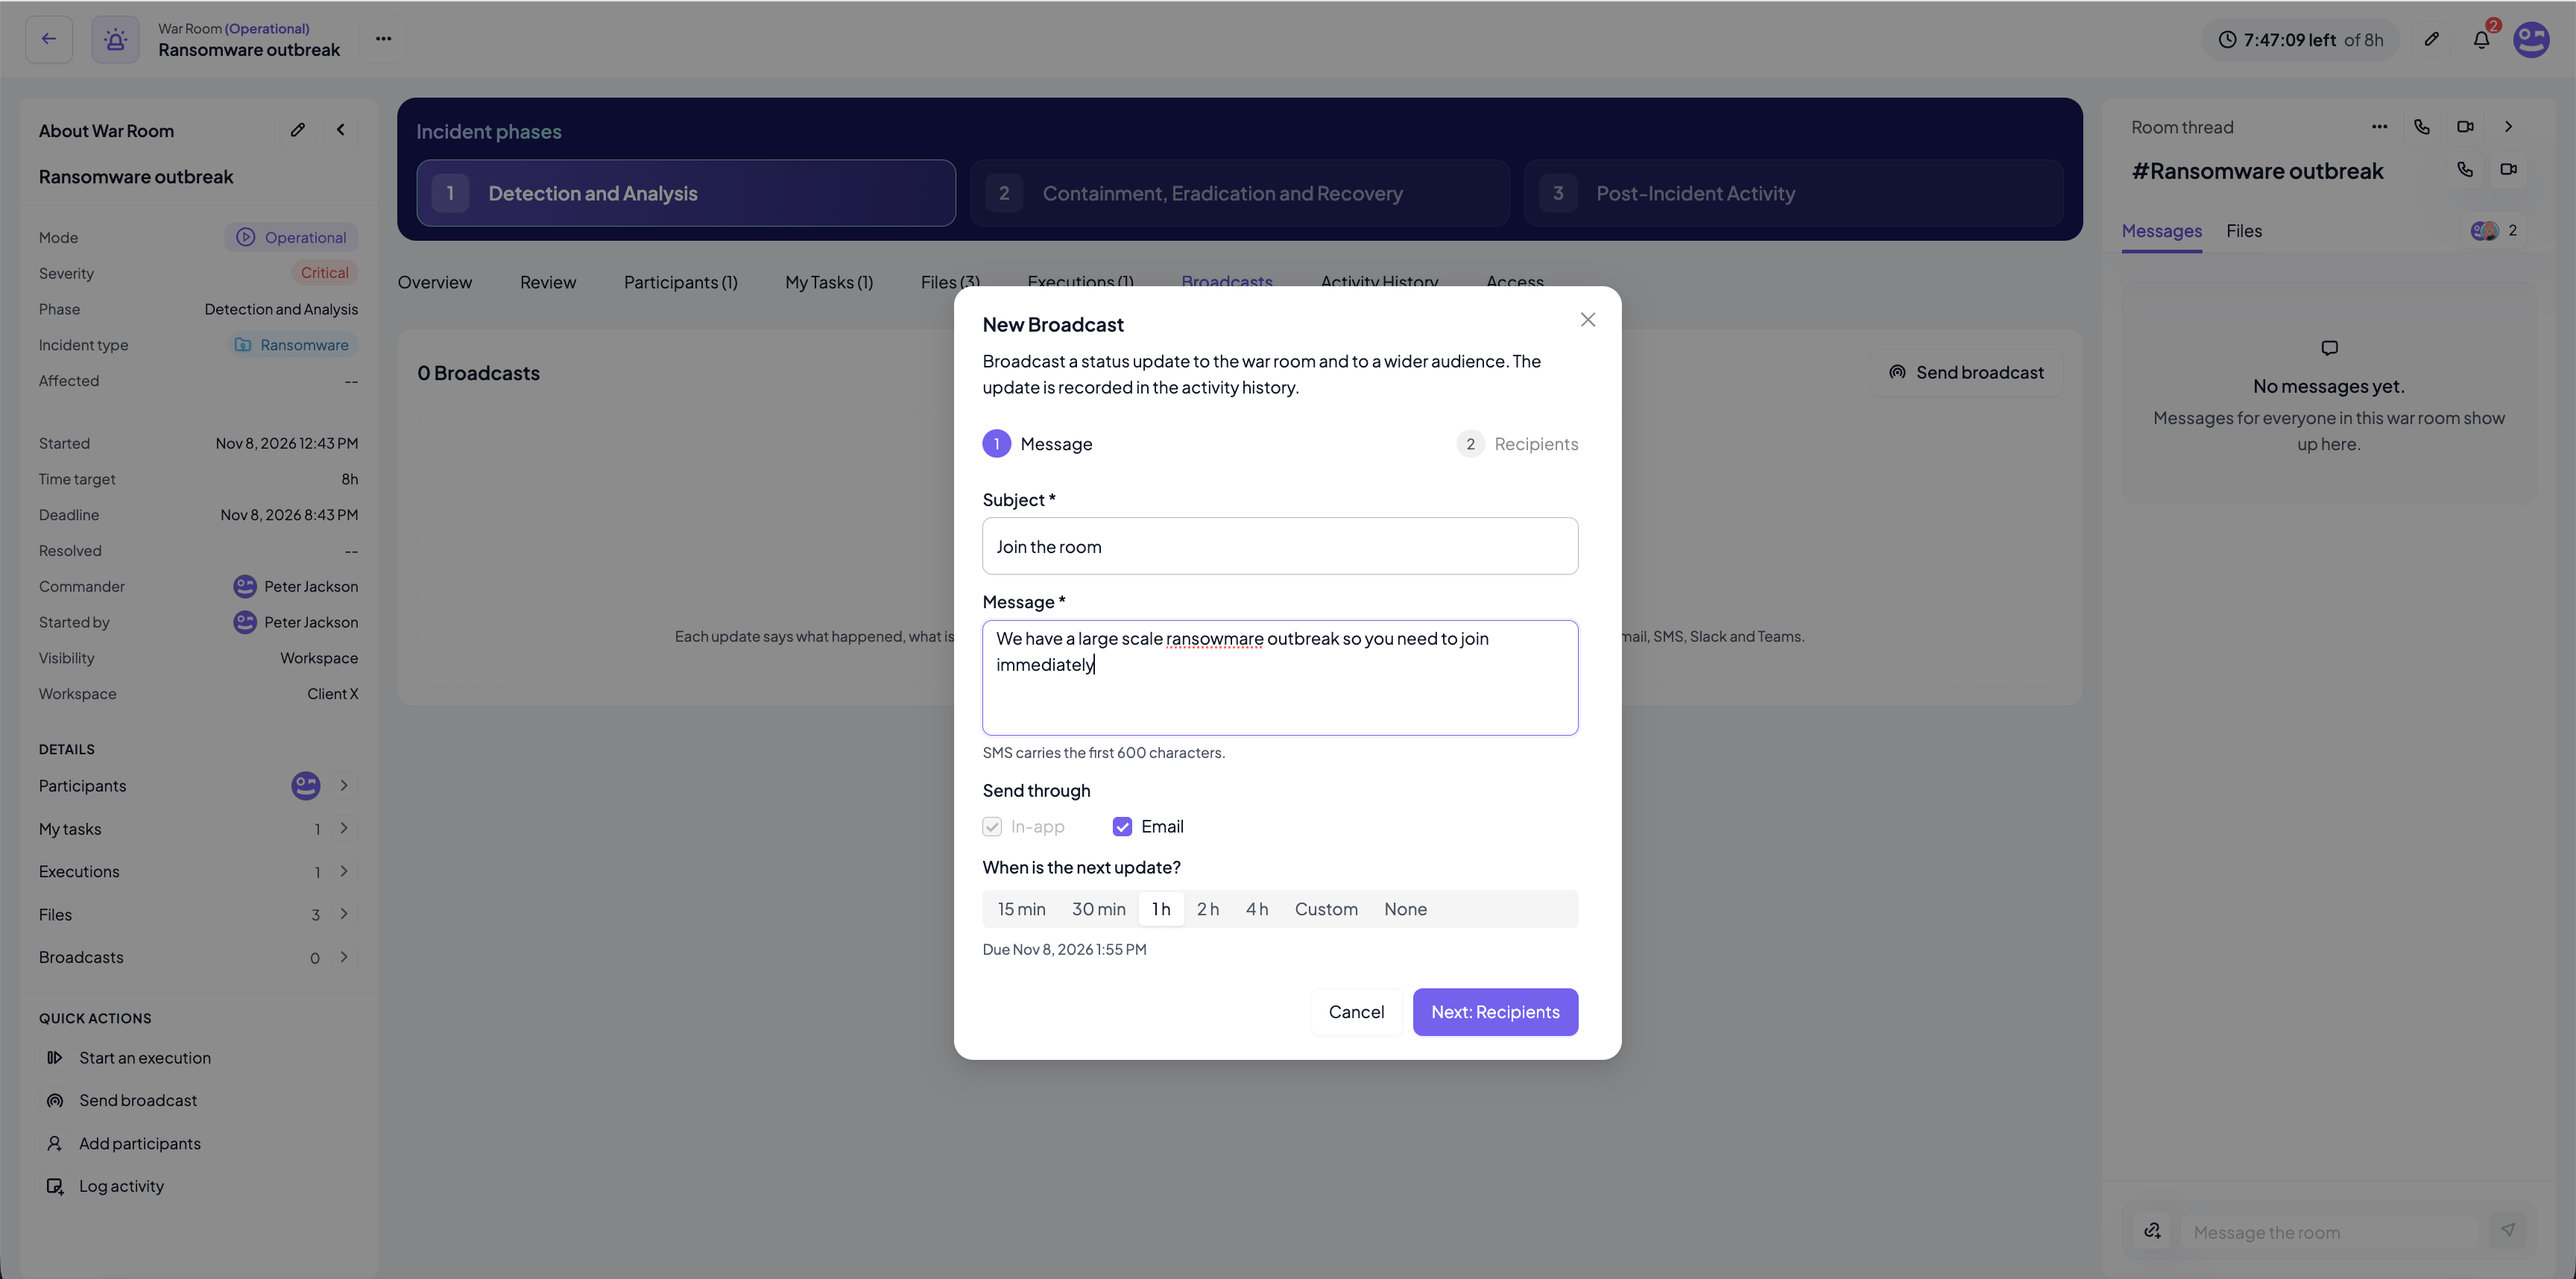
- Subject and Message: what has happened, what is being done, what is needed from whom. SMS carries the first 600 characters of the message.
- Send through: In-app is always on. Email and SMS are offered only when they are set up for your organisation, see Notification settings. Slack and Teams announcements follow the organisation settings automatically.
- When is the next update?: a promise to the audience. Choose a quick pick from 15 minutes to 4 hours, a custom time within 72 hours, or None. The default is 1 hour.
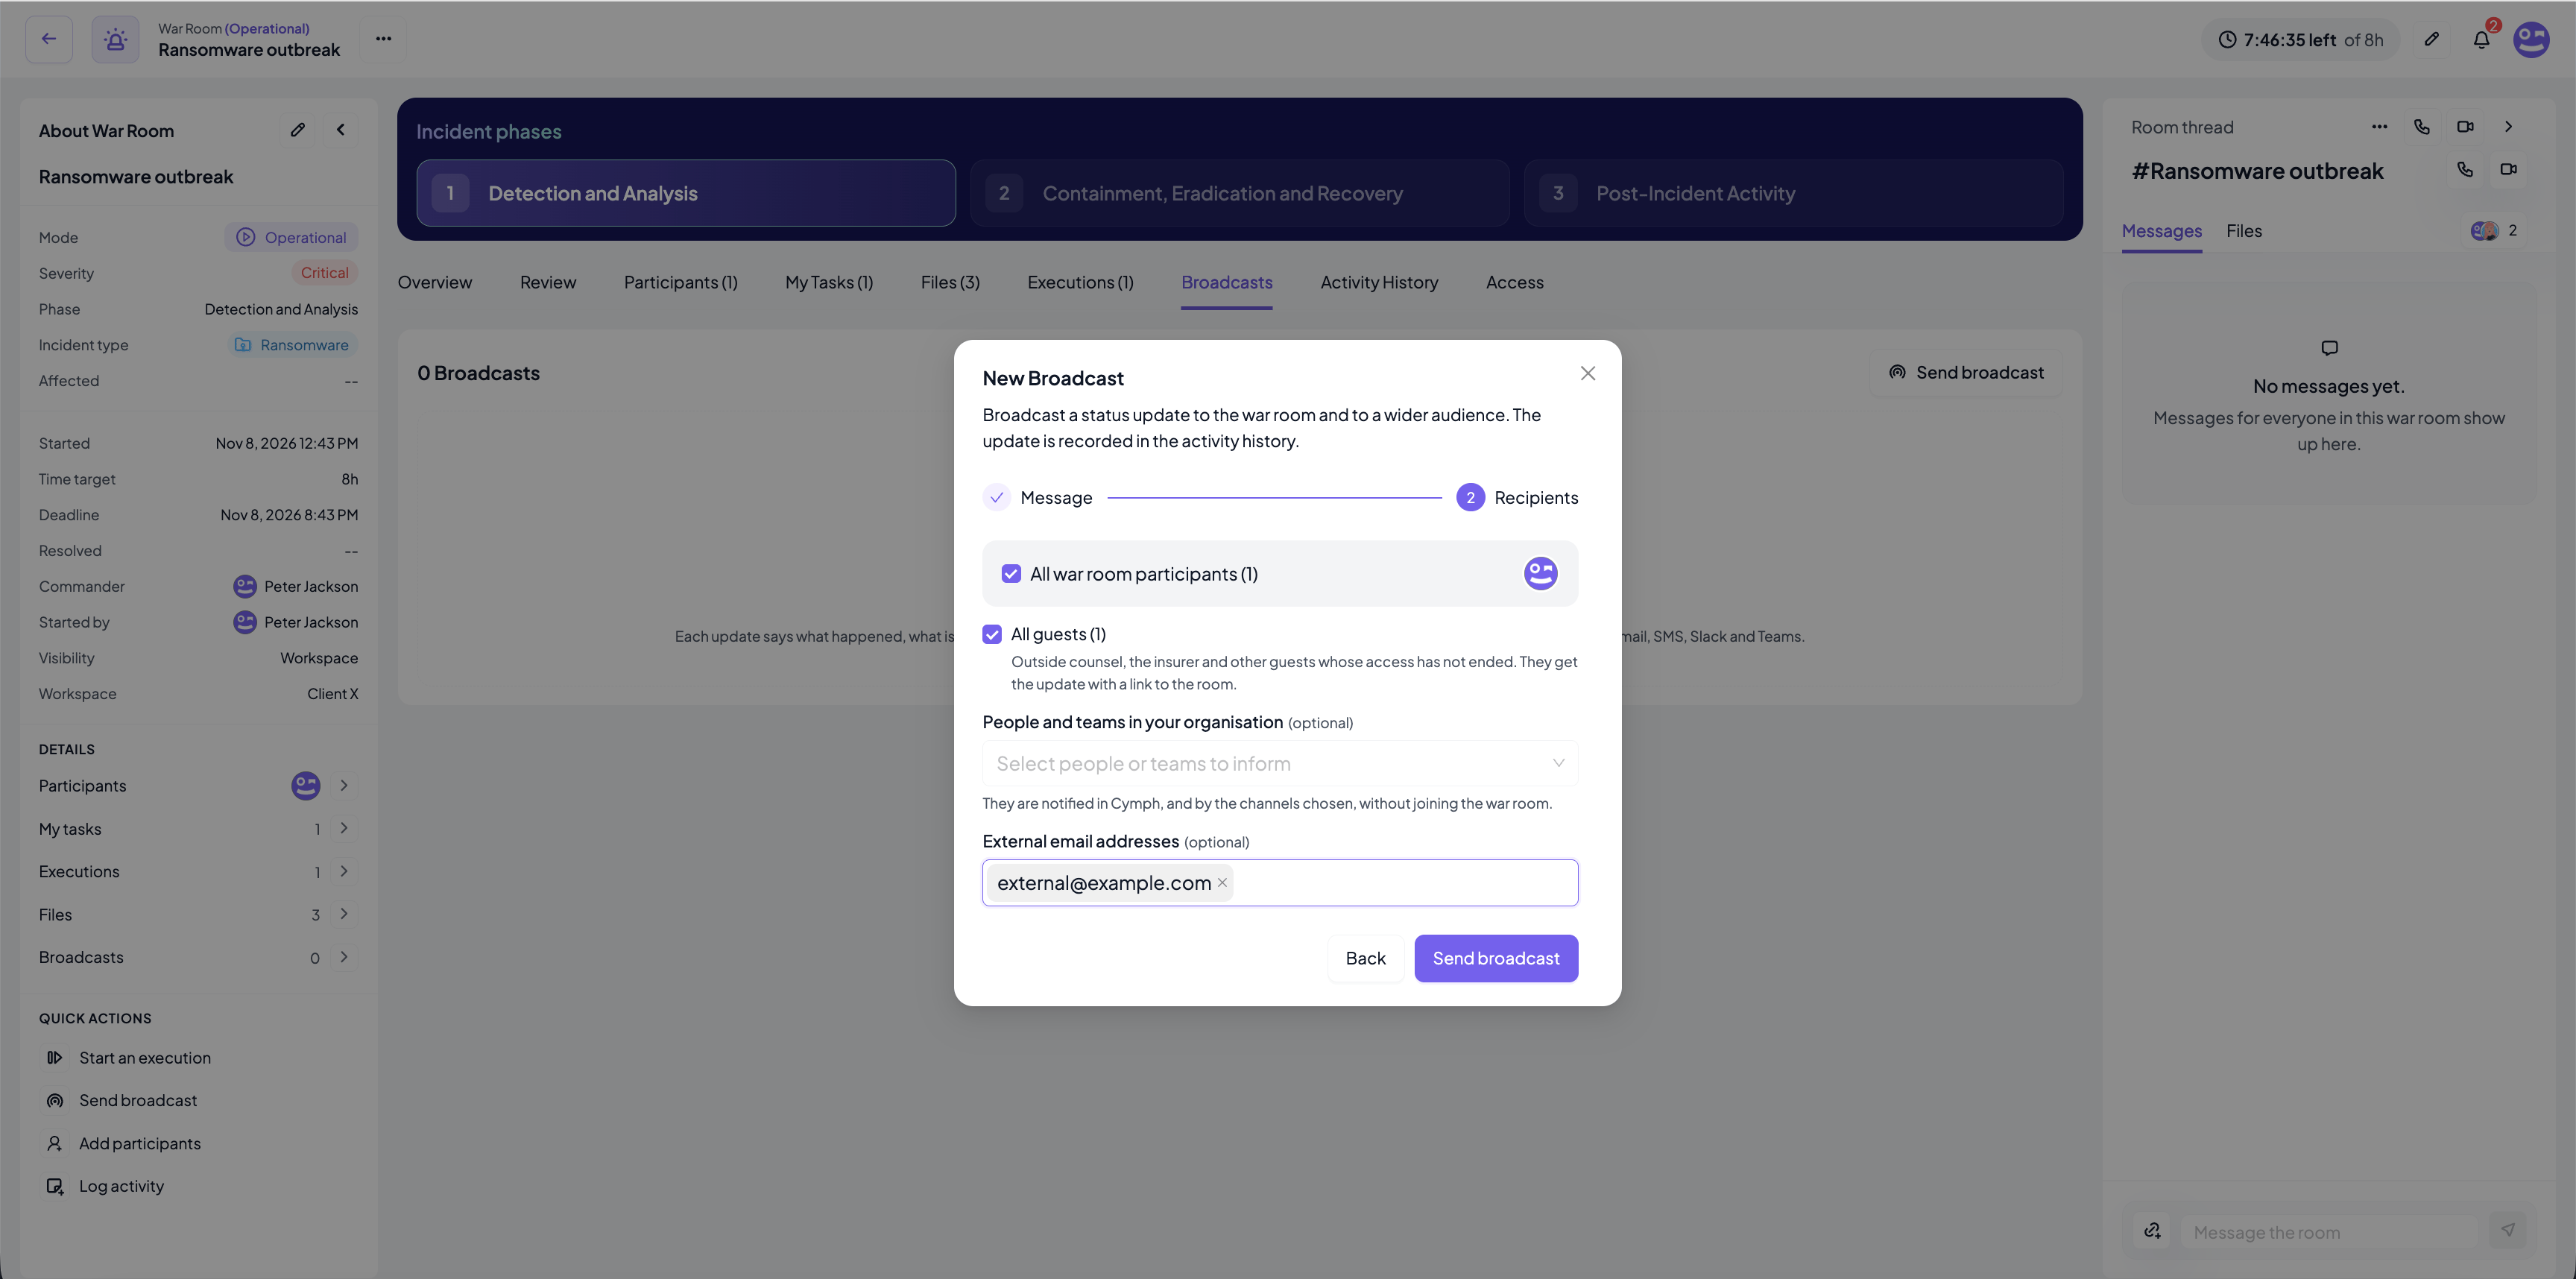
- All war room participants: on by default. The sender is not notified.
- All guests: the guests whose access has not ended. They get the update with a link to the room.
- People and teams in your organisation: anyone who should be informed without joining the war room. They are notified in Cymph and by the channels chosen, without a link to the room.
- External email addresses and External phone numbers (only for the channels chosen): people outside Cymph. Phone numbers must be in international format.
The next update promise
When a broadcast promises a next update, the room counts down to it. The header shows a Broadcast overdue by … pill when the promise is missed, the Overview card shows the countdown and, if the update is late, a button to send it now, and the Broadcasts tab marks each promise as kept or late. When a promise is missed, the lead of the room (the Incident Commander, otherwise the last sender, otherwise the creator) gets an in-app notice once and the miss is recorded in the Activity History. The Incident Commander can move or withdraw the promise from the Overview card, and sending a new broadcast replaces it.Activity History
The Activity History is the complete, timestamped record of the room: who did what and when. It is written automatically by the system and completed by hand by the people in the room, and it is the backbone of the timeline PDF in the export.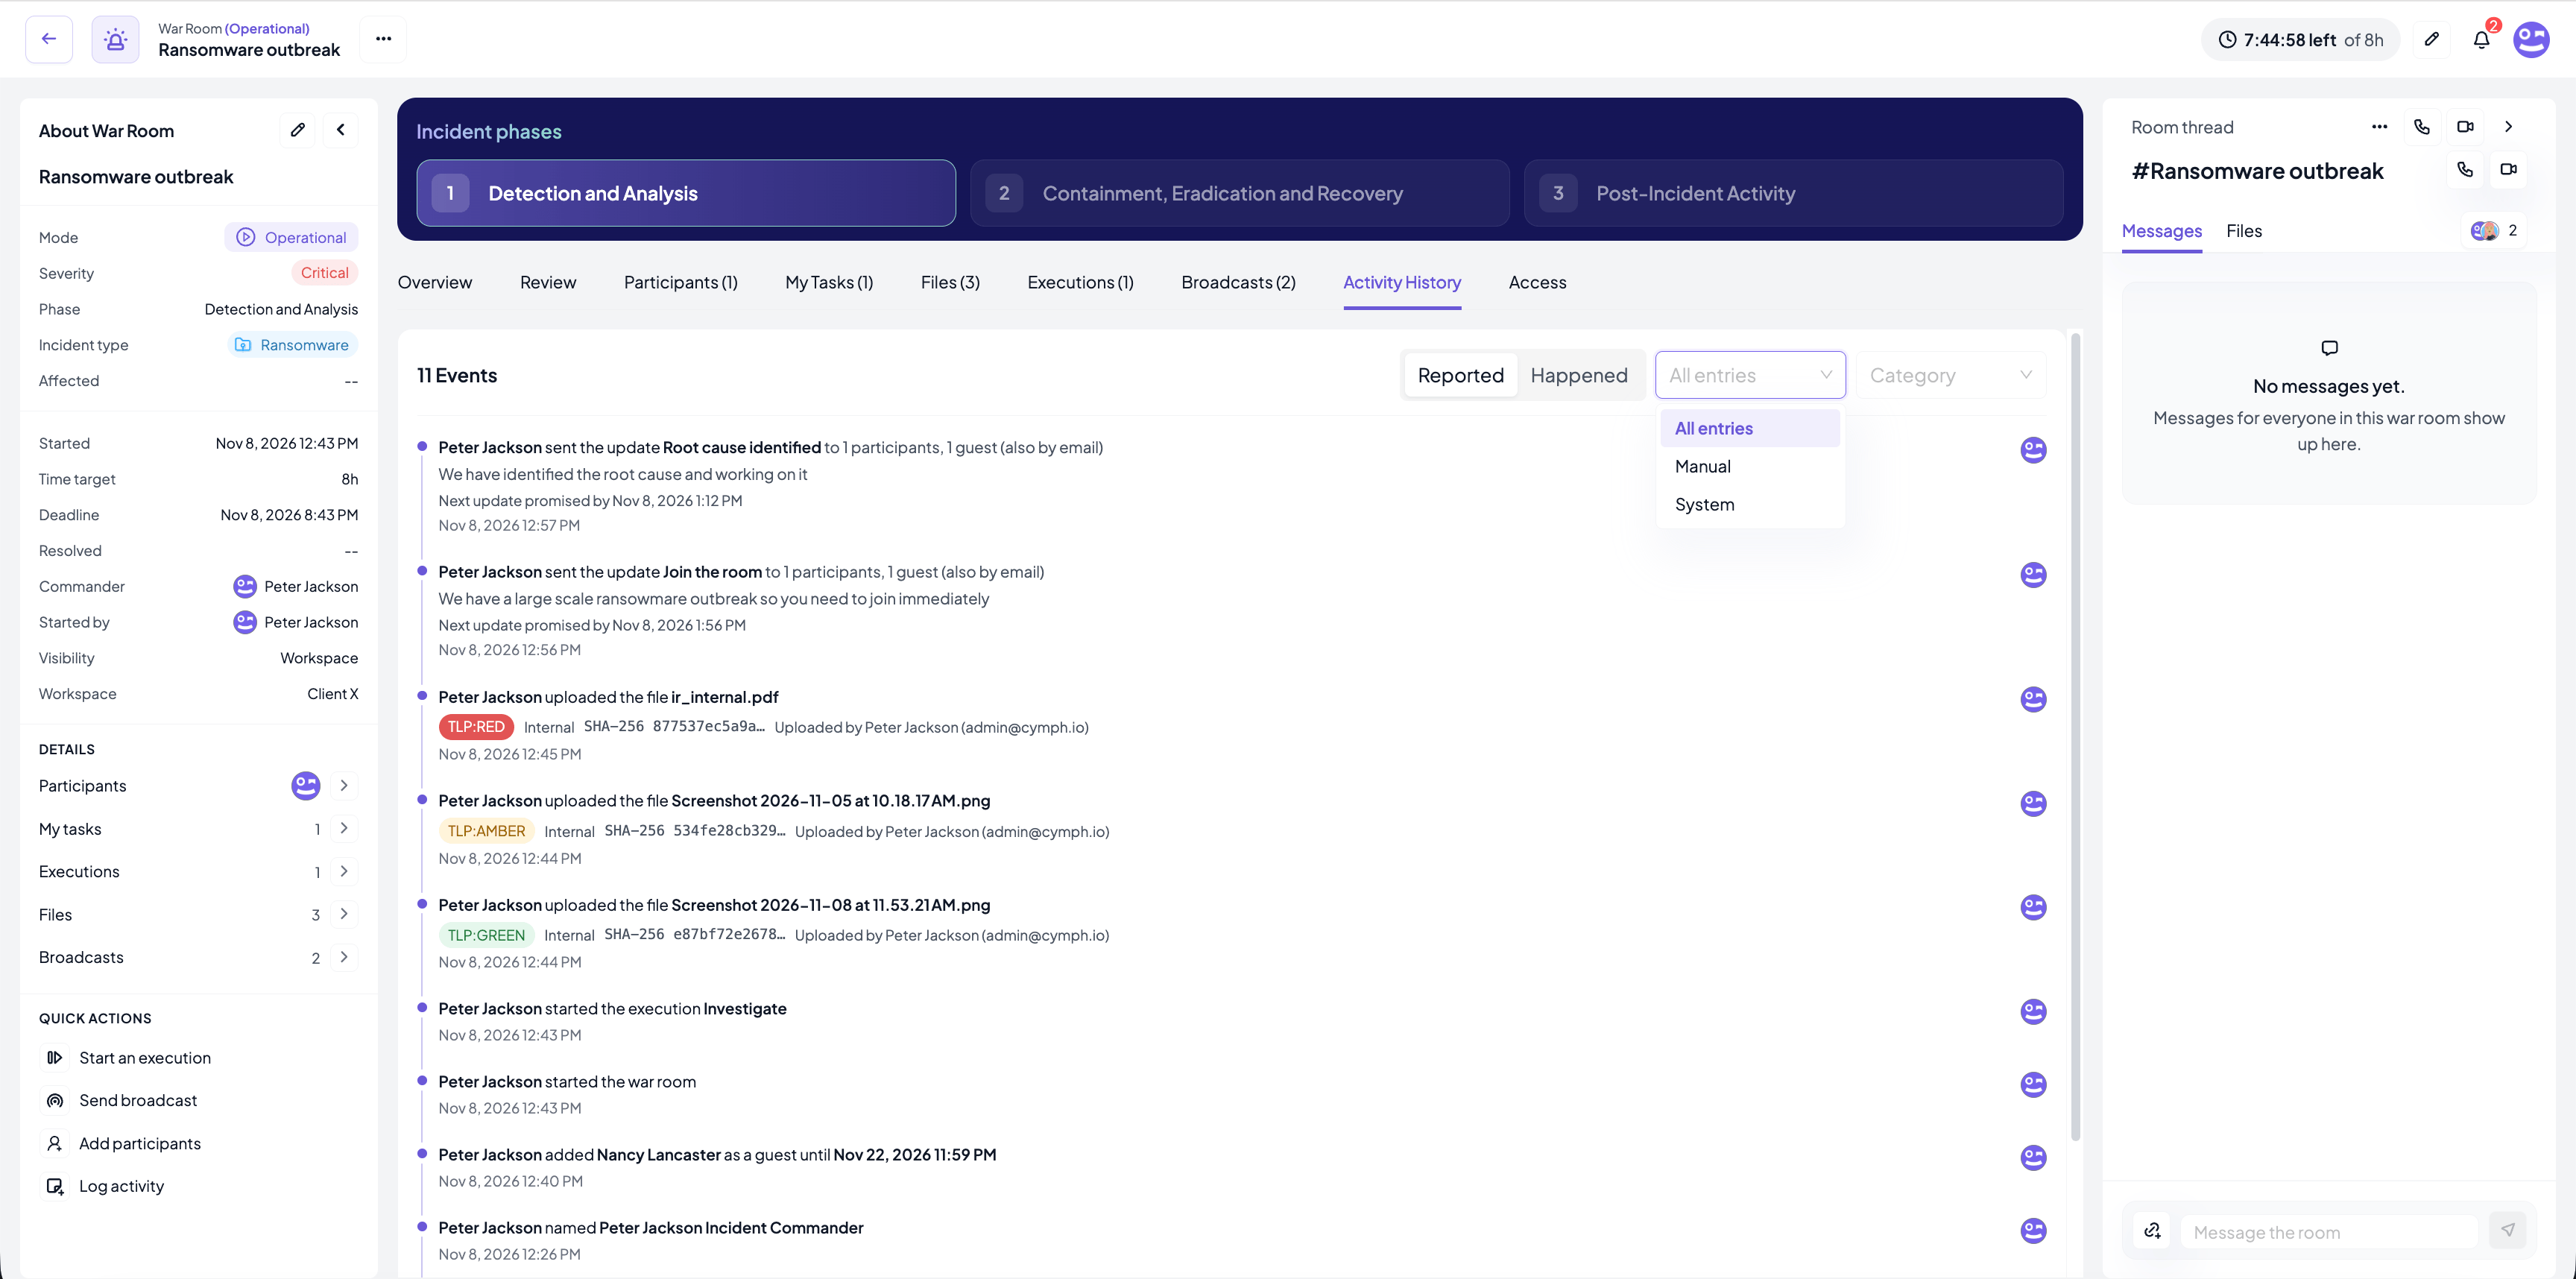
- Reported / Happened: sort by when entries were logged, or by when the thing actually happened. Backdated manual entries are placed where they happened, not where they were recorded.
- All entries / Manual / System: show everything, only the entries people logged by hand, or only the entries written by the system.
- Category: narrow manual entries to Decisions, Actions, Findings or IOCs.
Logging activity by hand
Press Log activity in the sidebar quick actions to record something that did not happen inside Cymph: a host isolated, a decision taken on a call, a finding from forensics. Manual entries get a Manual pill in the history.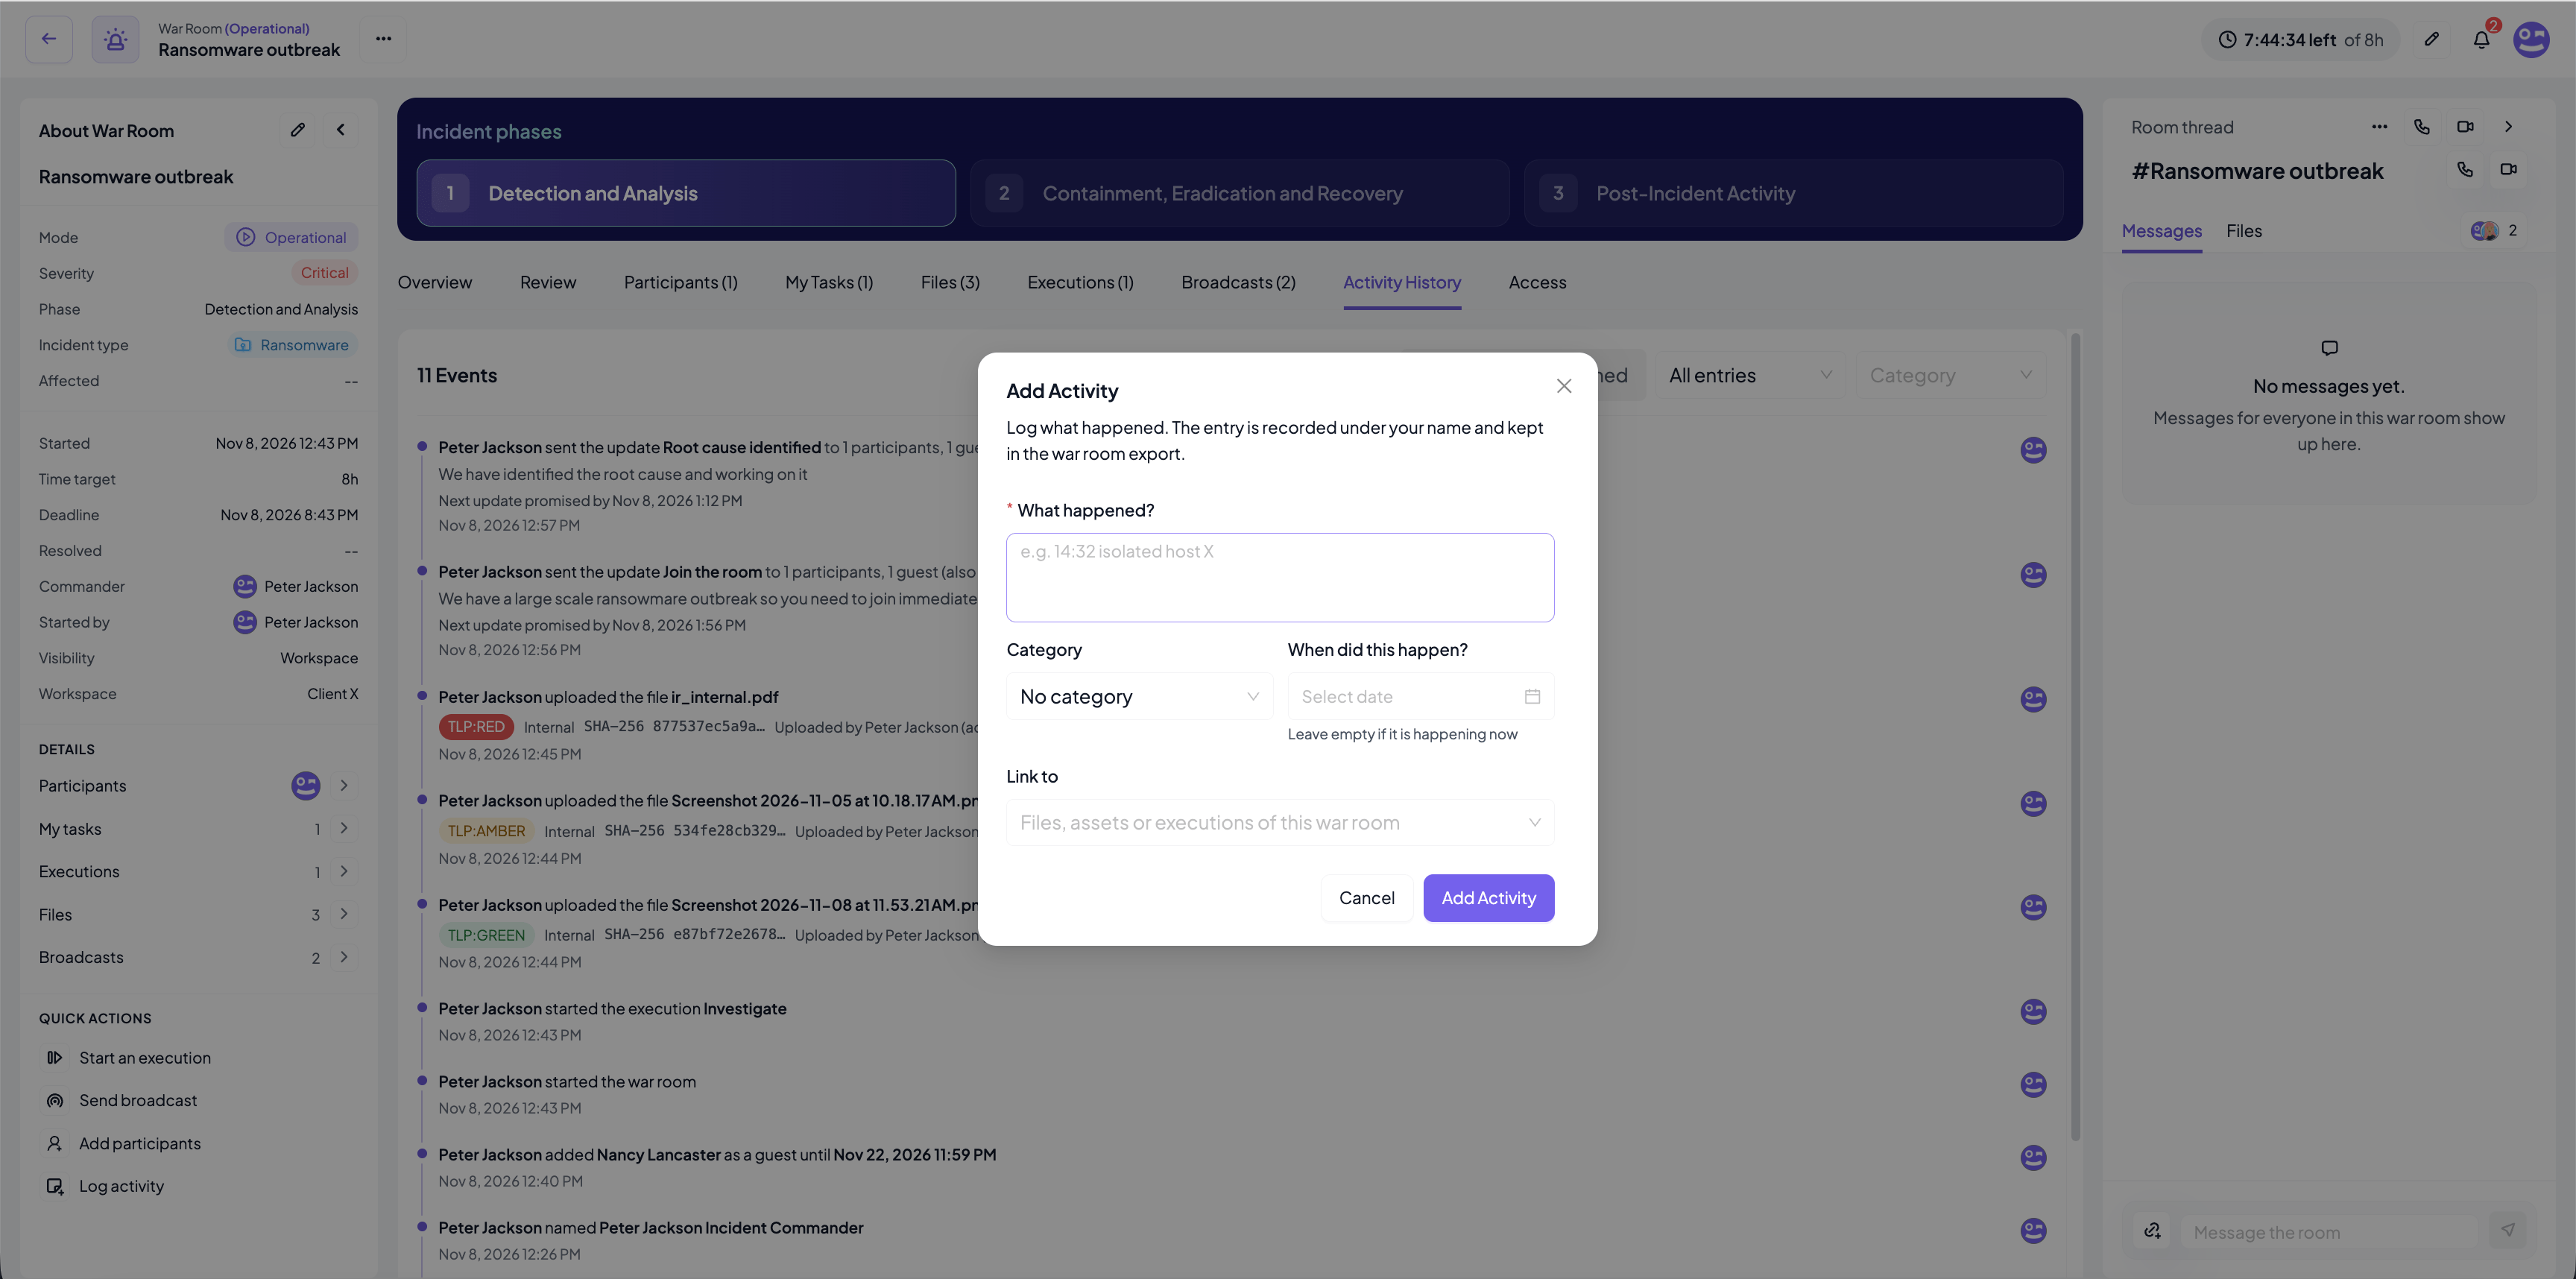
- What happened?: the entry text, up to 2000 characters.
- Category (optional): Decision, Action, Finding or IOC.
- When did this happen? (optional): leave empty if it is happening now, or backdate it. Entries dated before the room was opened are accepted and marked as such, which is fine when detection came first.
- Link to (optional): files, assets or executions of this war room that the entry refers to. They appear as chips on the entry.
Amending an entry
Entries are never edited or deleted. To correct a manual entry, hover it and press Amend: you give the corrected text, time, category or links and a reason (for example a typo, or new information from forensics). The correction is added as a new entry, the original stays on the record with the old text struck through, and both are kept in the export. The author of the entry and any participant can amend it, on rooms that are not archived.Post-incident review
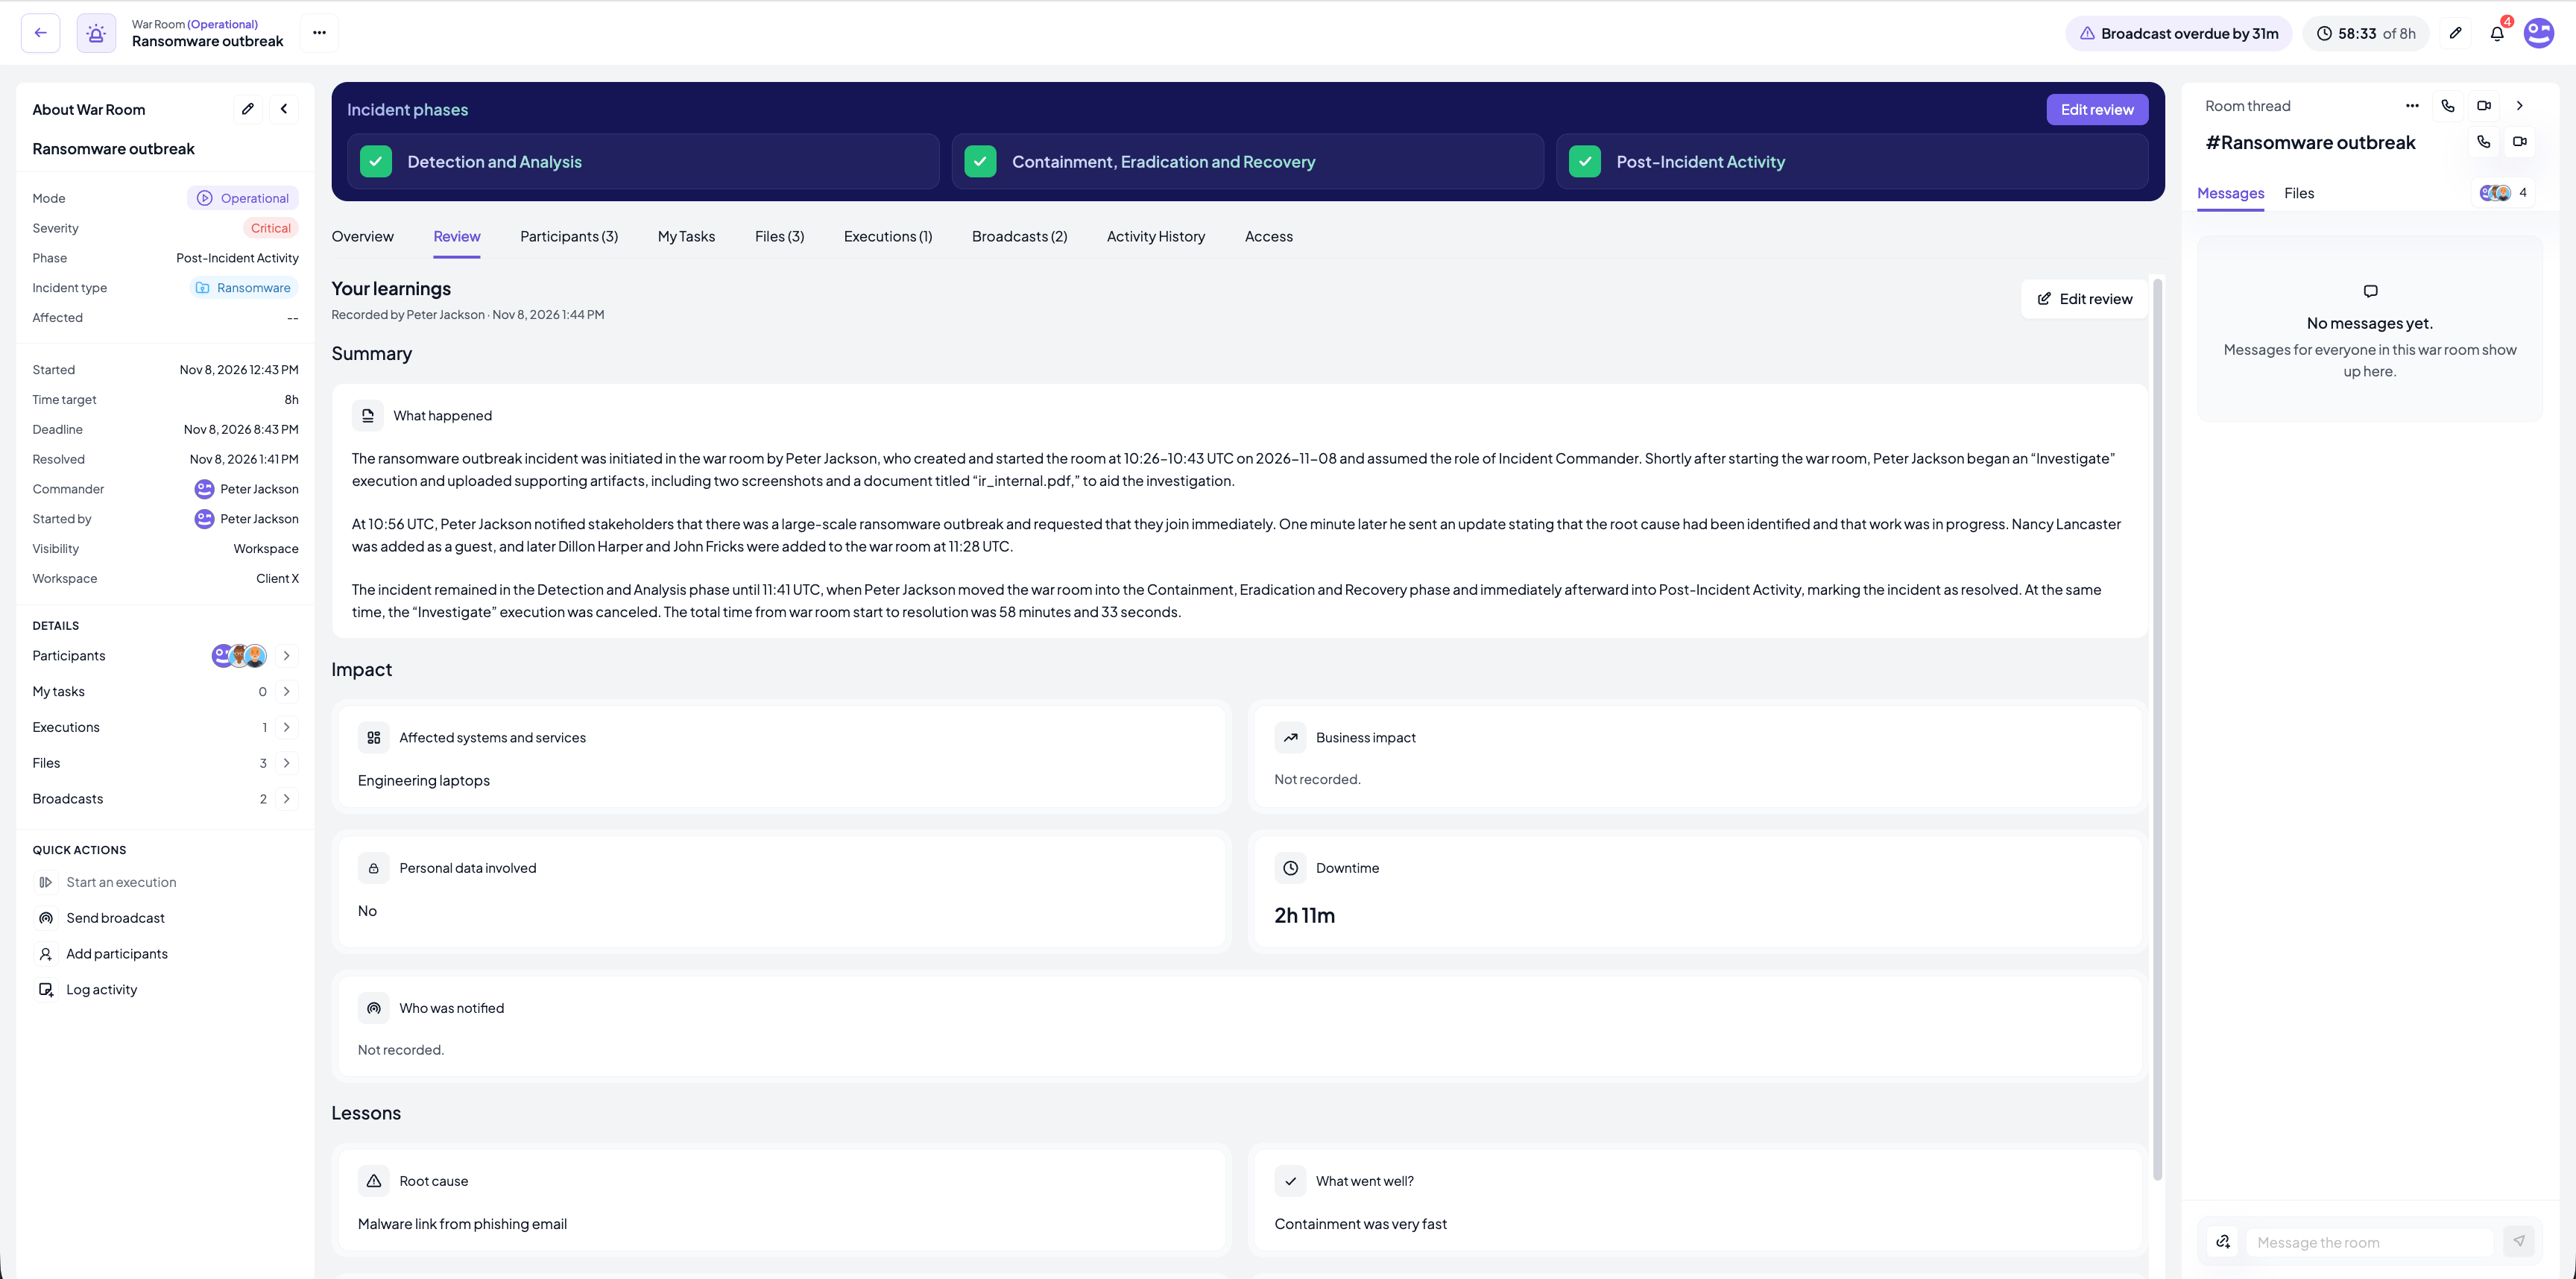
Moving the room into Post-Incident Activity marks the incident as resolved, stops the incident clock and opens the post-incident review: what happened, what it cost and what the team learned, in the team’s own words. What Cymph measured (timings, executions, broadcasts) is already in the room; the review adds the human account. The review is the material for the regulatory final report and for the lessons-learned meeting. The review dialog has three steps. You can Skip for now when resolving and write the review later from the Write the review button in the Incident phases panel or from the Review tab.Step 1: Summary
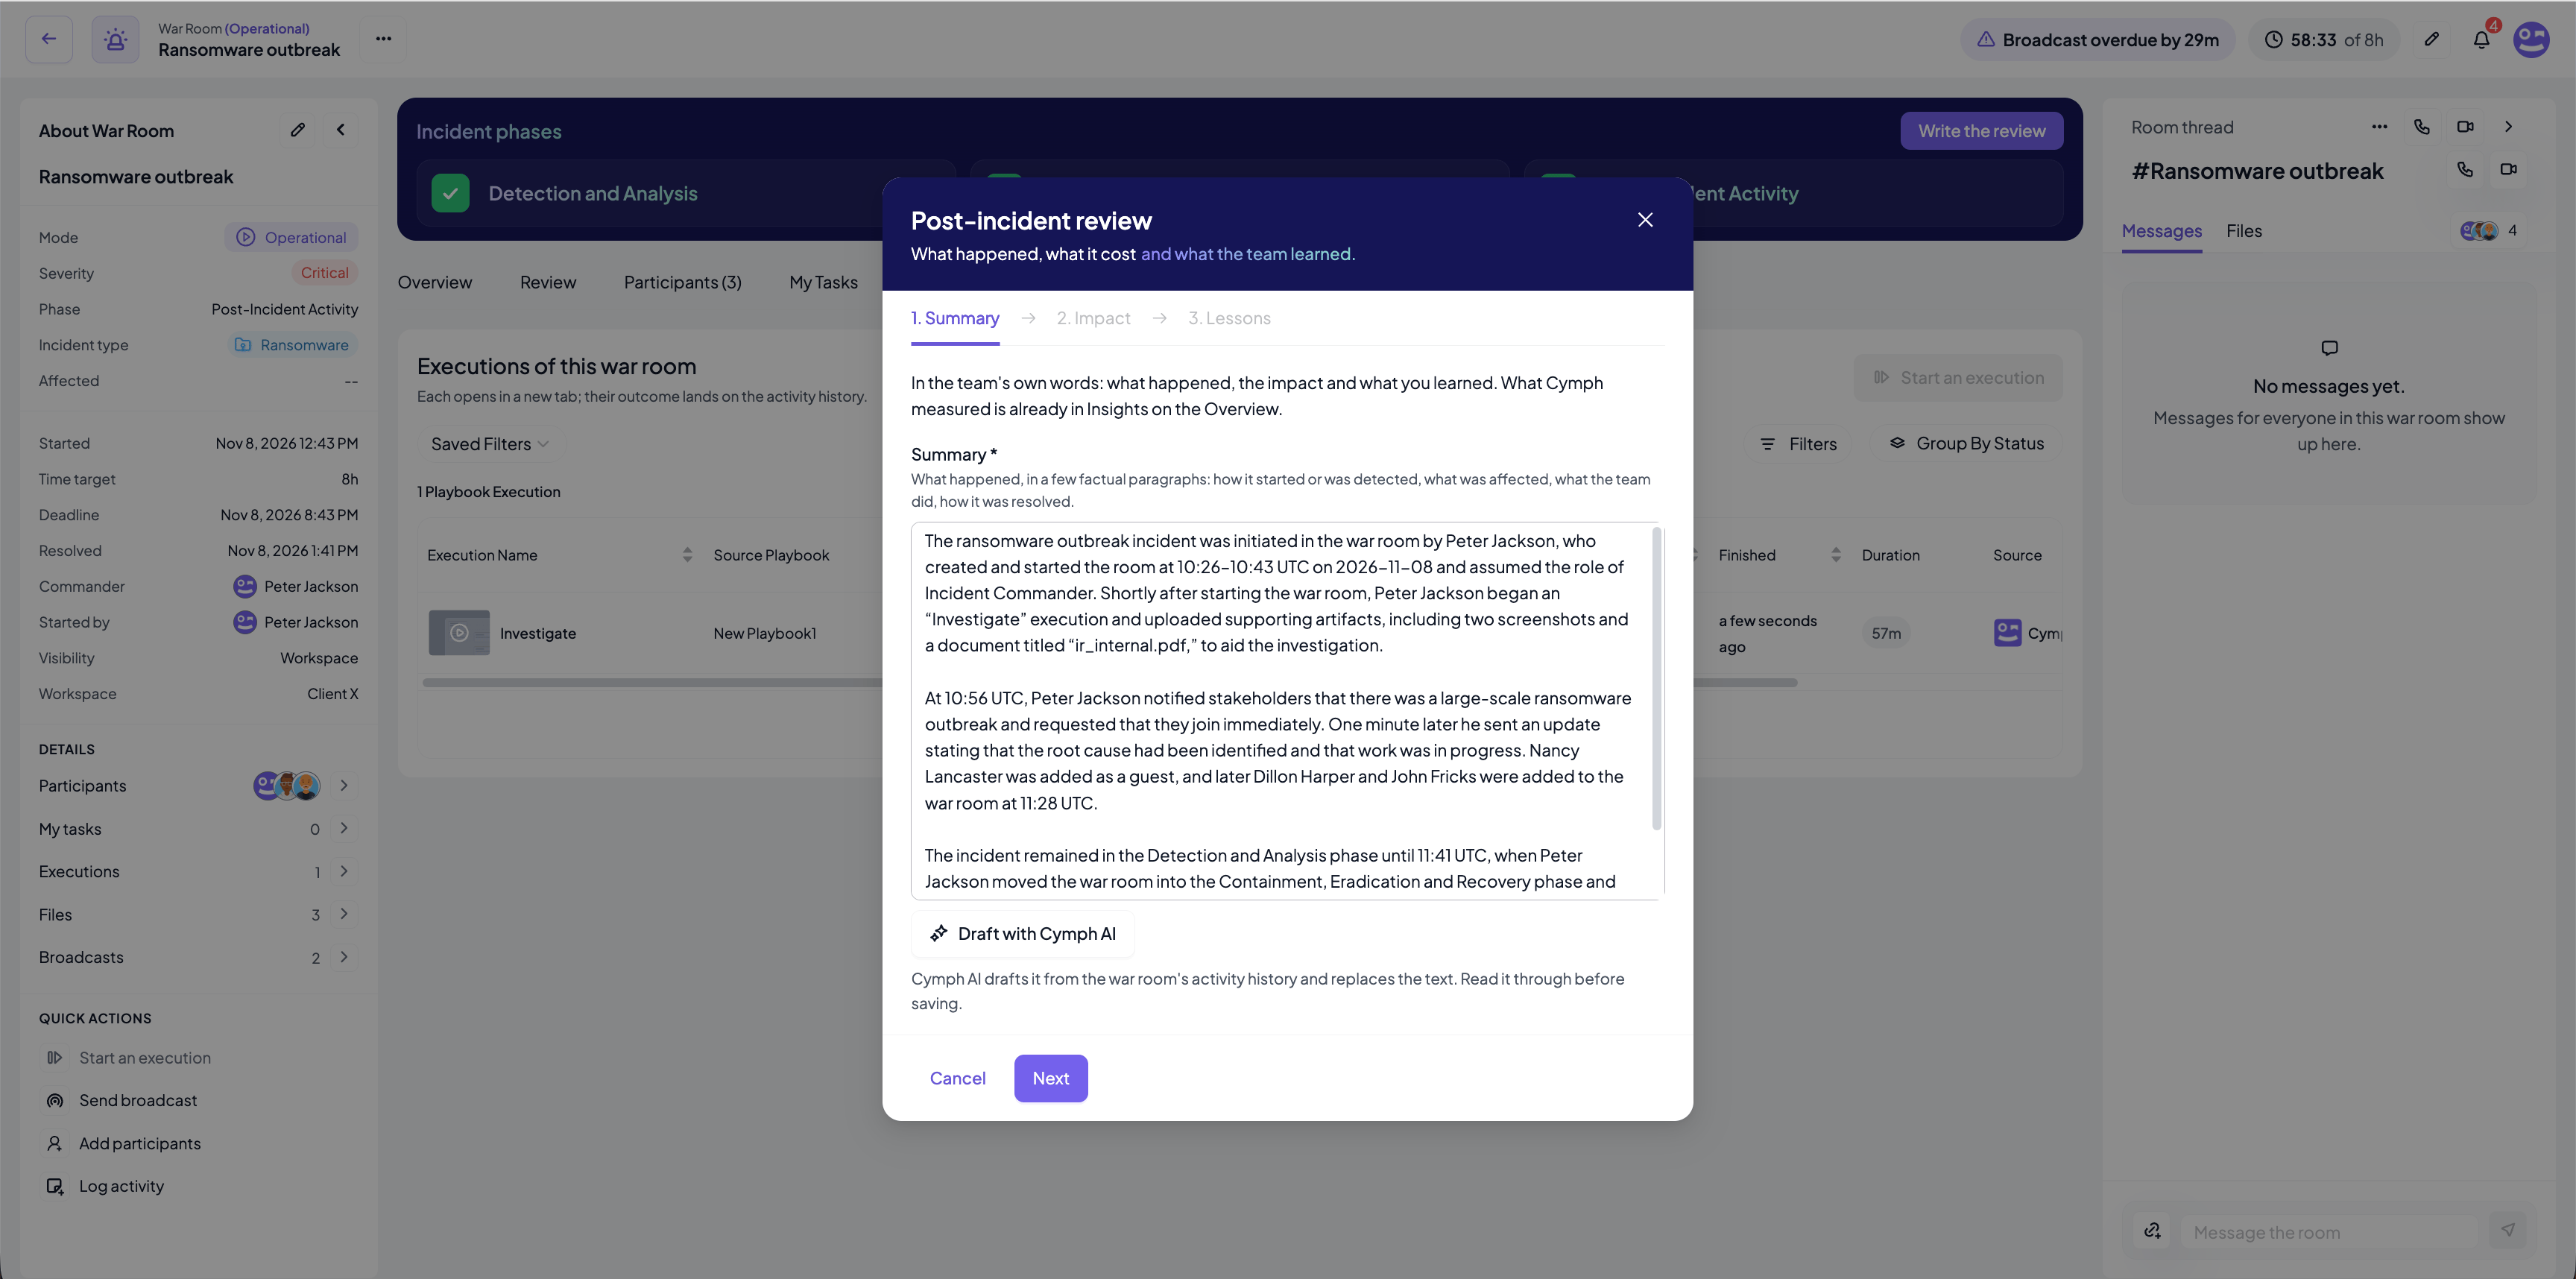
Step 2: Impact
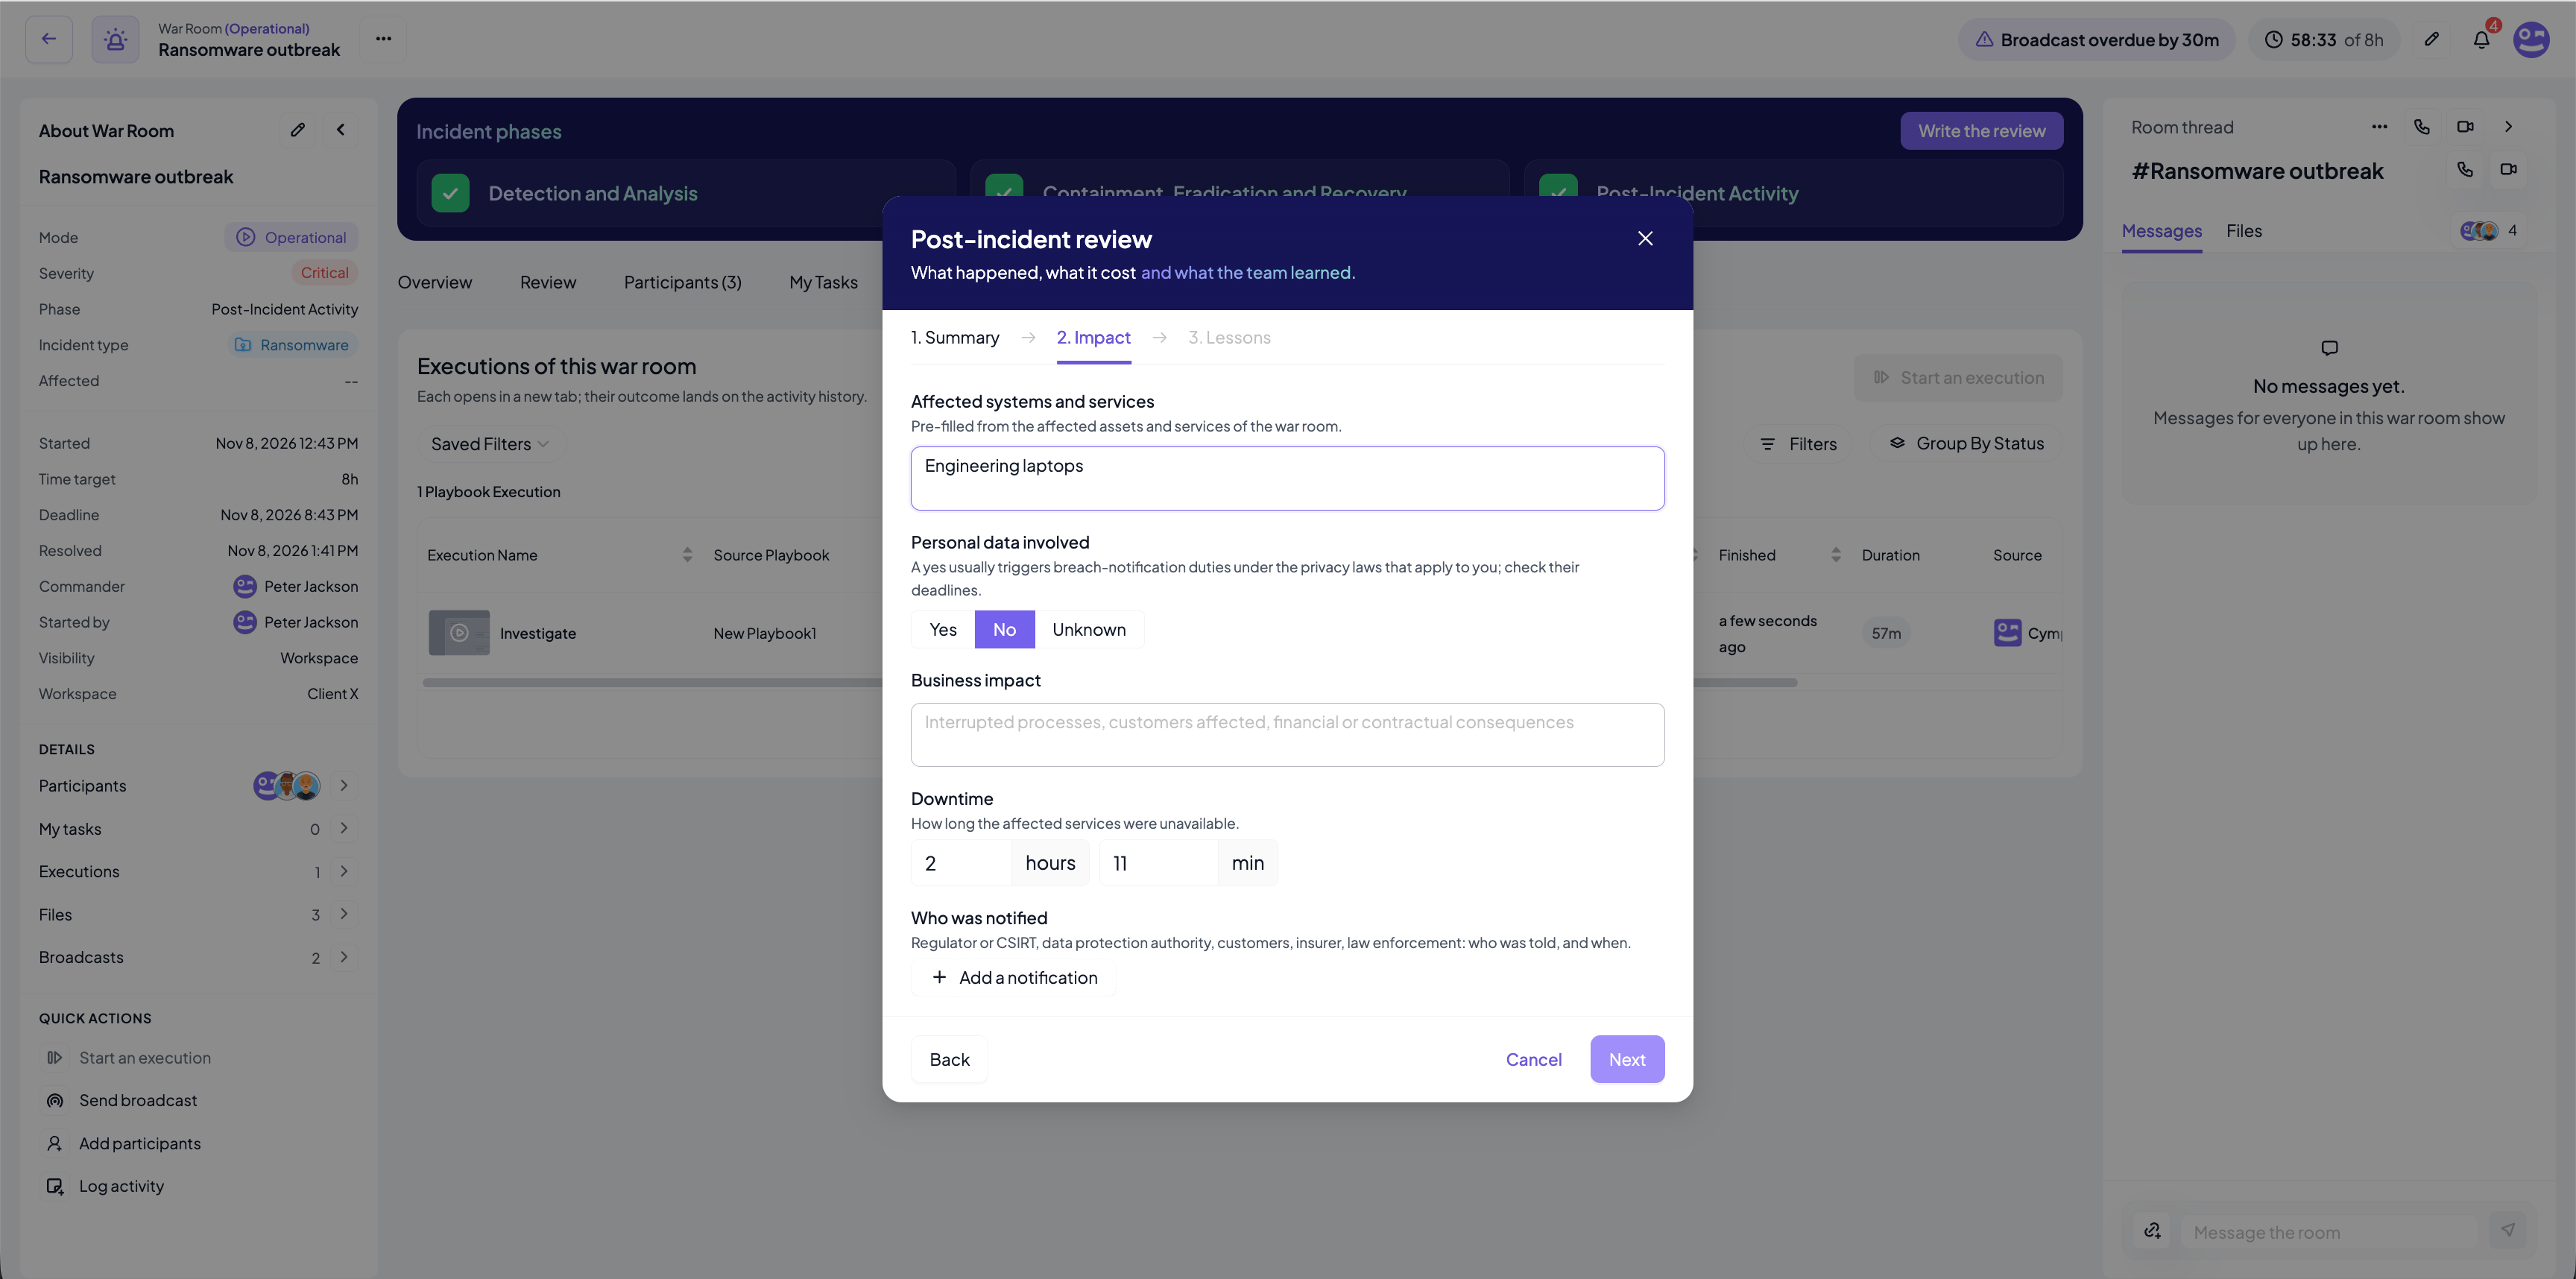
- Affected systems and services: pre-filled from the affected assets and services of the room the first time; edit freely.
- Personal data involved: Yes, No or Unknown, with room for which data and roughly how many people. A yes usually triggers breach-notification duties under the privacy laws that apply to you; check their deadlines.
- Business impact: interrupted processes, customers affected, financial or contractual consequences.
- Downtime: how long the affected services were unavailable, in hours and minutes.
- Who was notified: one line per party told about the incident (regulator or CSIRT, data protection authority, customers, insurer, law enforcement, other) with when and a note.
Step 3: Lessons
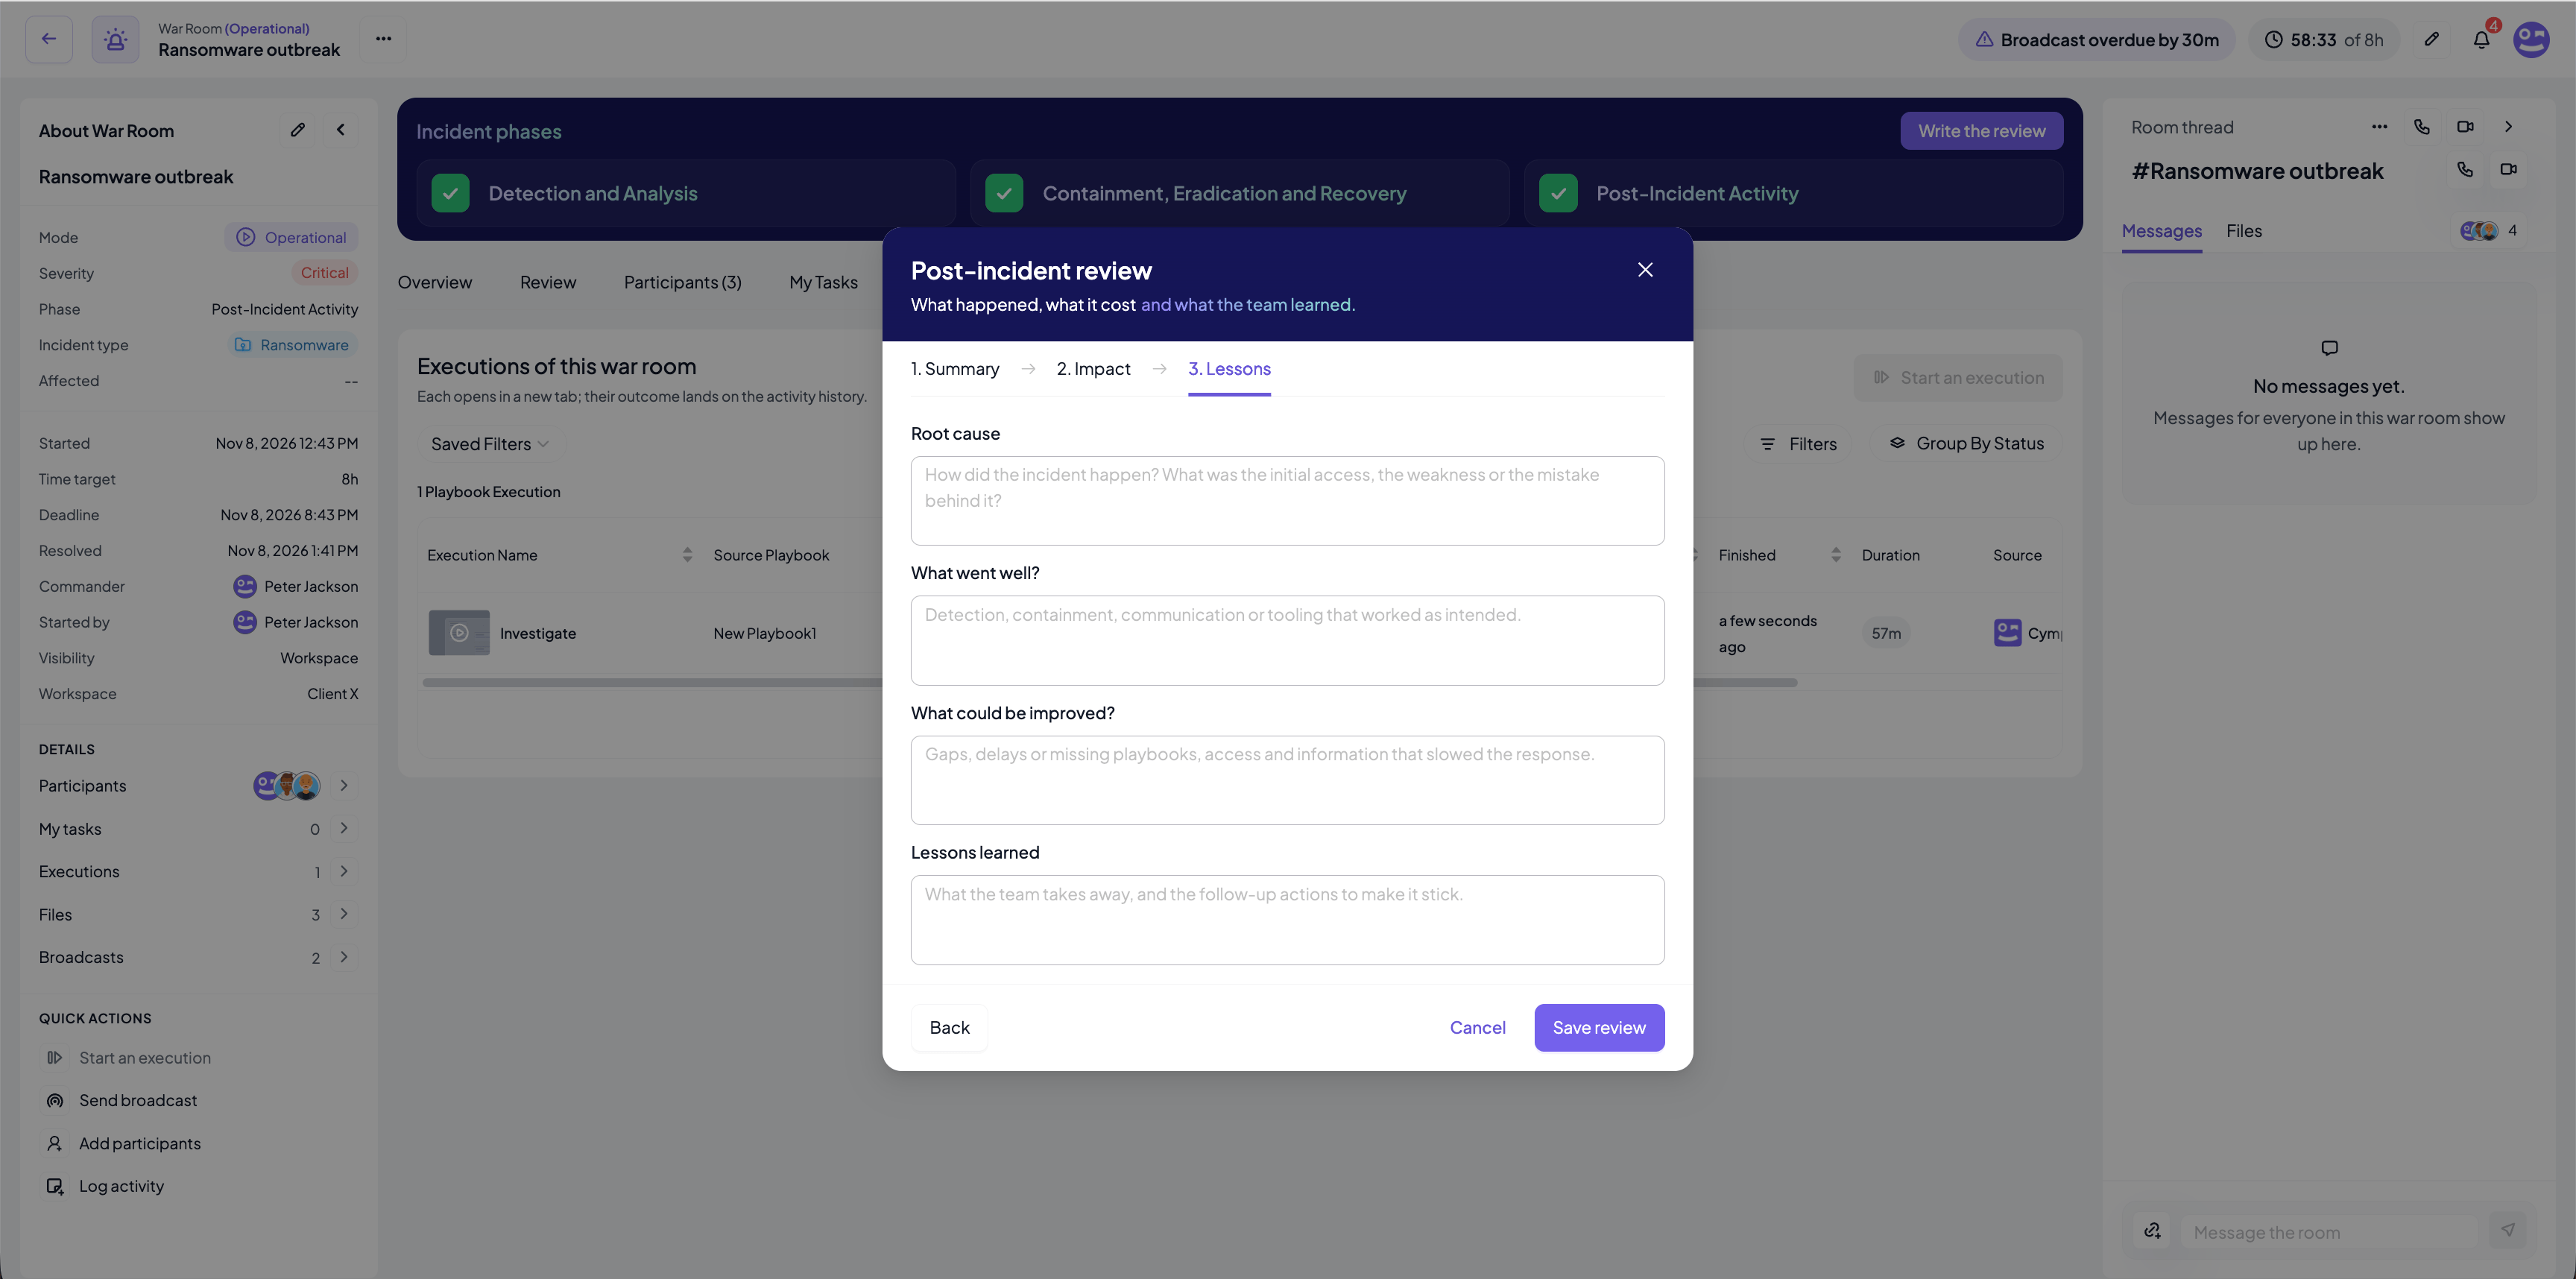
- Root cause: how the incident happened, the initial access, the weakness or the mistake behind it.
- What went well?: detection, containment, communication or tooling that worked as intended.
- What could be improved?: gaps, delays, missing playbooks, access or information that slowed the response.
- Lessons learned: what the team takes away and the follow-up actions to make it stick.
Review tab
Turning the review into playbook changes
A review is only useful once the playbooks change. Ask Cymph AI about the room, for example “What should we learn from the ransomware war room?”: the assistant finds the room, reads its review together with the improvement suggestions and final notes recorded on the executions run in it, and answers with proposed updates to the playbooks that were run or that cover this kind of incident. Each proposal opens as a review card, so you step through the changes and apply the ones you agree with. When the team had no playbook for what happened, the assistant recommends a new one and offers to draft it.Cymph AI must be enabled for your organisation. The assistant never sees a restricted room you are not seated in.
Archiving and reopening
When the incident is over and the review is written, the Incident Commander closes the room with Archive War Room from the room menu. An archived room is read-only: nobody can add participants, upload files, start executions, send broadcasts or log activity, and the room thread becomes read-only too. Guests can still be revoked, and the room can still be exported.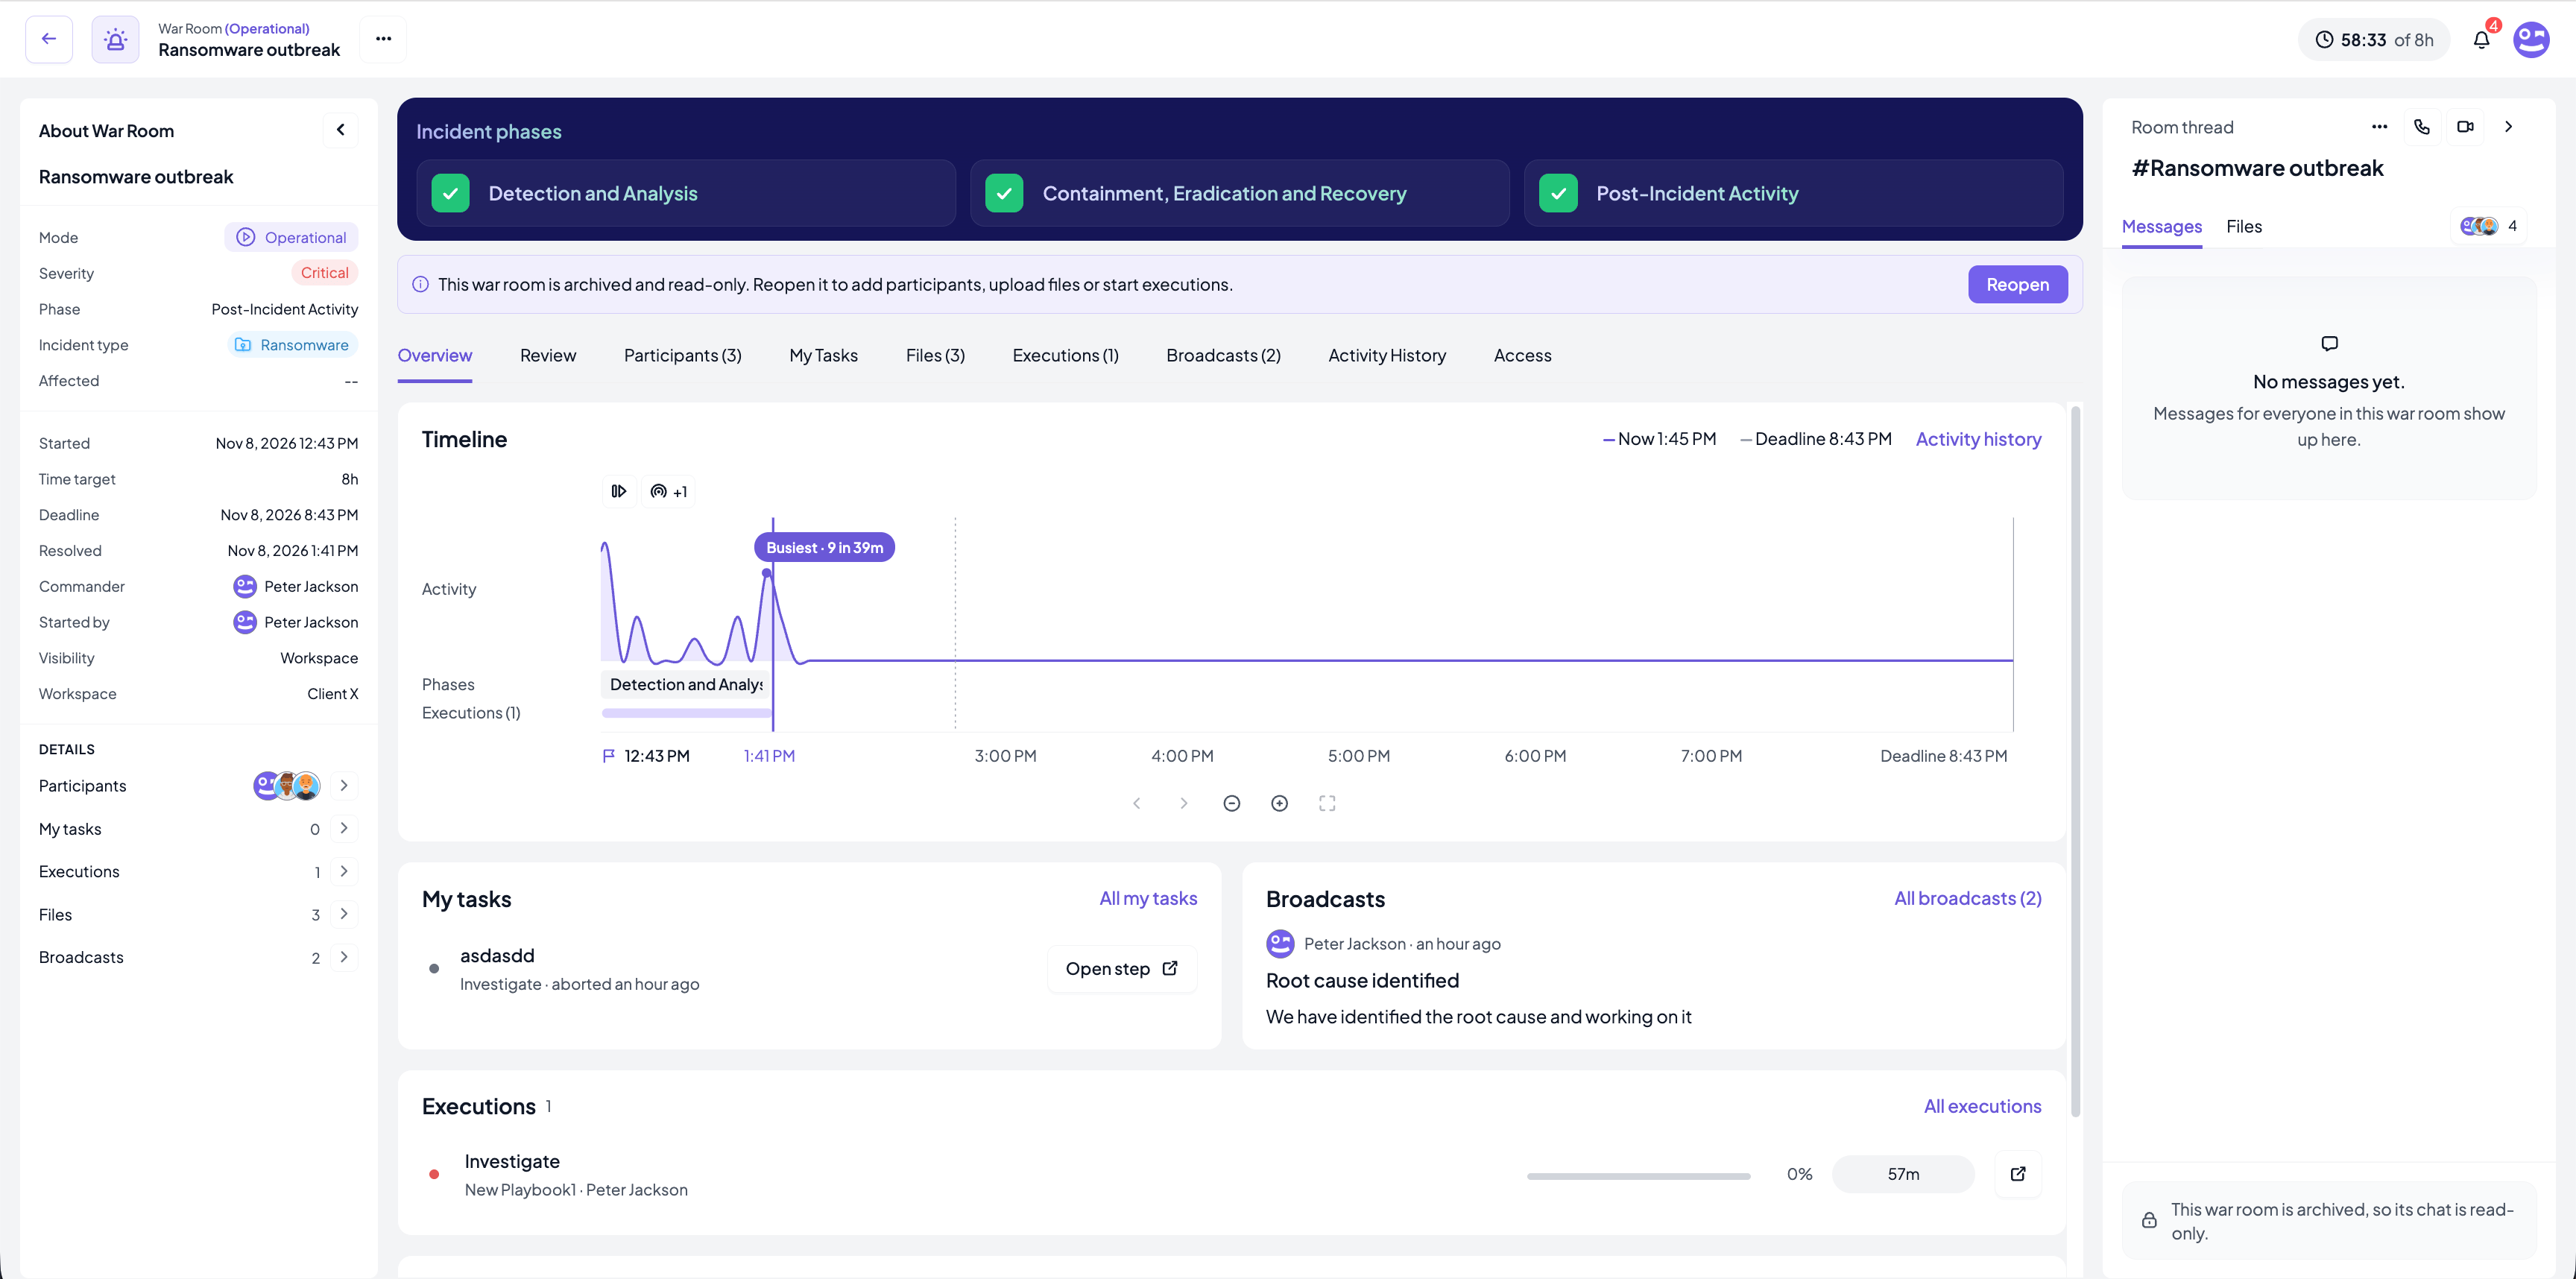
Exporting a war room
Export War Room, in the room menu or in the list, downloads a zip archive that is a self-contained record of the incident, suitable for the insurer, the regulator, auditors or a lessons-learned meeting. It contains:- The timeline report (PDF): a cover with the room facts, severity, incident type, purpose and timings, then the participants and guests, the executions, the full activity history with every file’s custody details, and the post-incident review.
- The files: every file uploaded to the room, together with an integrity list that gives, for each file, its labels, its fingerprint at upload and at export, whether the two still match, and its custody trail: who uploaded, downloaded, relabelled or deleted it, and when.
- The executions: a PDF report per execution started from the room, the same report you can download from an execution.
- The room thread: the chat as a PDF, with the files shared in it.
Notification settings
How your organisation is told about war rooms is set by an organisation admin in Organisation → Settings → Notifications, in the War Room Notification Preferences section, separately from execution and task notifications.- Channels: Email (members who have email enabled in their own notification settings are emailed when they are added to a room, and broadcasts can go out by email), SMS (Twilio) (participants are texted on the mobile phone of their profile, if they have SMS enabled in their notification settings), Slack and Microsoft Teams (room moments are announced in the configured channels, threaded per room).
- Announced in Slack and Microsoft Teams: which moments are posted: war room opened, status updates sent, severity changed, phase changed, war room archived or reopened.
- Texted to participants (SMS): which moments participants are texted about: added to a war room, severity changed, phase changed, archived or reopened. For status updates this only pre-selects SMS in the Send broadcast form; the sender can still change it.