

- Contacts: the people who can be named or called. They are Cymph users from the workspace or external people such as a customer’s staff, an incident response retainer, outside counsel or a cyber insurer.
- Decision roles: the positions that take decisions, for example Client CISO or MSSP SOC shift lead. Each role is held by one contact and has one deputy.
- Ownership matrix: the list of decisions that come up during an incident. Each decision names the role that takes it, whether the response team may act without asking first, and the roles that are told.
- Escalation ladders: one ladder per severity level, saying which roles to reach, in what order, and how long to wait before moving to the next one.
The examples on this page come from a managed security service provider (MSSP) that runs security operations for a customer, Halden Freight Group. The MSSP’s staff are Cymph users; the customer’s people and its outside advisers are external contacts. The same setup works for an enterprise that keeps an incident response retainer and outside counsel on call.
Where to find it
Ownership & Escalation is a tab of the workspace page. Open Workspaces, select the workspace and choose the Ownership & Escalation tab. Each workspace has its own contacts, roles, matrix and ladders, so an MSSP that keeps one workspace per customer has one matrix per customer. The tab has six sections, shown as tabs under the sign-off bar: Overview, Contacts, Decision roles, Ownership matrix, Escalation ladders and Activity. The number next to a section is how many entries it holds.Everyone with access to the workspace can read every section. Adding, editing and removing are for the admins and editors of the workspace. For everyone else the buttons stay visible but are greyed out, and say why on hover.
Overview
The tab opens on the Overview section, which shows at a glance how much of the matrix is filled in and what needs attention.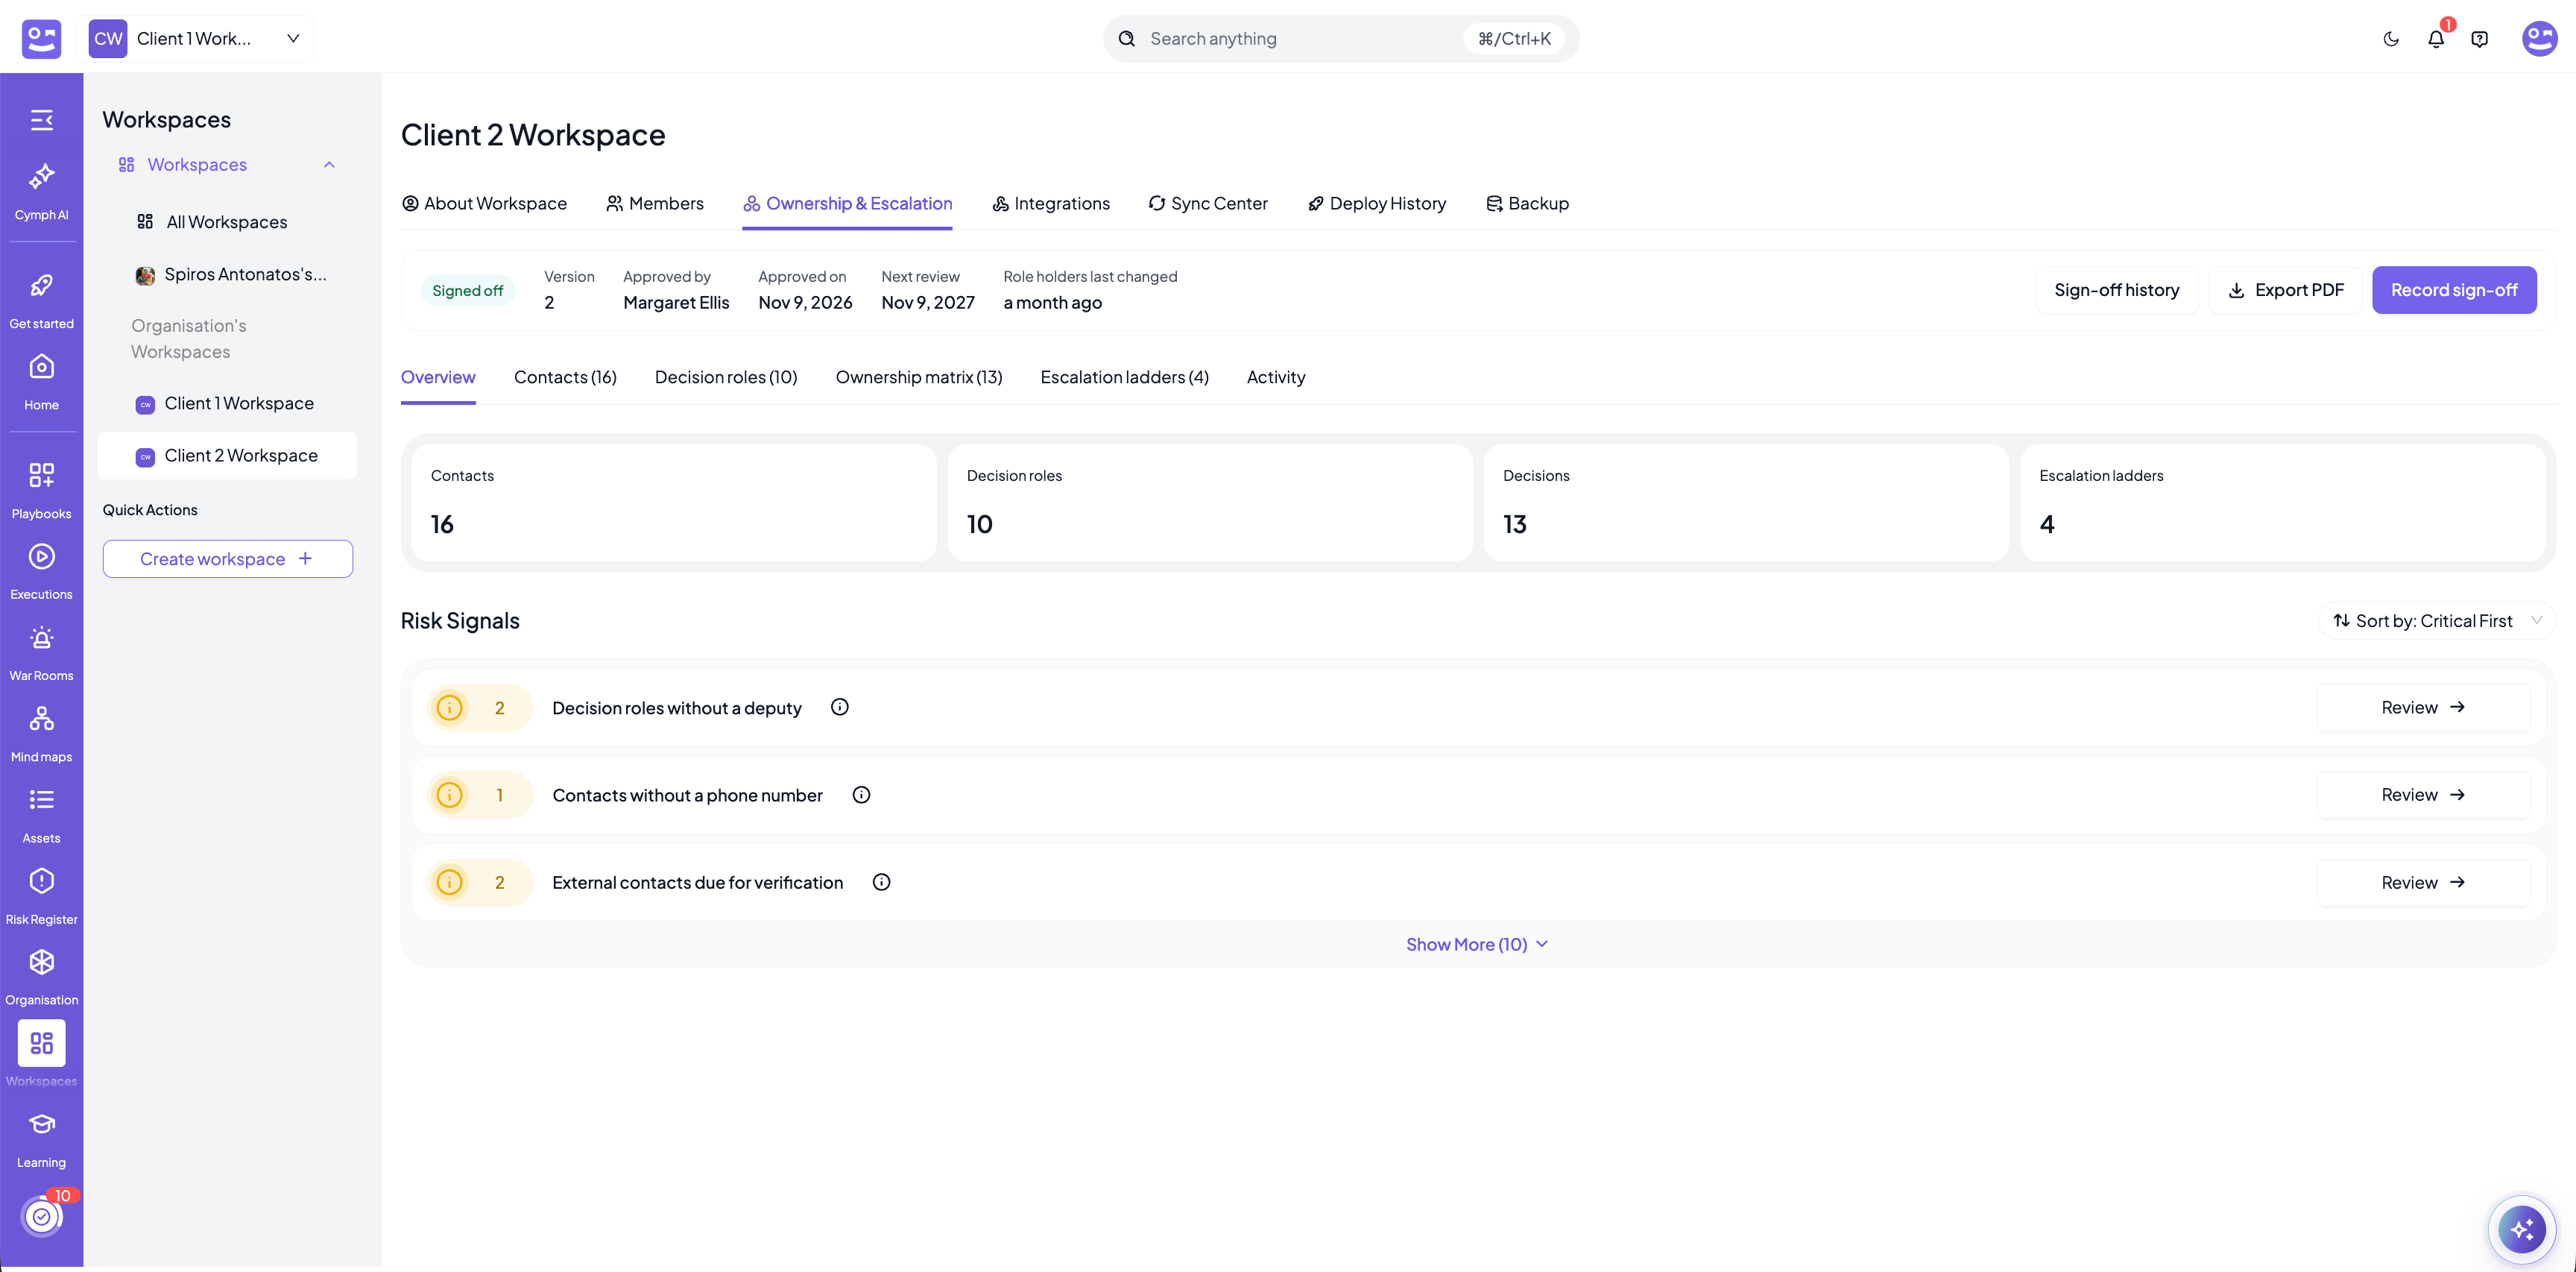
- Sign-off bar (top): whether the rules are signed off, by whom and when, and when they are due for review.
- Count tiles: the number of contacts, decision roles, decisions and escalation ladders. Click a tile to open its section.
- Risk signals: the gaps found in the contacts, roles, matrix, ladders and sign-off of the workspace, most severe first. See Risk signals.
Contacts
The Contacts section lists the people the matrix can point at. Start here: a role can only be held by someone who is a contact of the workspace.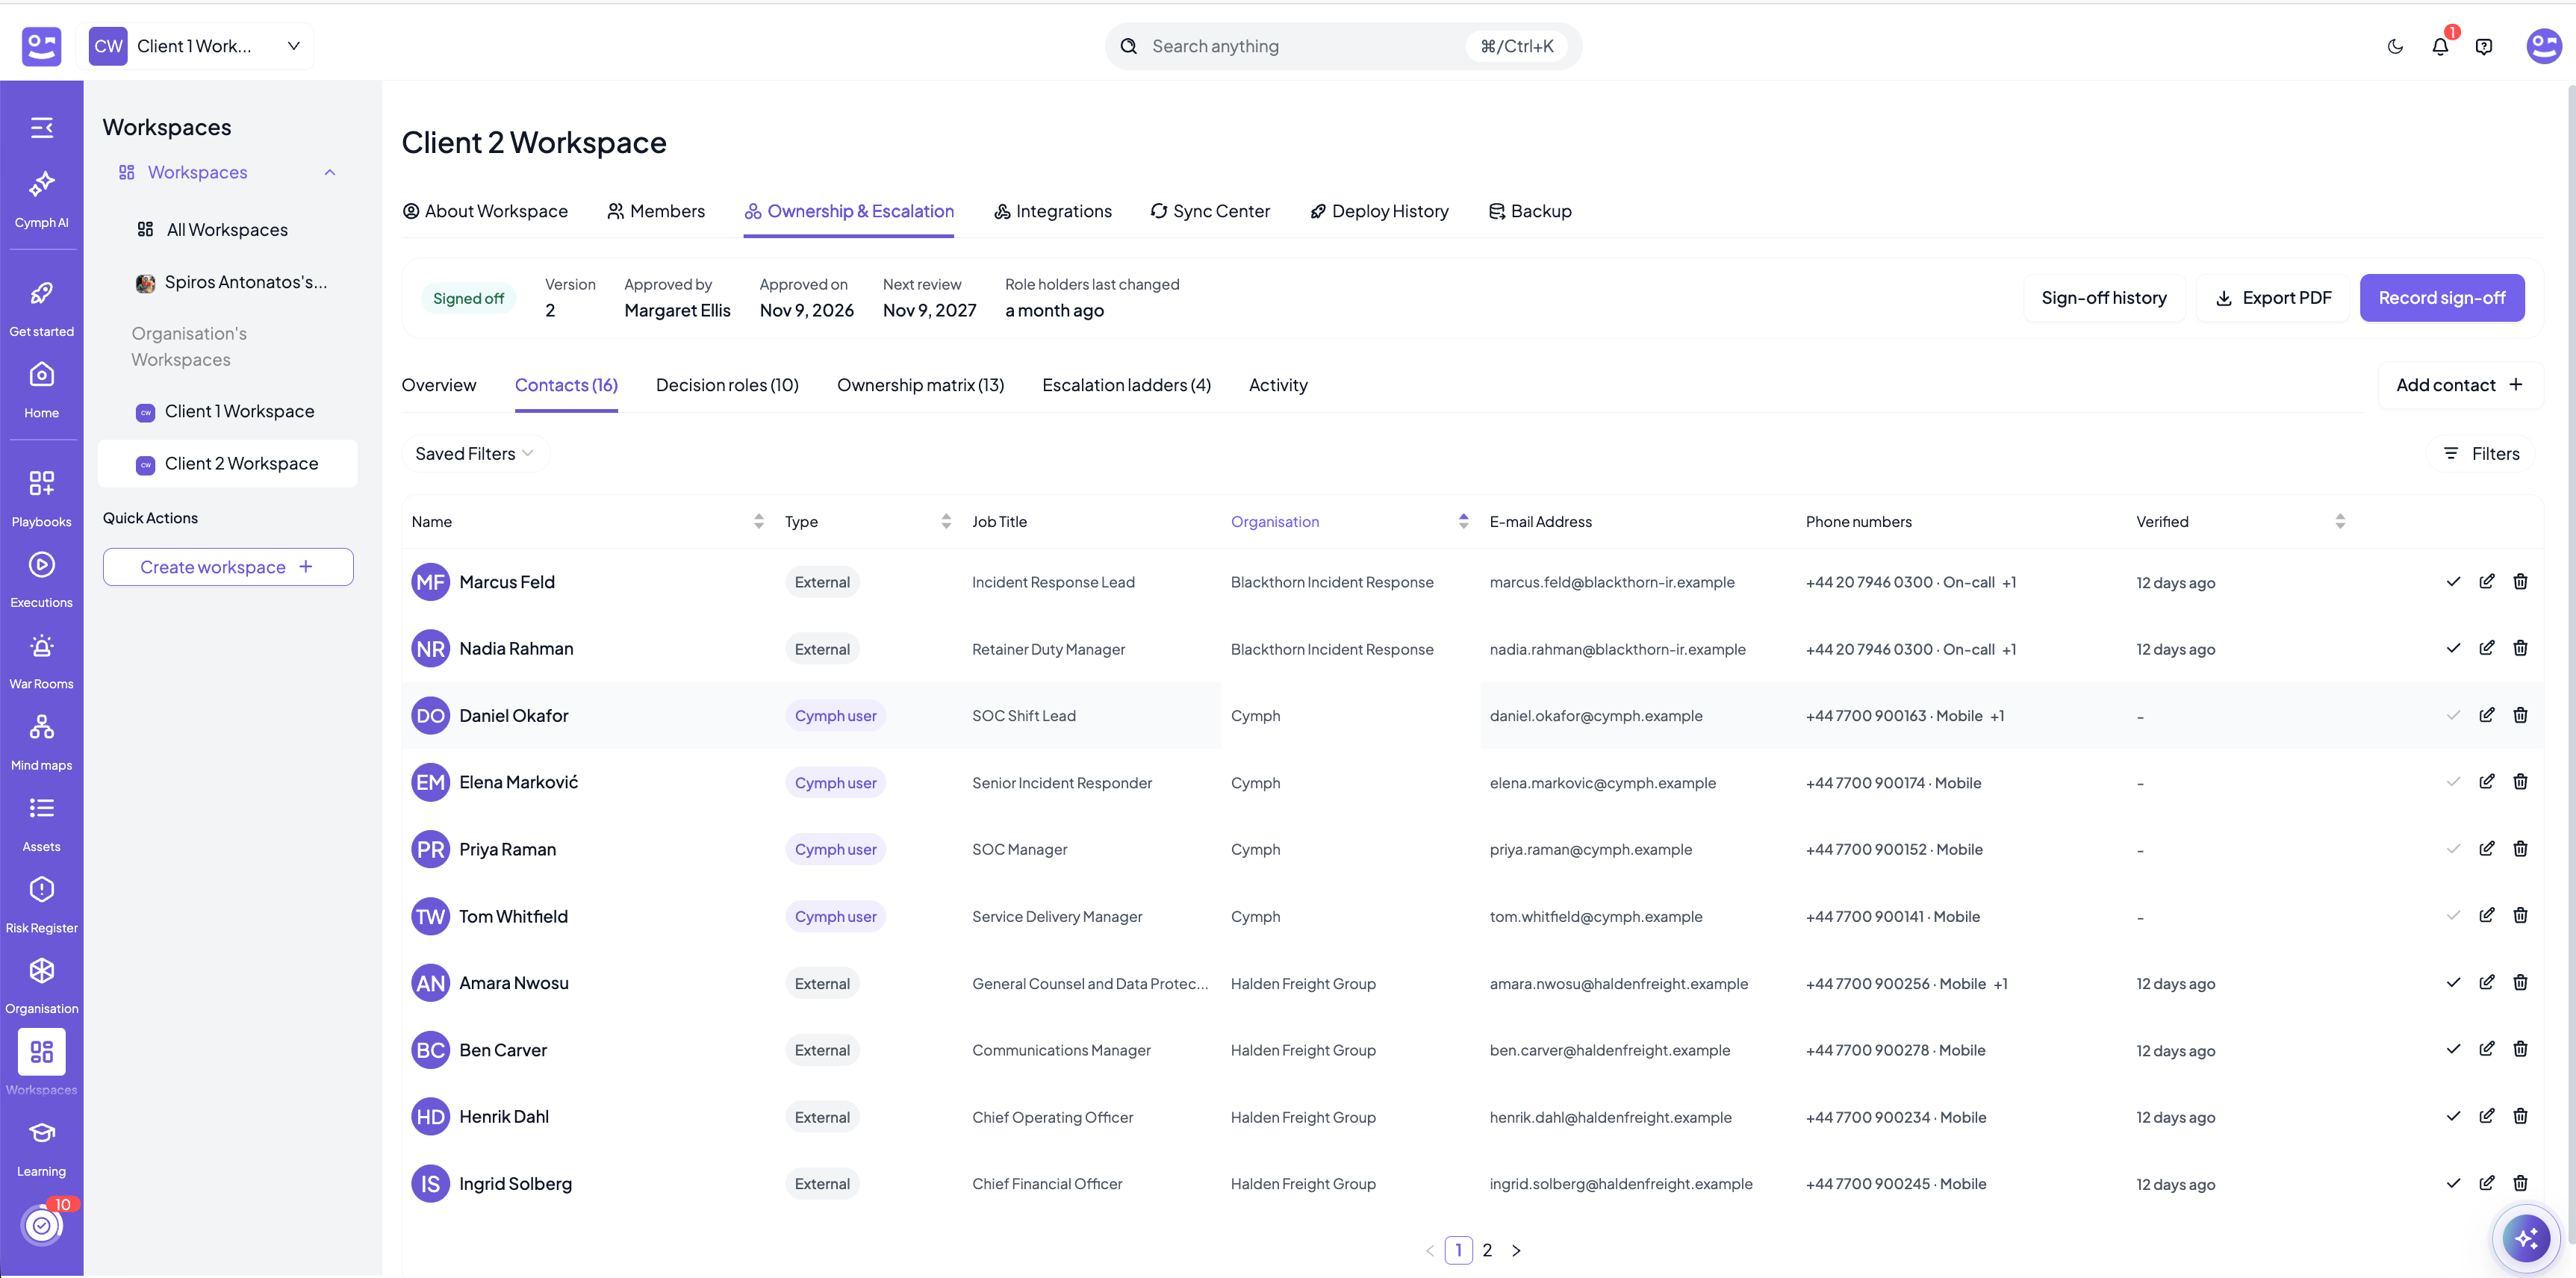
- Cymph user: a member of the workspace. The name, e-mail address, job title and mobile phone are read from the user’s profile, so a change there shows here at once. They cannot be edited on the contact.
- External: someone without a Cymph account. All details are typed in and kept by the workspace.
- Name: the name of the contact. A warning icon next to a Cymph user means they are no longer a member of the workspace.
- Type: Cymph user or External.
- Job Title and Organisation: for a Cymph user, the job title of their profile and the name of their organisation.
- E-mail Address
- Phone numbers: the number to try first, with its type. When a contact has more numbers, hover over the +1 or +2 to see them all in the order to try them. A contact nobody can call shows No phone number in the warning colour.
- Verified: for an external contact, how long ago someone confirmed the details. See Keeping external contacts verified.
Adding contacts
Press Add contact and choose the type of contact. Cymph user: pick one or more people from the members of the workspace. People who are already contacts are not offered.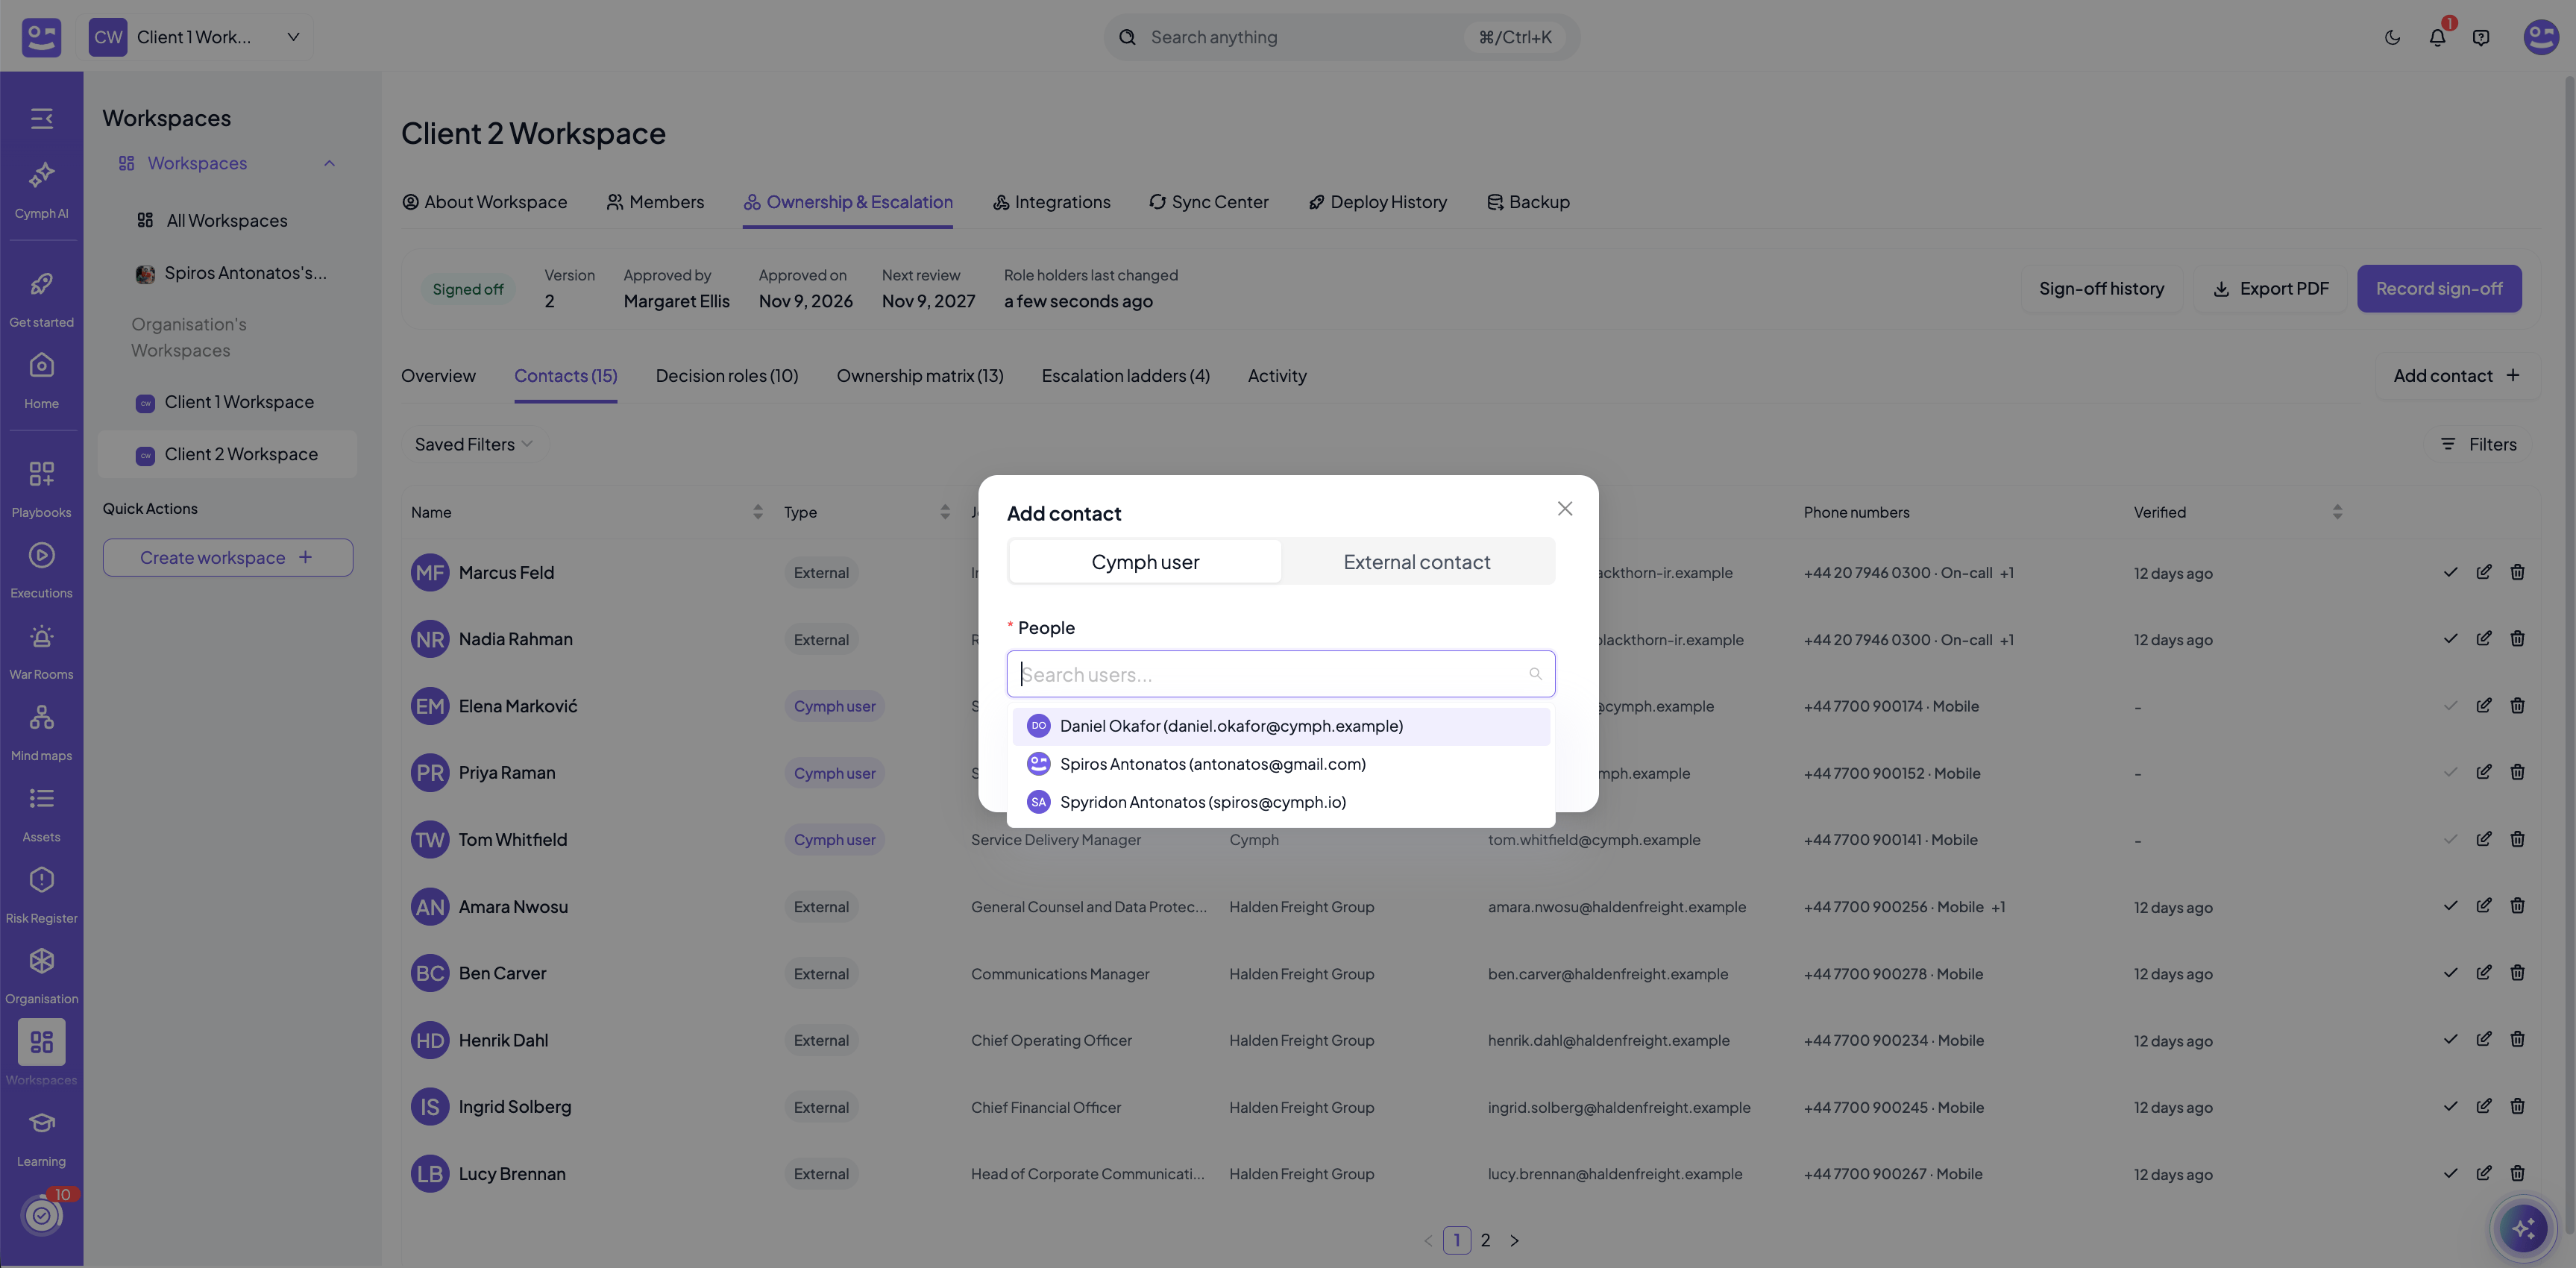
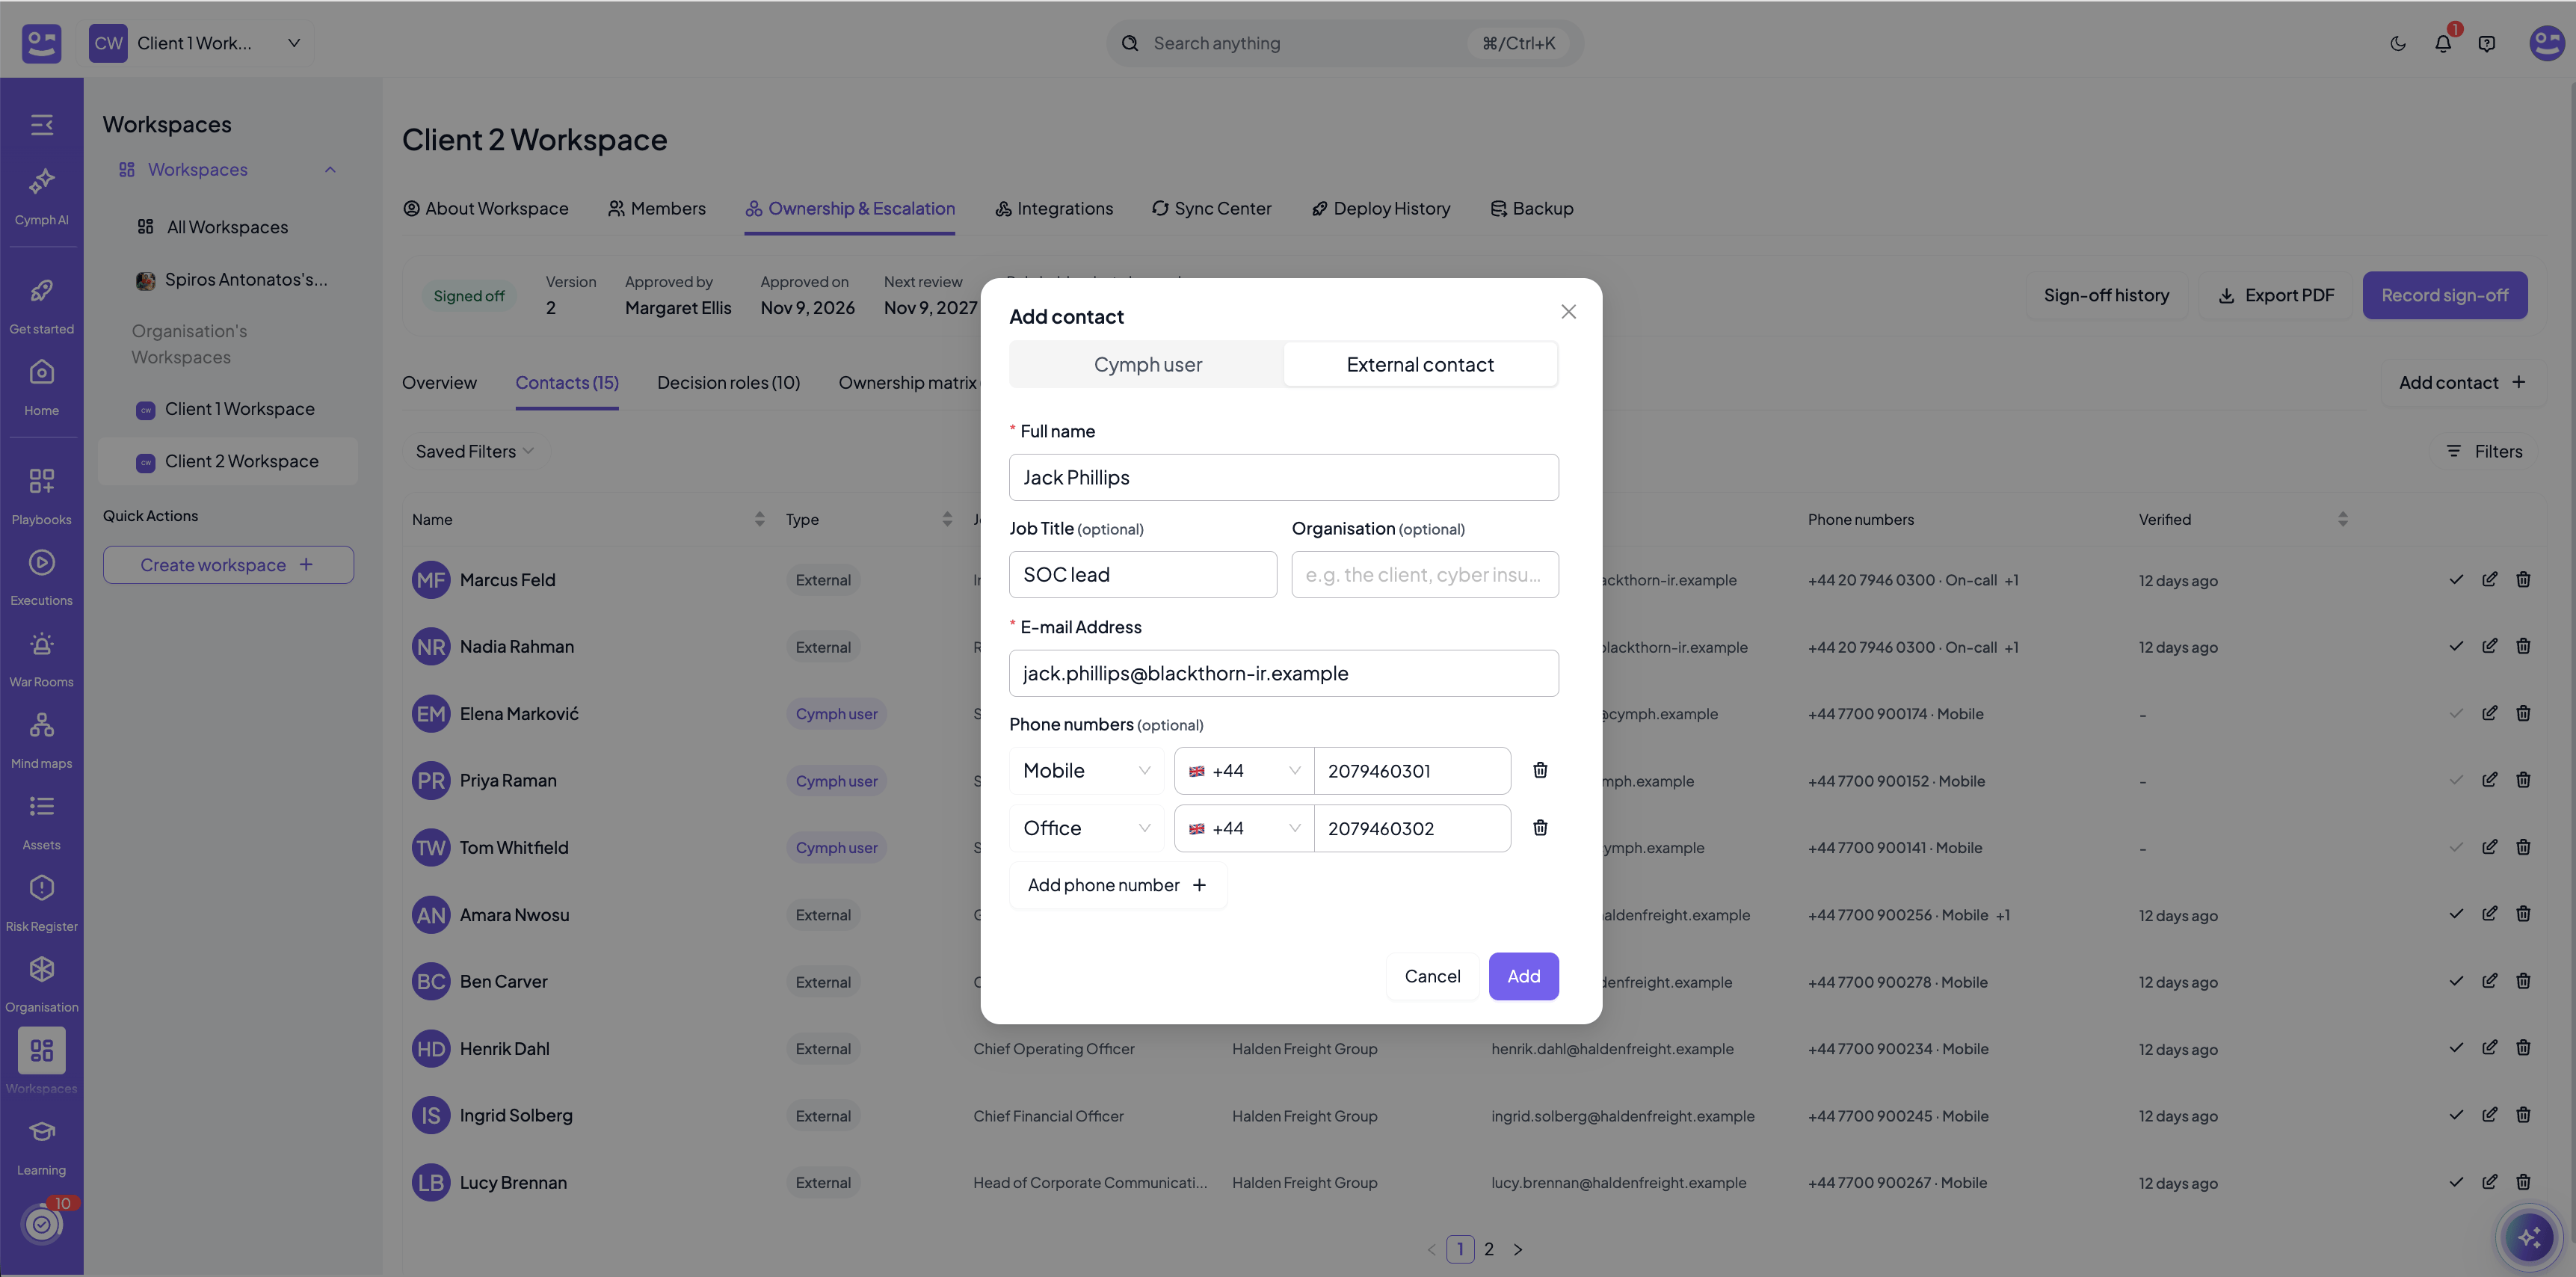
- Full name and E-mail Address are mandatory. The e-mail address must be unique among the contacts of the workspace.
- Job Title and Organisation are optional, but worth filling in: the organisation is what tells the customer’s people apart from the retainer, the insurer or outside counsel.
- Phone numbers: up to three numbers, each marked as Mobile, Office or On-call (a duty line that is answered around the clock). List them in the order they should be tried.
An e-mail address that belongs to a Cymph account cannot be used for an external contact. Add the person as a Cymph user instead, so their details always follow their profile.
Editing and removing contacts
Each row has three actions on the right:- Mark as verified: confirms that the details of an external contact are still correct.
- Edit: changes the details of an external contact. For a Cymph user it opens Edit phone numbers, where the workspace can add up to two numbers of its own (for example the SOC duty line) after the mobile phone of the profile.
- Remove: removes the contact from the workspace. The roles the contact held or deputised are left empty, which raises a risk signal until someone else is named.
Keeping external contacts verified
A phone number that was correct six months ago may ring out during an incident. External contacts therefore carry the date their details were last confirmed:- A new external contact starts out verified: whoever types the details in vouches for them.
- Changing the e-mail address or the phone numbers clears the verification, because nobody has confirmed the new details yet.
- After 90 days the contact shows Verification due.
Decision roles
The matrix never points at a person directly. It points at a decision role, and the role says who holds it today. When someone changes job or leaves, you name a new holder on the role and every decision and escalation ladder that uses the role follows, without touching the approved rules.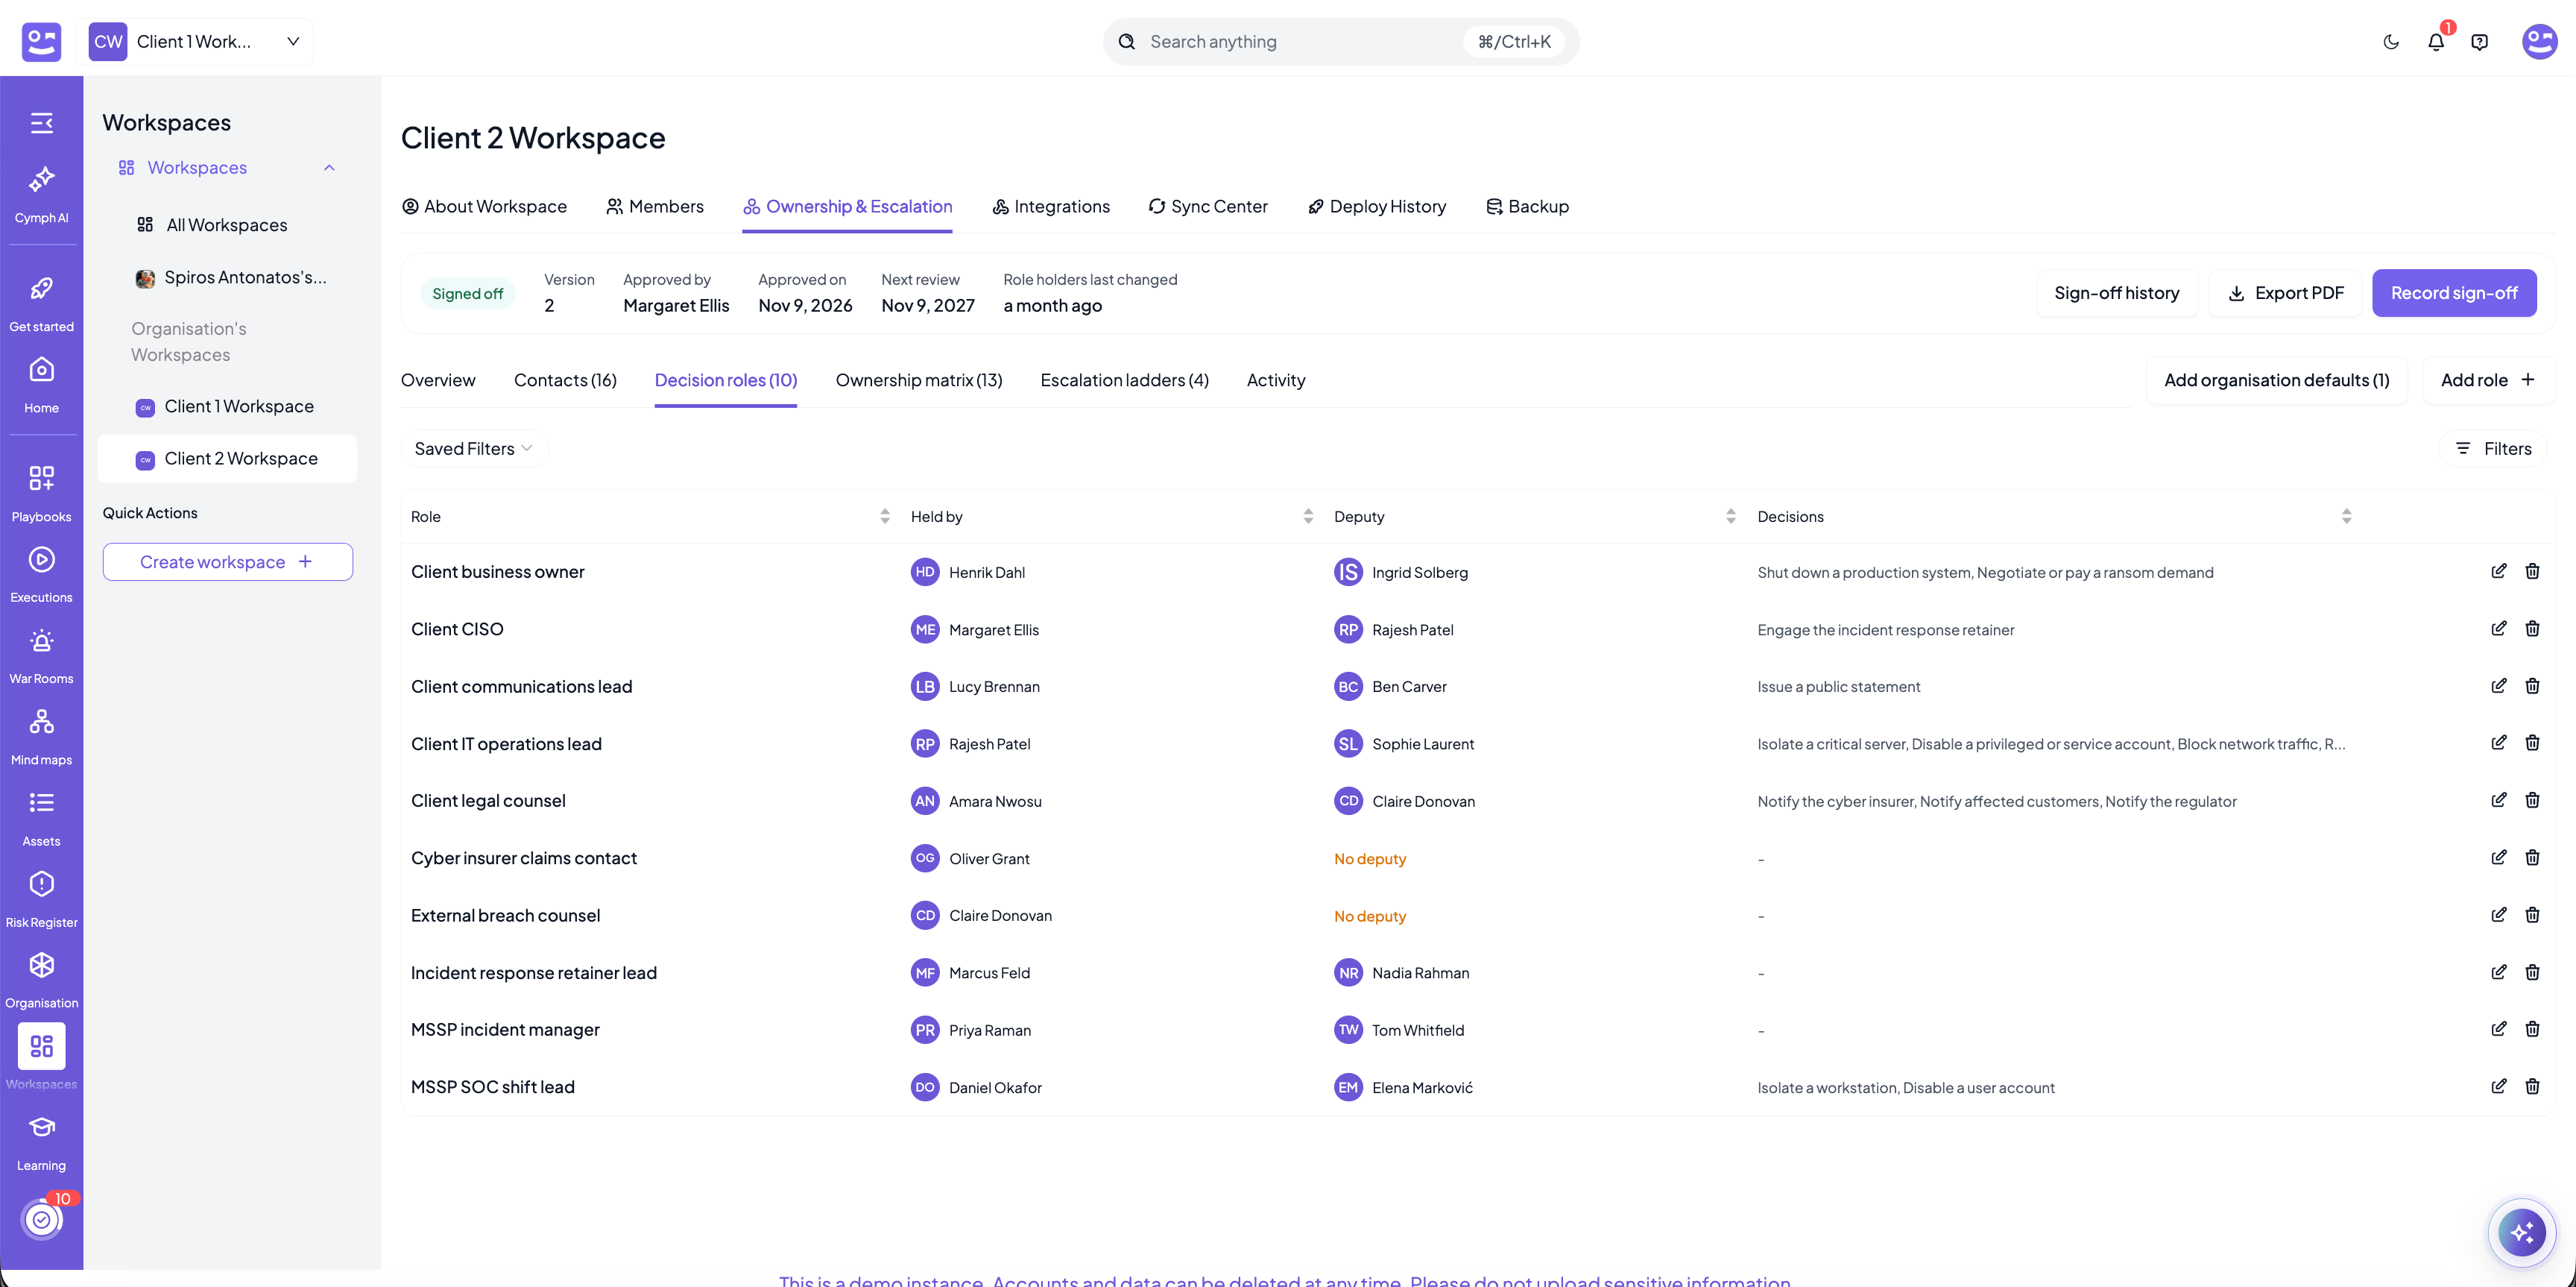
- Role: the name of the role. Name it after the position, not the person, for example Client CISO or MSSP incident manager.
- Held by: the contact who takes the role’s decisions. A role nobody holds shows No holder in the warning colour.
- Deputy: the contact who decides when the holder cannot be reached. A role without one shows No deputy.
- Decisions: the decisions of the ownership matrix that this role owns.
Adding a role
Press Add role.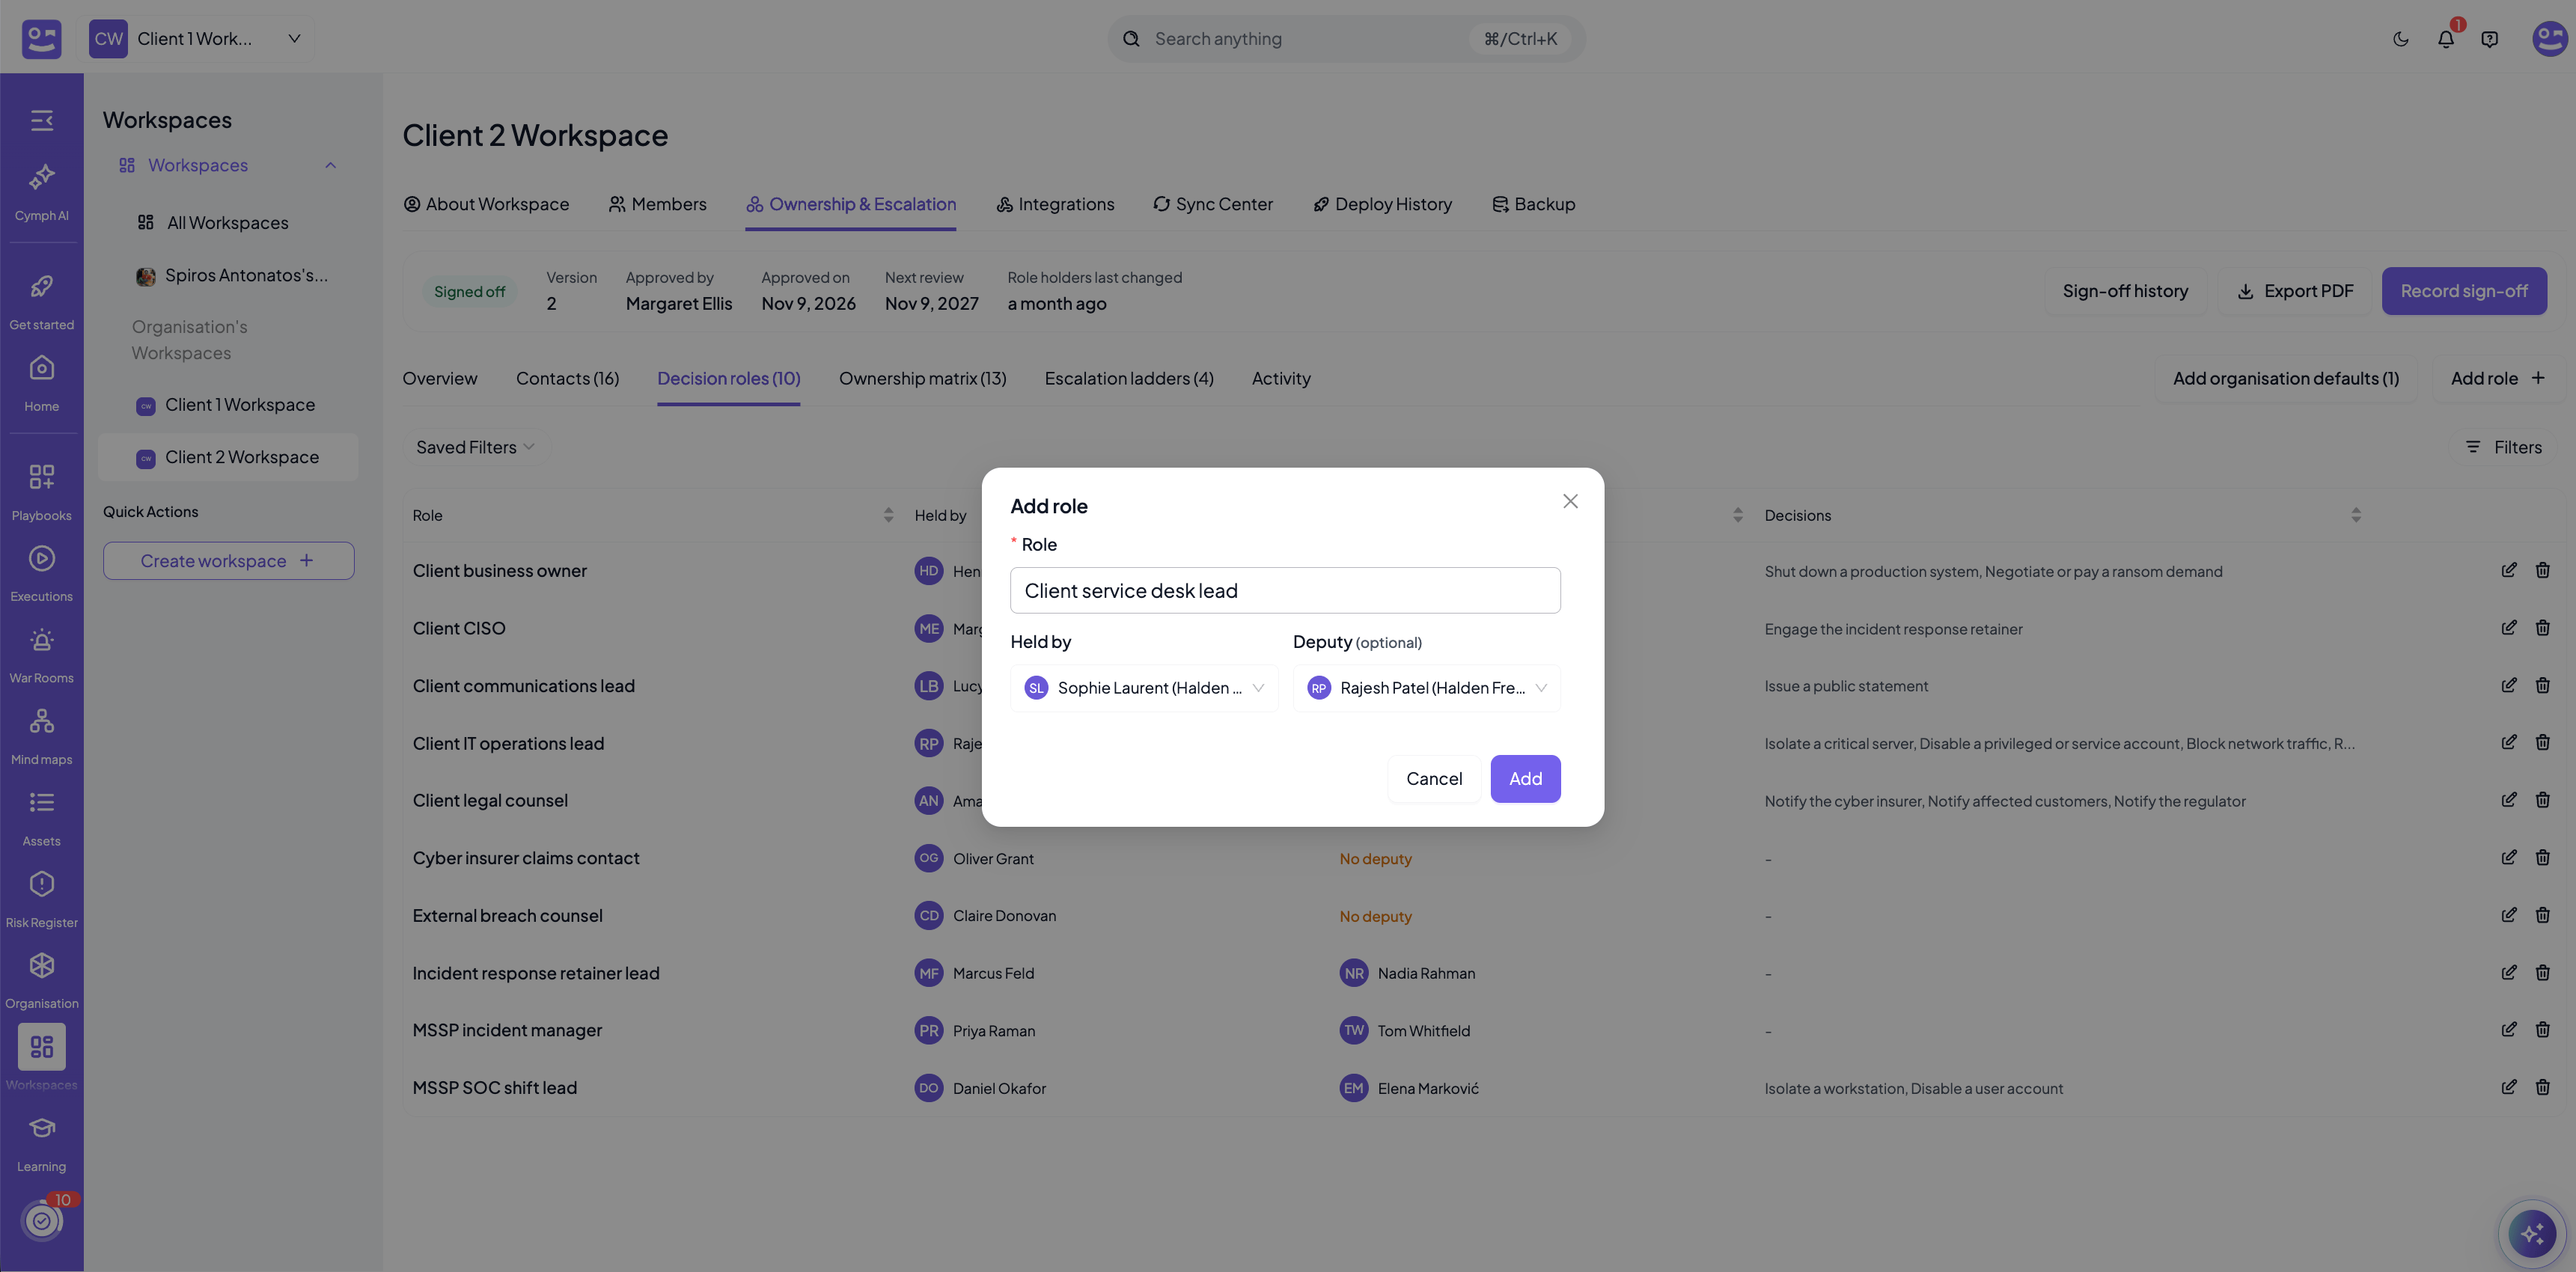
- Role: the name of the role. It must be unique in the workspace.
- Held by and Deputy: both are picked from the contacts of the workspace, and both are optional so a role can be created before it is known who fills it. The deputy must be a different person from the holder. The same contact can hold or deputise several roles.
Editing and removing roles
- Edit: renames the role or changes its holder and deputy. Changing who holds a role does not need a new sign-off; the sign-off bar shows when role holders last changed.
- Remove: removes the role. The decisions it owned are left without an owner and the role is taken out of the escalation ladders it was a step of, so check both afterwards.
Adding the organisation’s default roles
An organisation can define a standard set of decision roles that its workspaces start from. When the organisation has default roles that the workspace does not have yet, the Add organisation defaults button appears next to Add role, with the number of roles waiting. Pressing it copies them into the workspace with nobody holding them, ready for you to name the holder and deputy. See Organisation defaults. Decision roles raise two risk signals: roles nobody holds and roles without a deputy. See Risk signals.Ownership matrix
The Ownership matrix section is the heart of the feature: one row per decision that may have to be taken during an incident, with who takes it, whether the response team has to ask first, and who is told.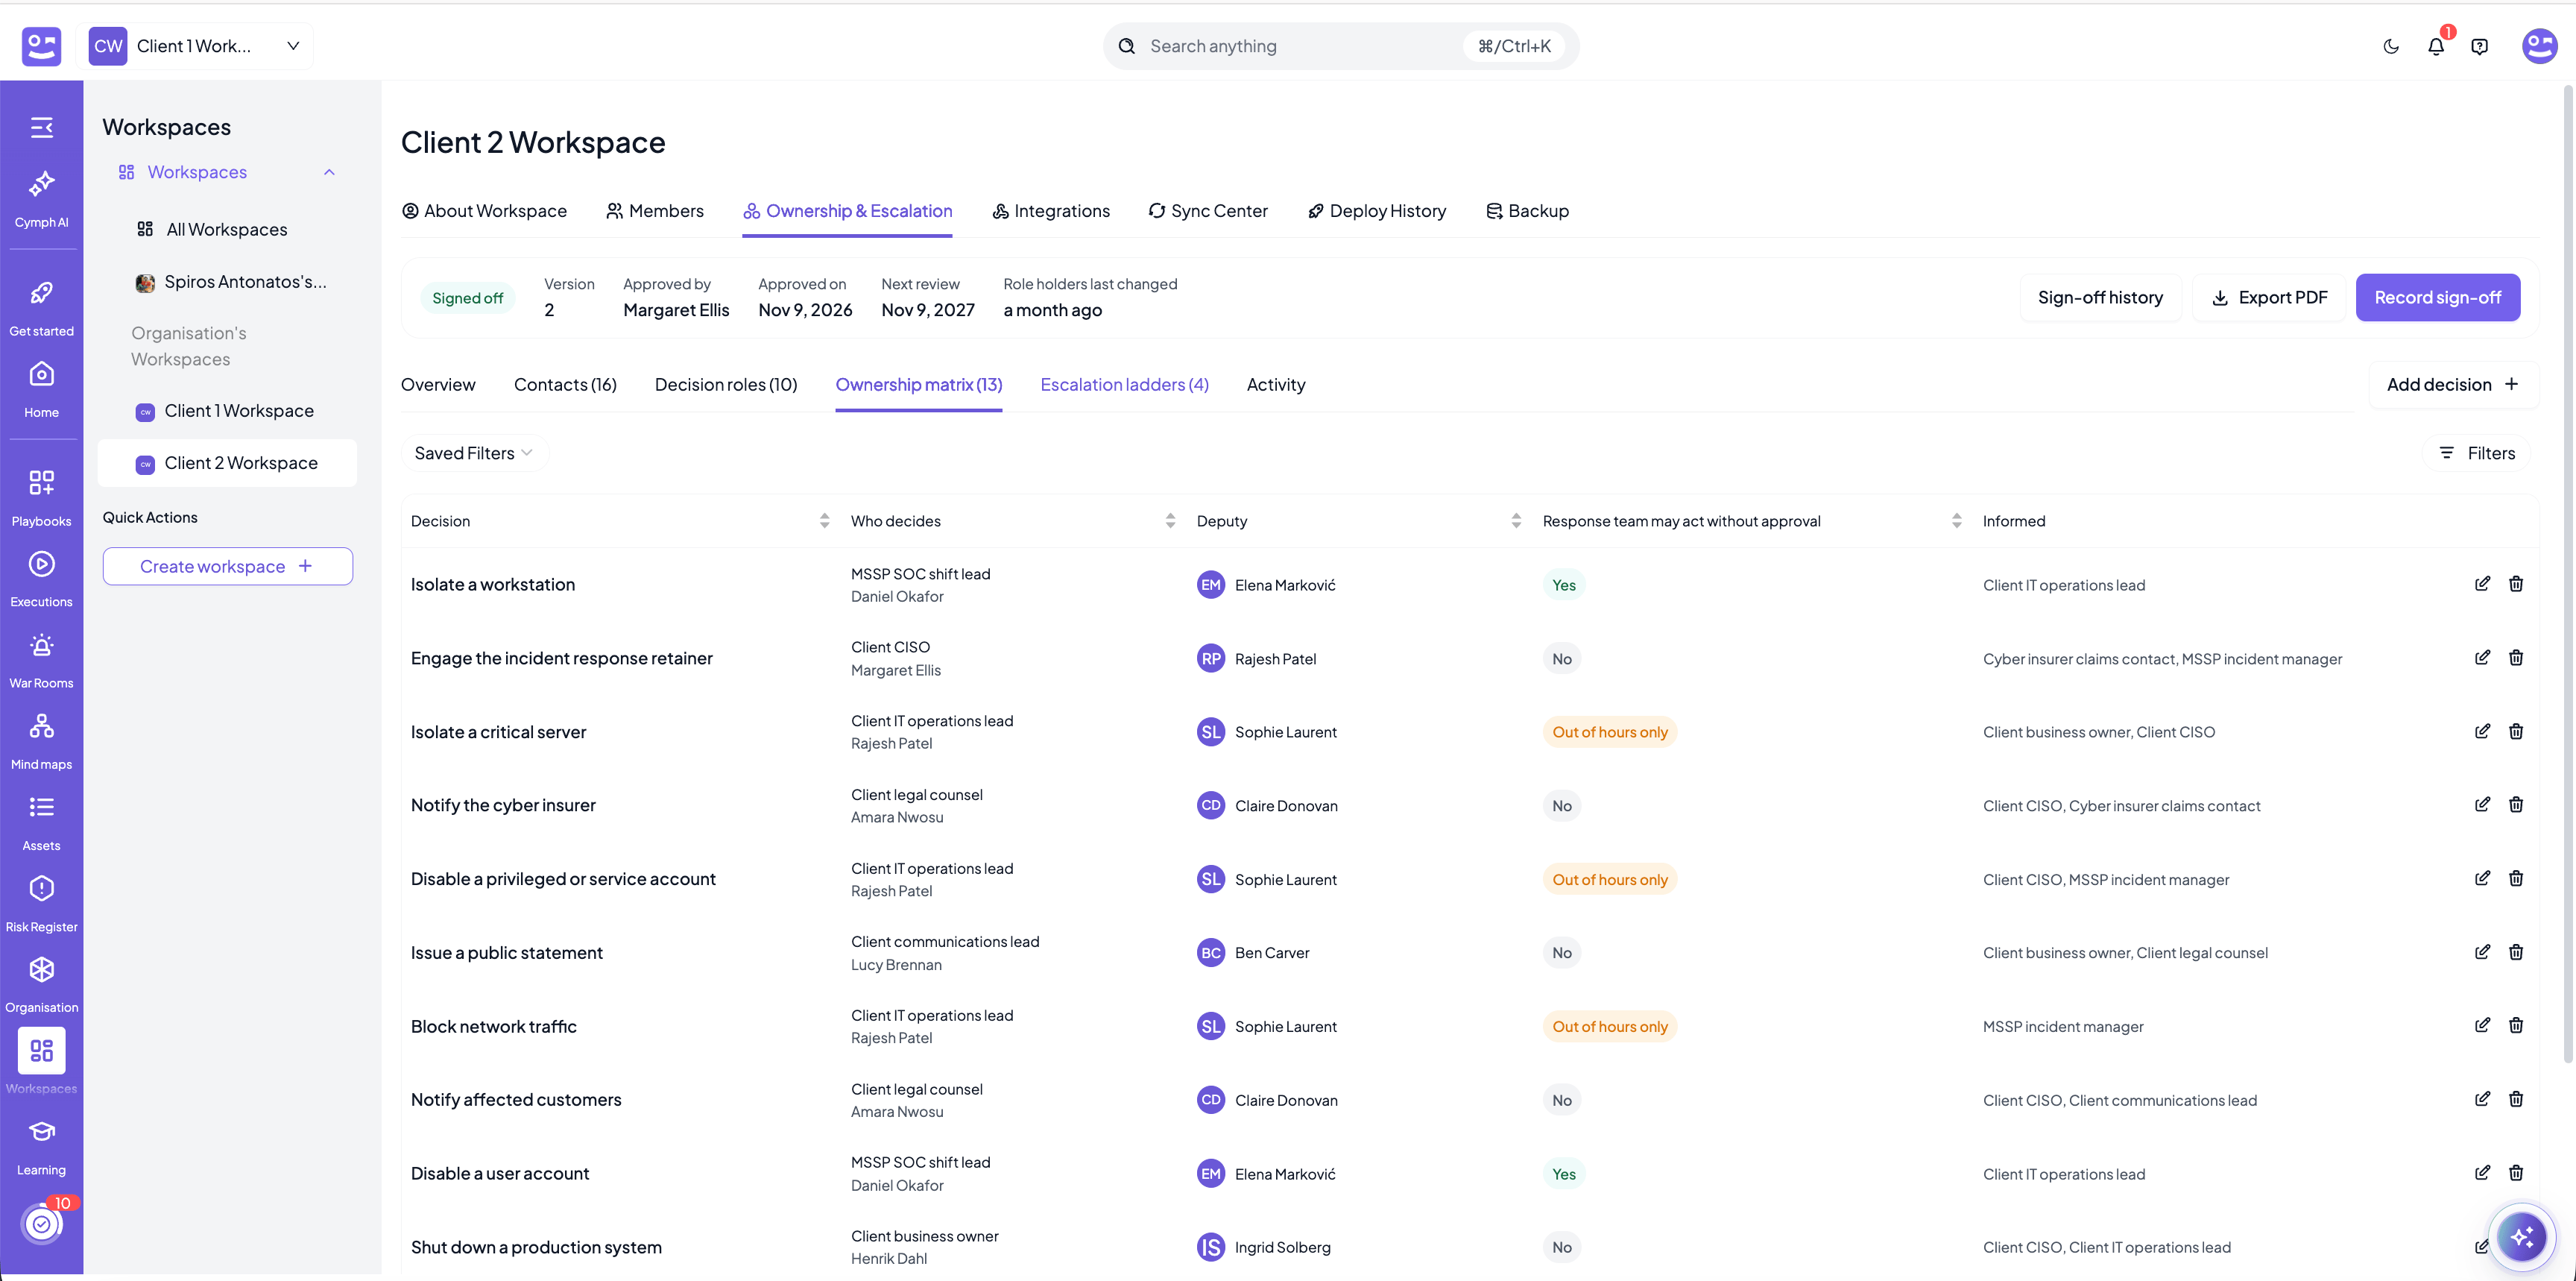
- Decision: what has to be decided, for example Isolate a critical server or Notify the regulator.
- Who decides: the decision role that owns the decision, with the contact who holds it underneath. A decision no role owns shows No owner in the warning colour.
- Deputy: the deputy of that role. It is set on the role, not on the decision.
- Response team may act without approval: the pre-authorisation of the decision.
- No: the response team must get the approval of the owner (or the deputy) before acting.
- Out of hours only: approval is needed during working hours; outside them the team may act and report afterwards.
- Yes: the decision is pre-authorised. The team acts straight away and the owner is told.
- Informed: the roles that are told once the decision is taken. They are not asked.
Adding a decision
Press Add decision.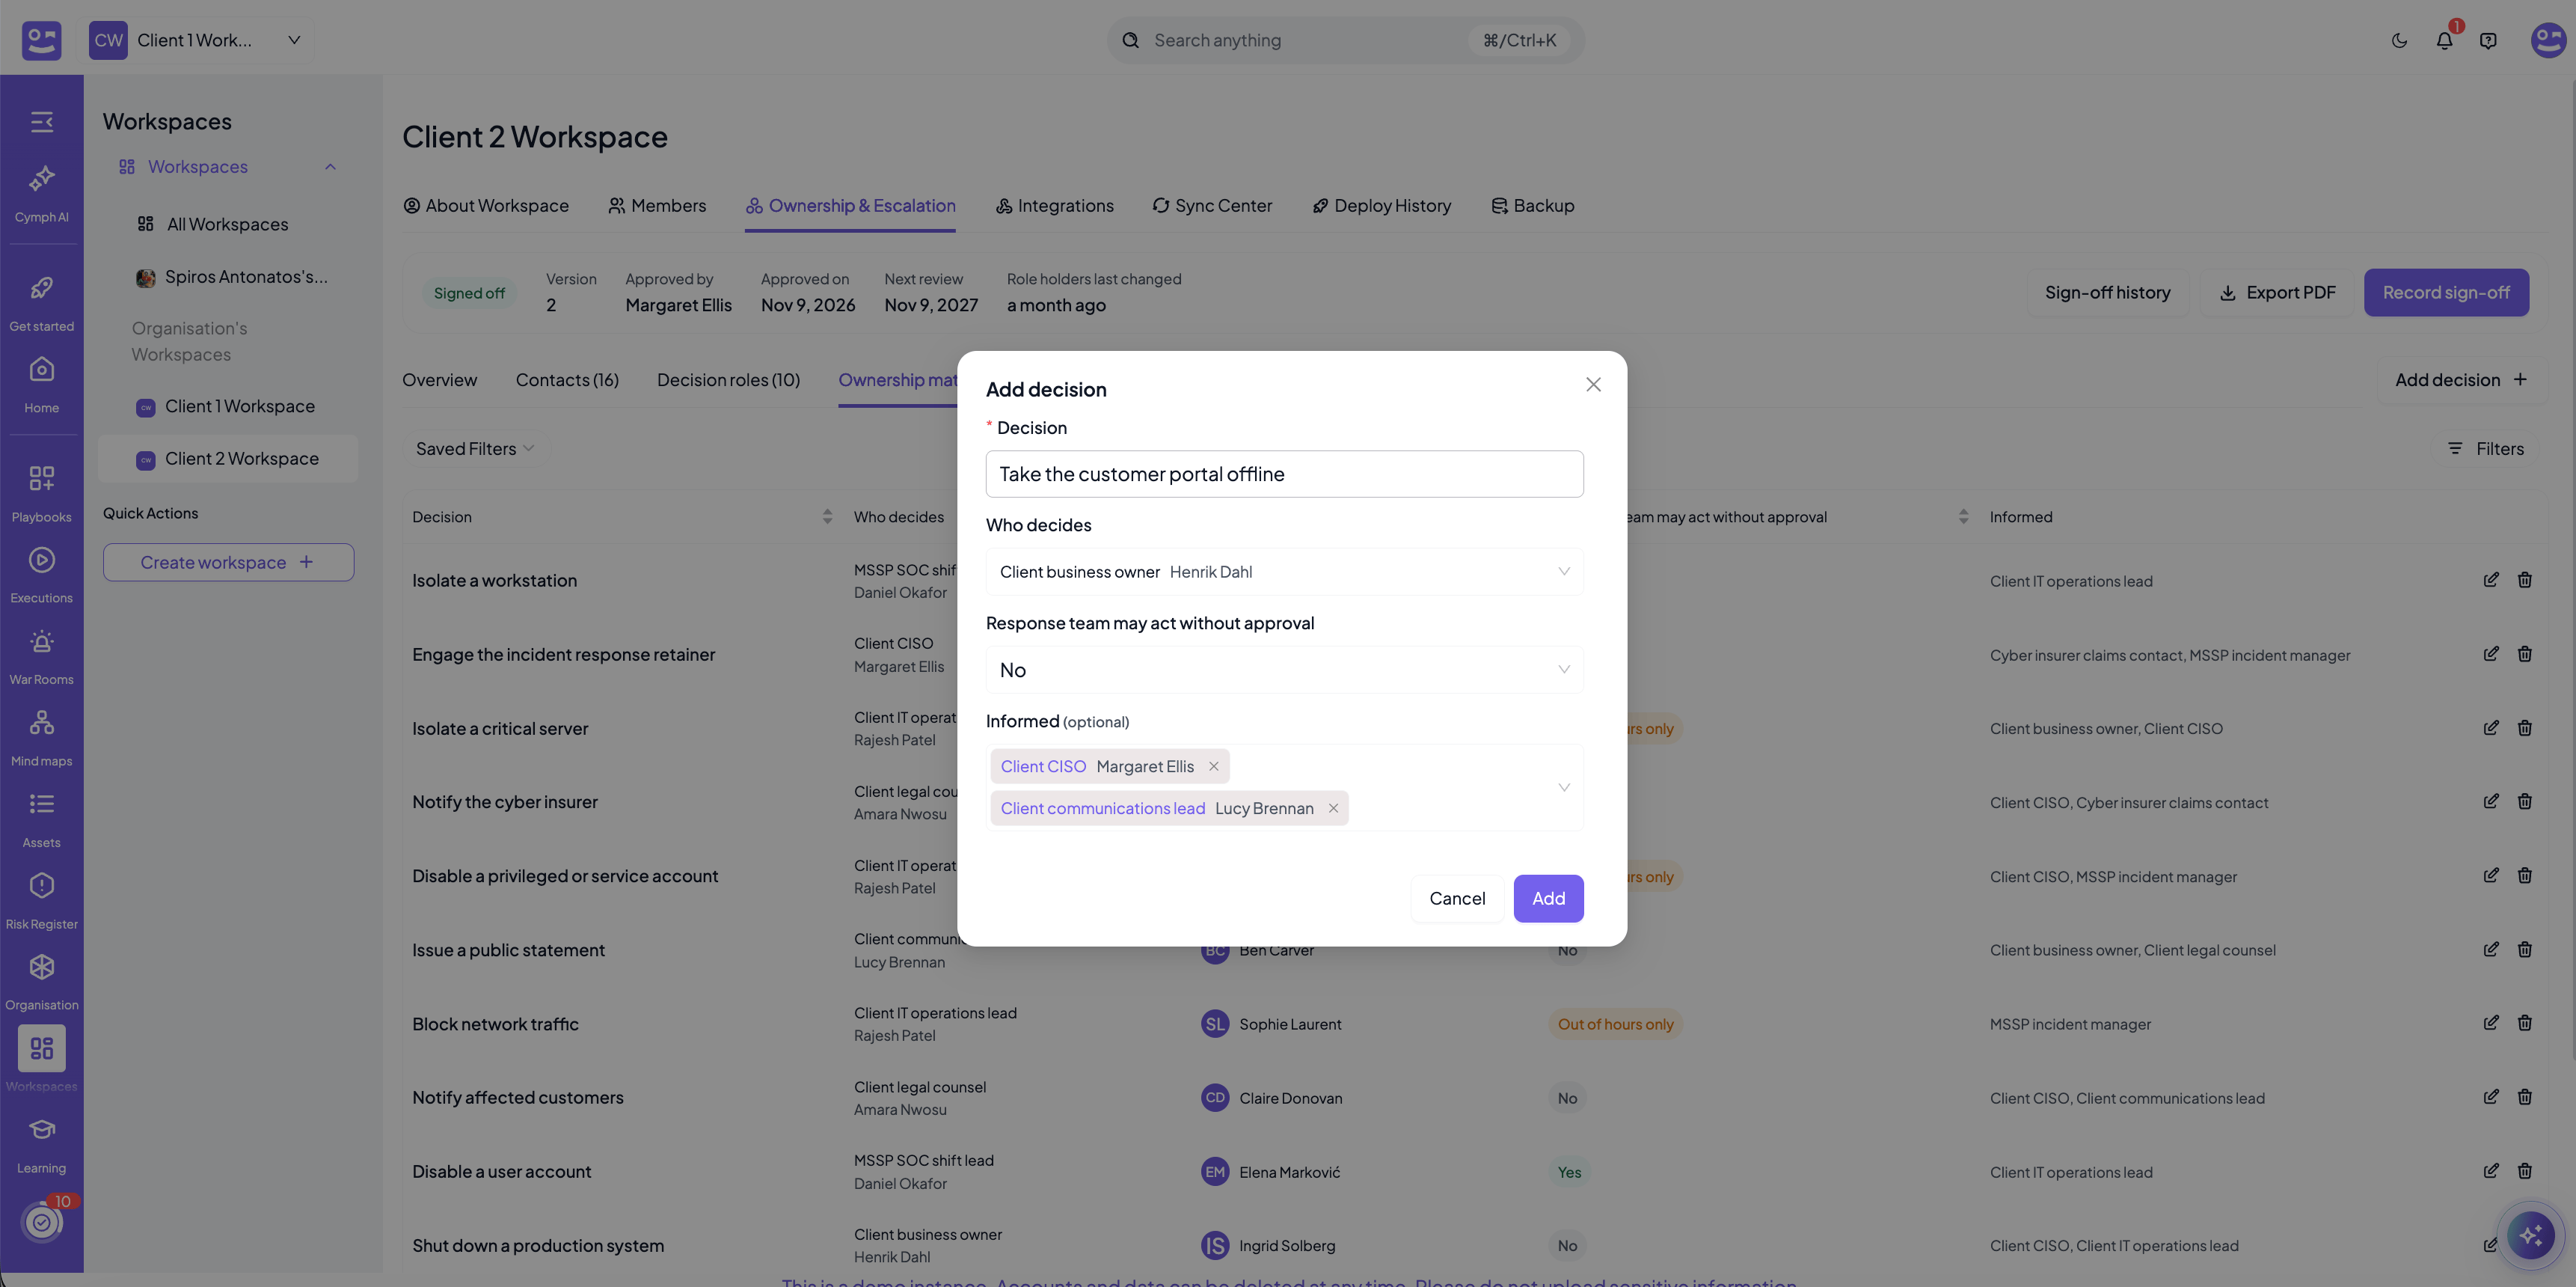
- Decision: the name of the decision. It must be unique in the workspace. Phrase it as the action being approved.
- Who decides: the decision role that owns it. It can be left empty while the matrix is being drafted, but a decision without an owner raises a critical risk signal.
- Response team may act without approval: No, Out of hours only or Yes.
- Informed (optional): the roles to tell.
Editing and removing decisions
- Edit: changes the name, owner, pre-authorisation or informed roles. These are the rules that get approved, so any change shows in the sign-off bar as Changed since sign-off until a new sign-off is recorded.
- Remove: removes the decision from the matrix. Before you confirm, the dialog lists the playbooks with a step that calls for the decision and the executions in progress with such a step, so you can see what the removal touches. In the playbook editor, a step whose decision was removed is marked Decision removed until another decision is picked.
Escalation ladders
The ownership matrix says who decides. The Escalation ladders section says who to call, and in what order, when an incident needs attention and nobody is answering. There is one ladder per severity level (Critical, High, Medium and Low), the same levels a war room uses.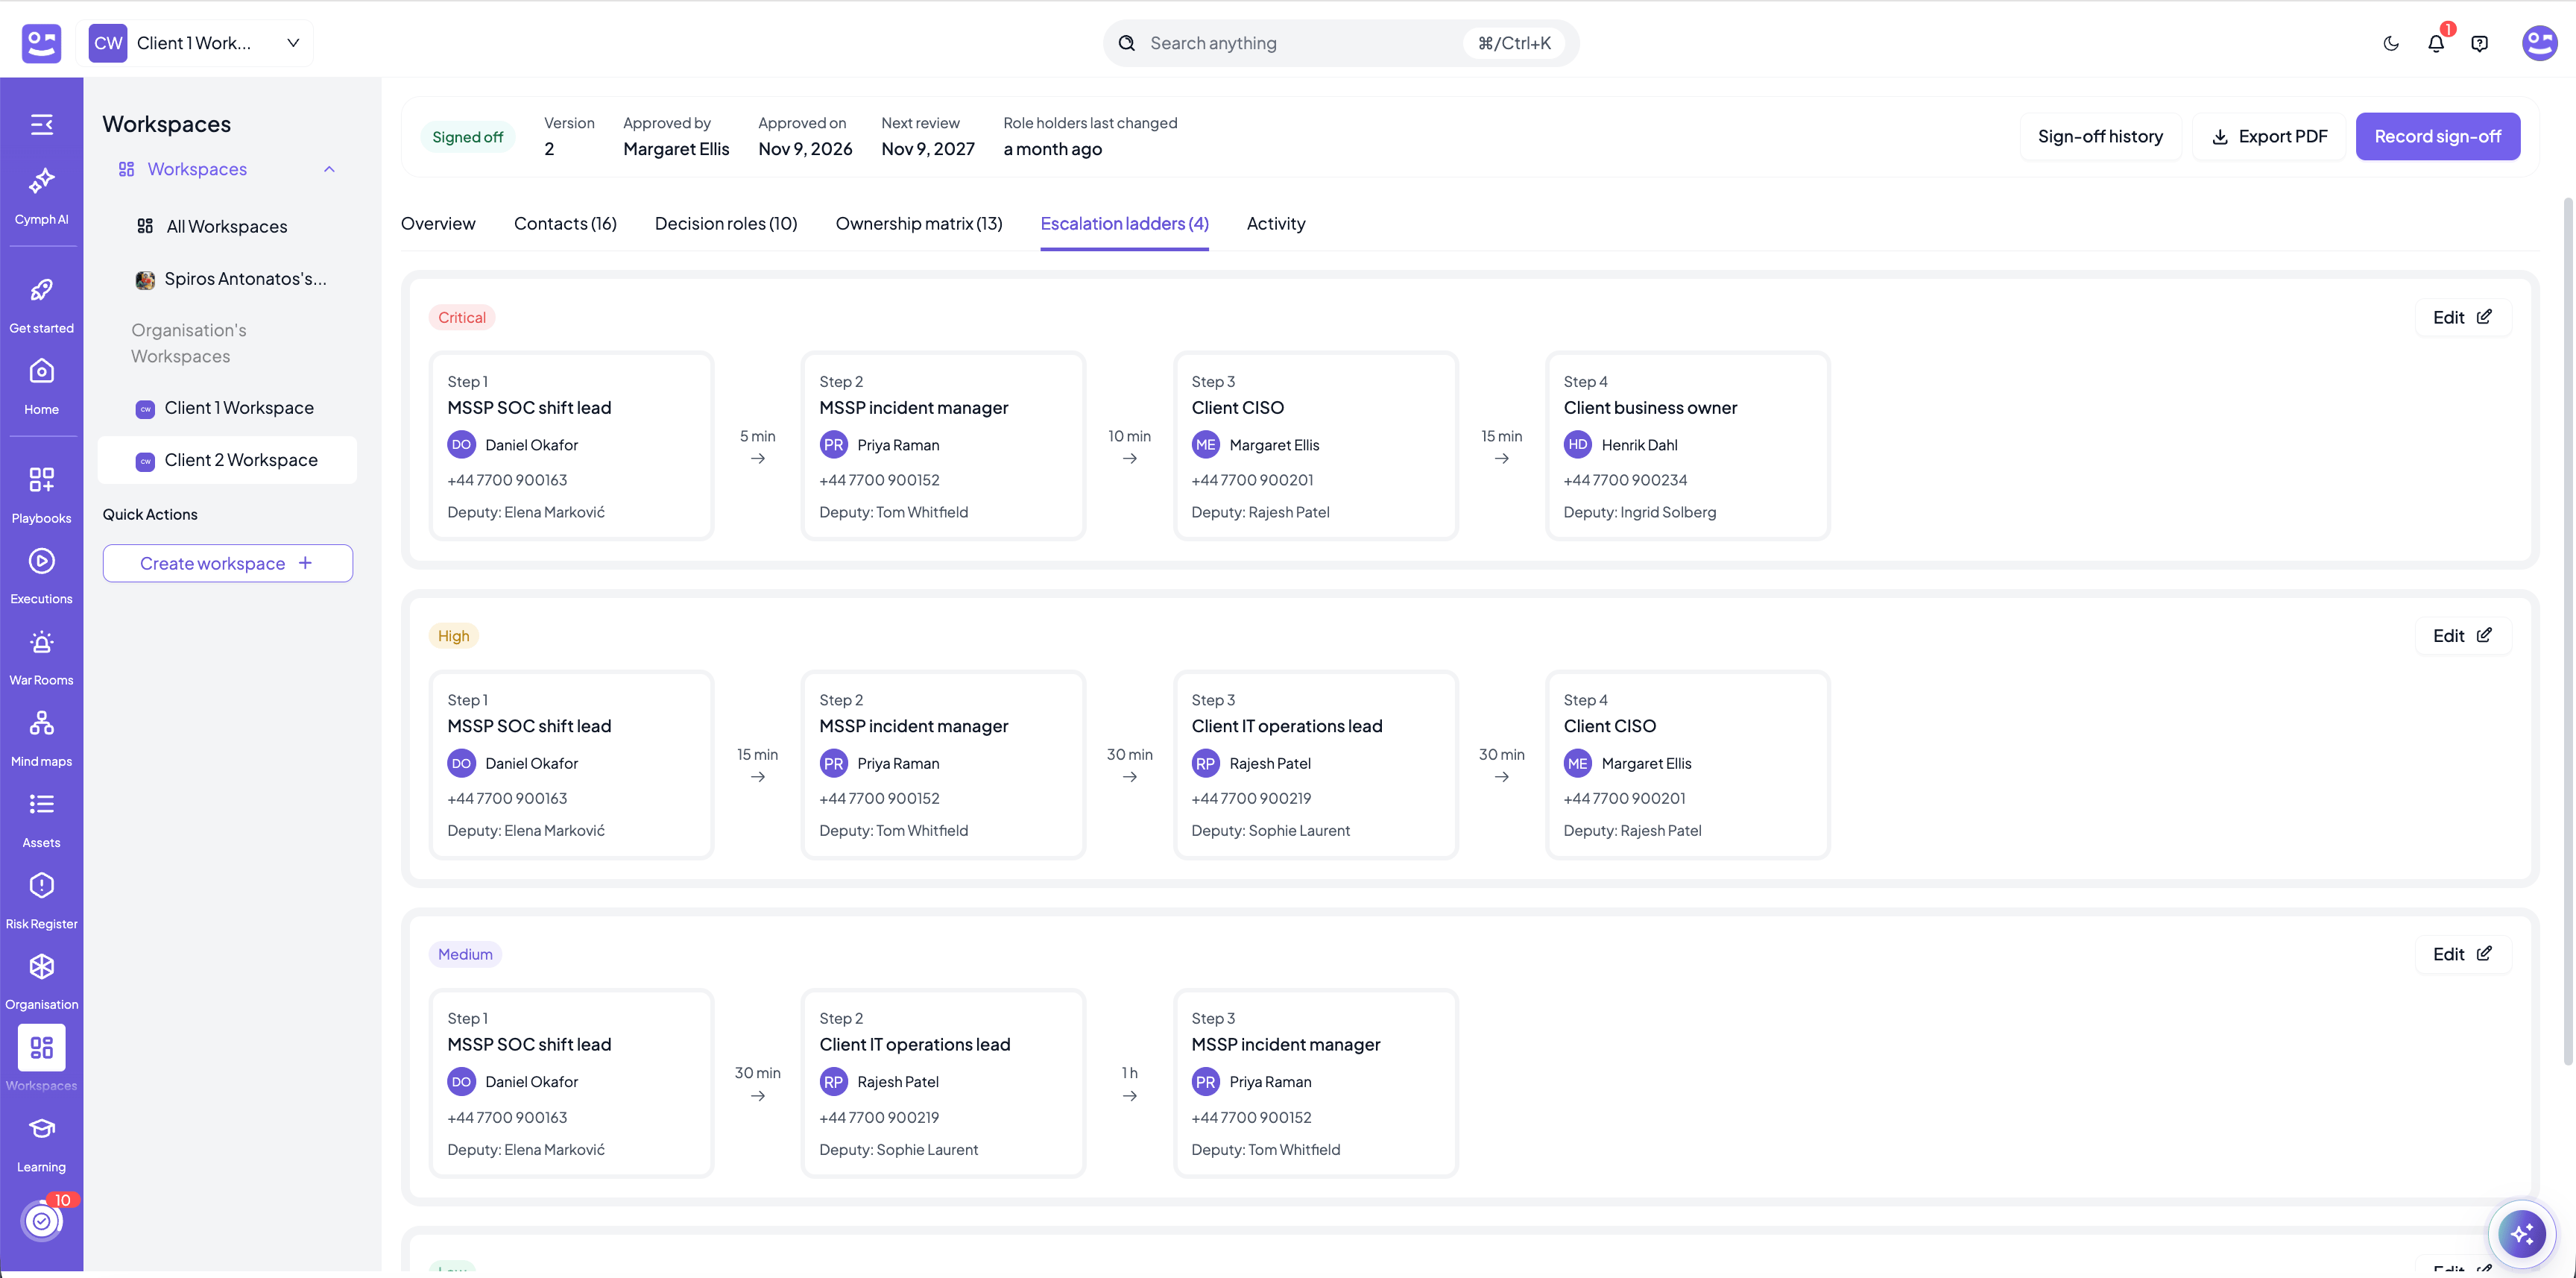
- A step names a decision role. Under the role the card shows who holds it today, the number to call first and the deputy.
- Between two steps, the wait is how long to give the step to answer before moving on to the next one. The last step has no wait.
- A severity level that has no ladder shows No escalation ladder in the warning colour.
Escalation ladders are a reference for the people handling the incident. Cymph does not page anyone or start a timer; it shows the responder who to call next and how long to wait.
Editing a ladder
Press Edit on the card of a severity level.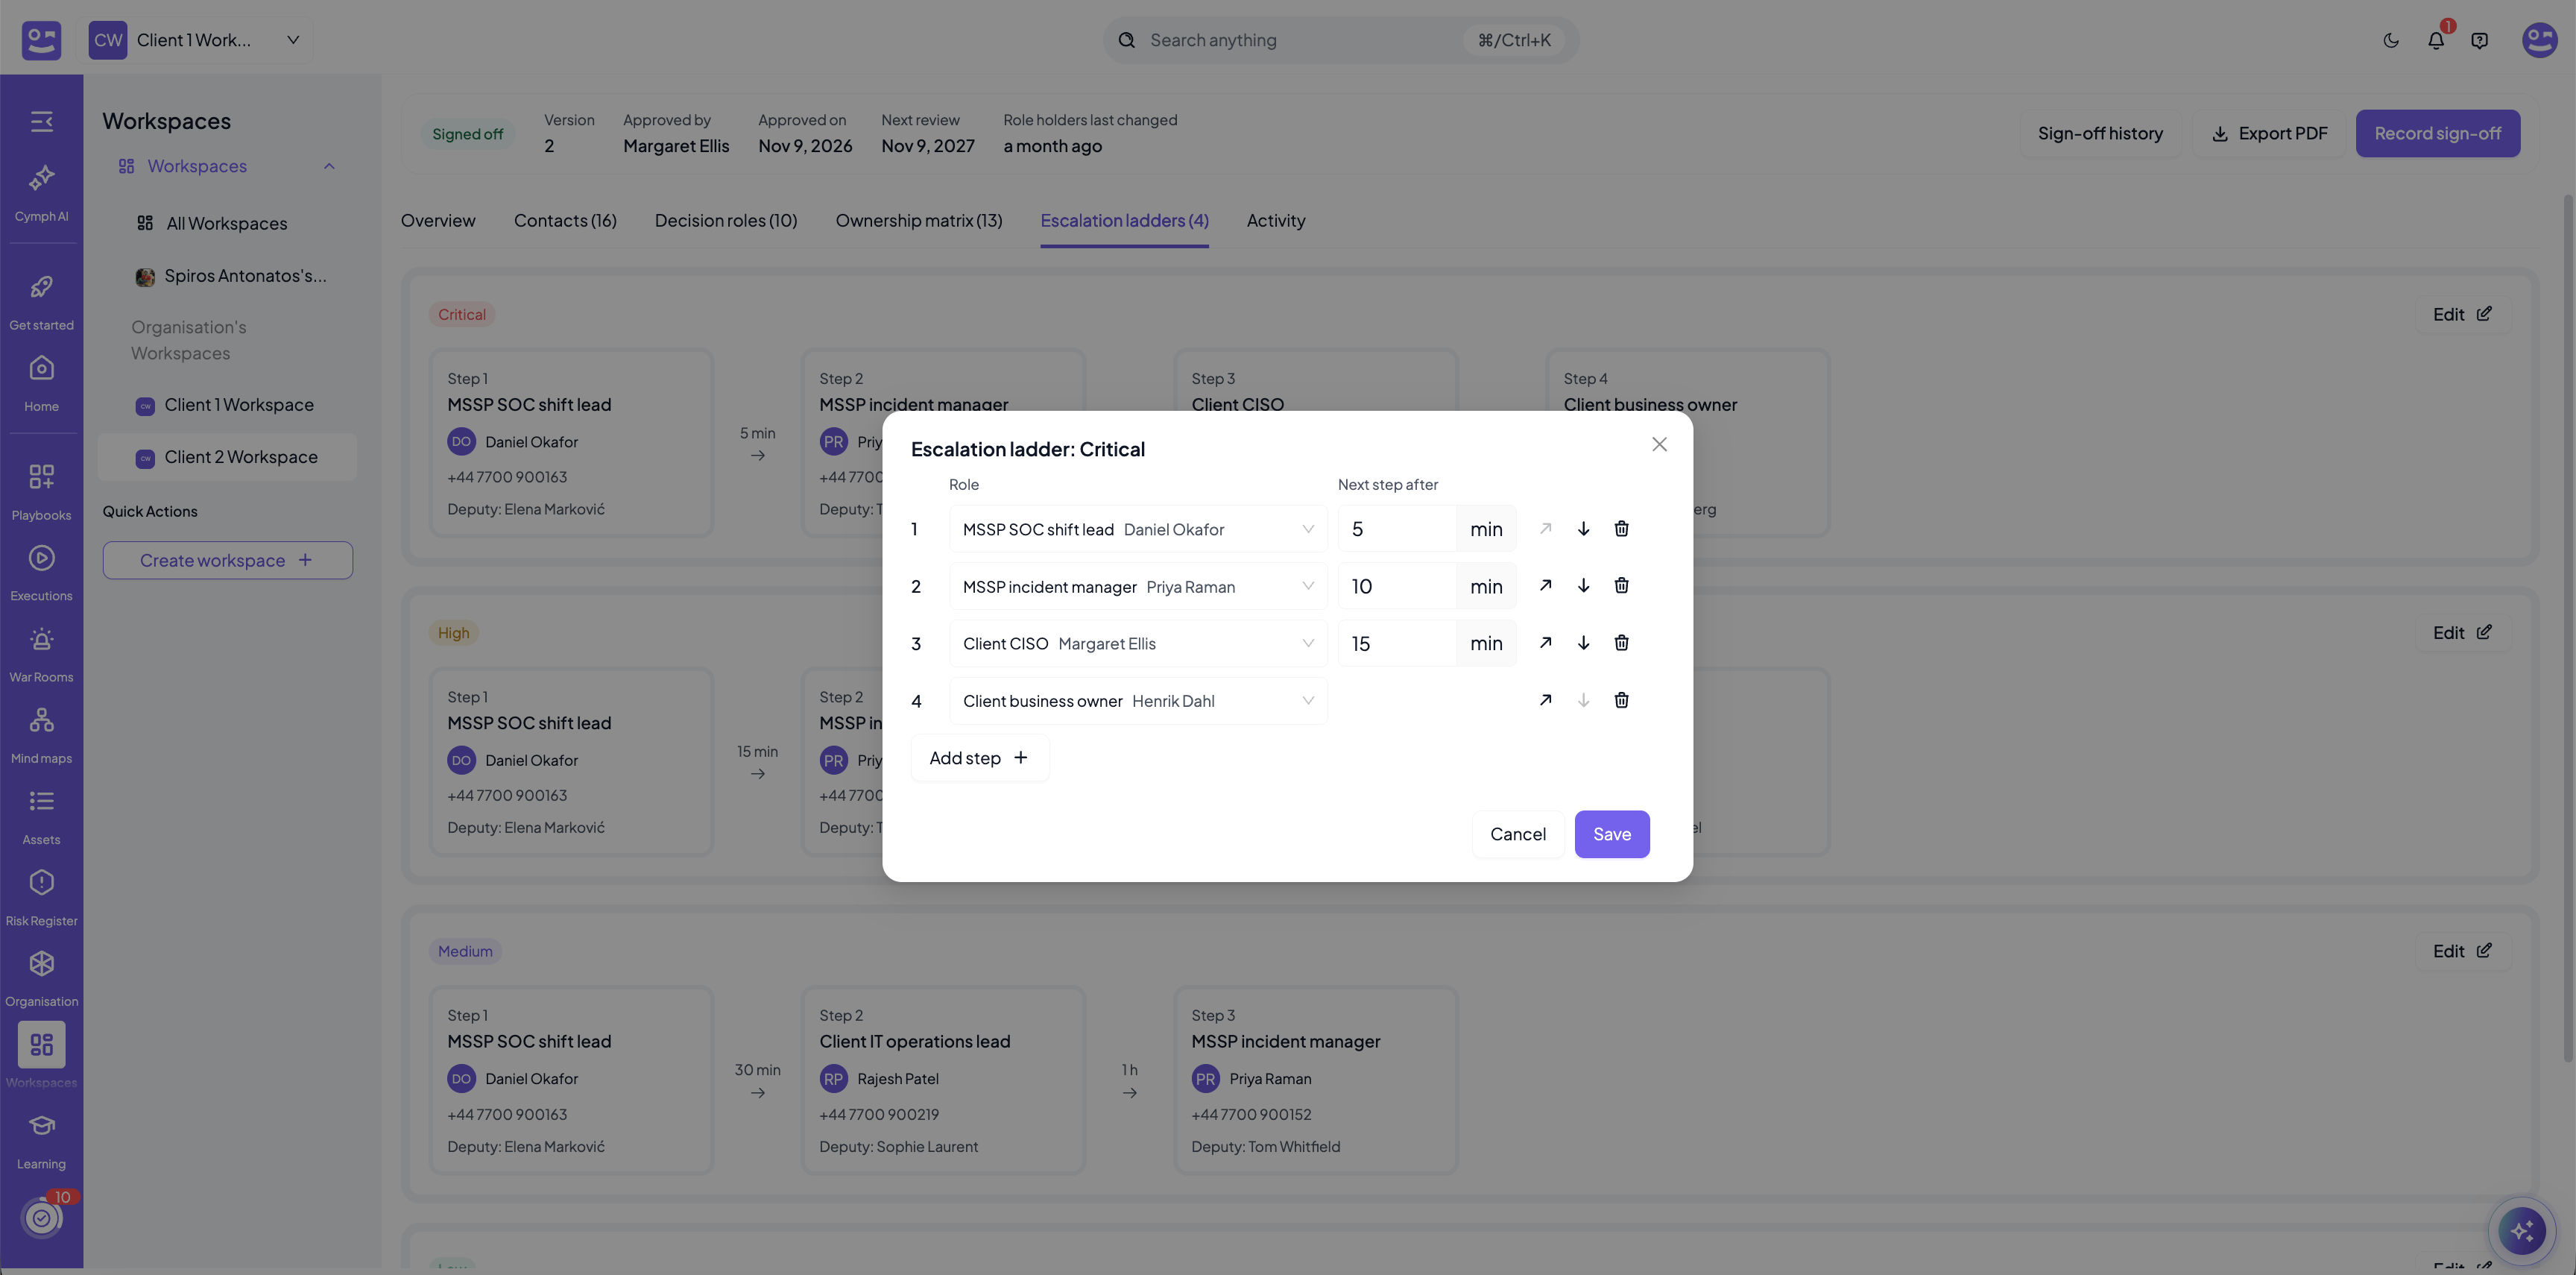
- Role: the decision role to reach at this step. A role can be on a ladder only once.
- Next step after: the minutes to wait for an answer before moving on. The last step has none.
- Use the arrows to move a step up or down and the bin to remove it. Add step adds a step at the end. A ladder can have up to ten steps.
Sign-off
The roles, the ownership matrix and the escalation ladders are an agreement: the person accountable for the workspace’s incident response (in an MSSP workspace, usually the customer’s CISO) approves them, and from then on they are the rules the response team follows. Cymph records that approval as a numbered sign-off. A sign-off covers the rules:- the decision roles that exist,
- for each decision, the role that decides, the pre-authorisation and the roles informed,
- the escalation ladder of each severity level.
The sign-off bar
The bar at the top of the tab shows where the matrix stands, whichever section is open.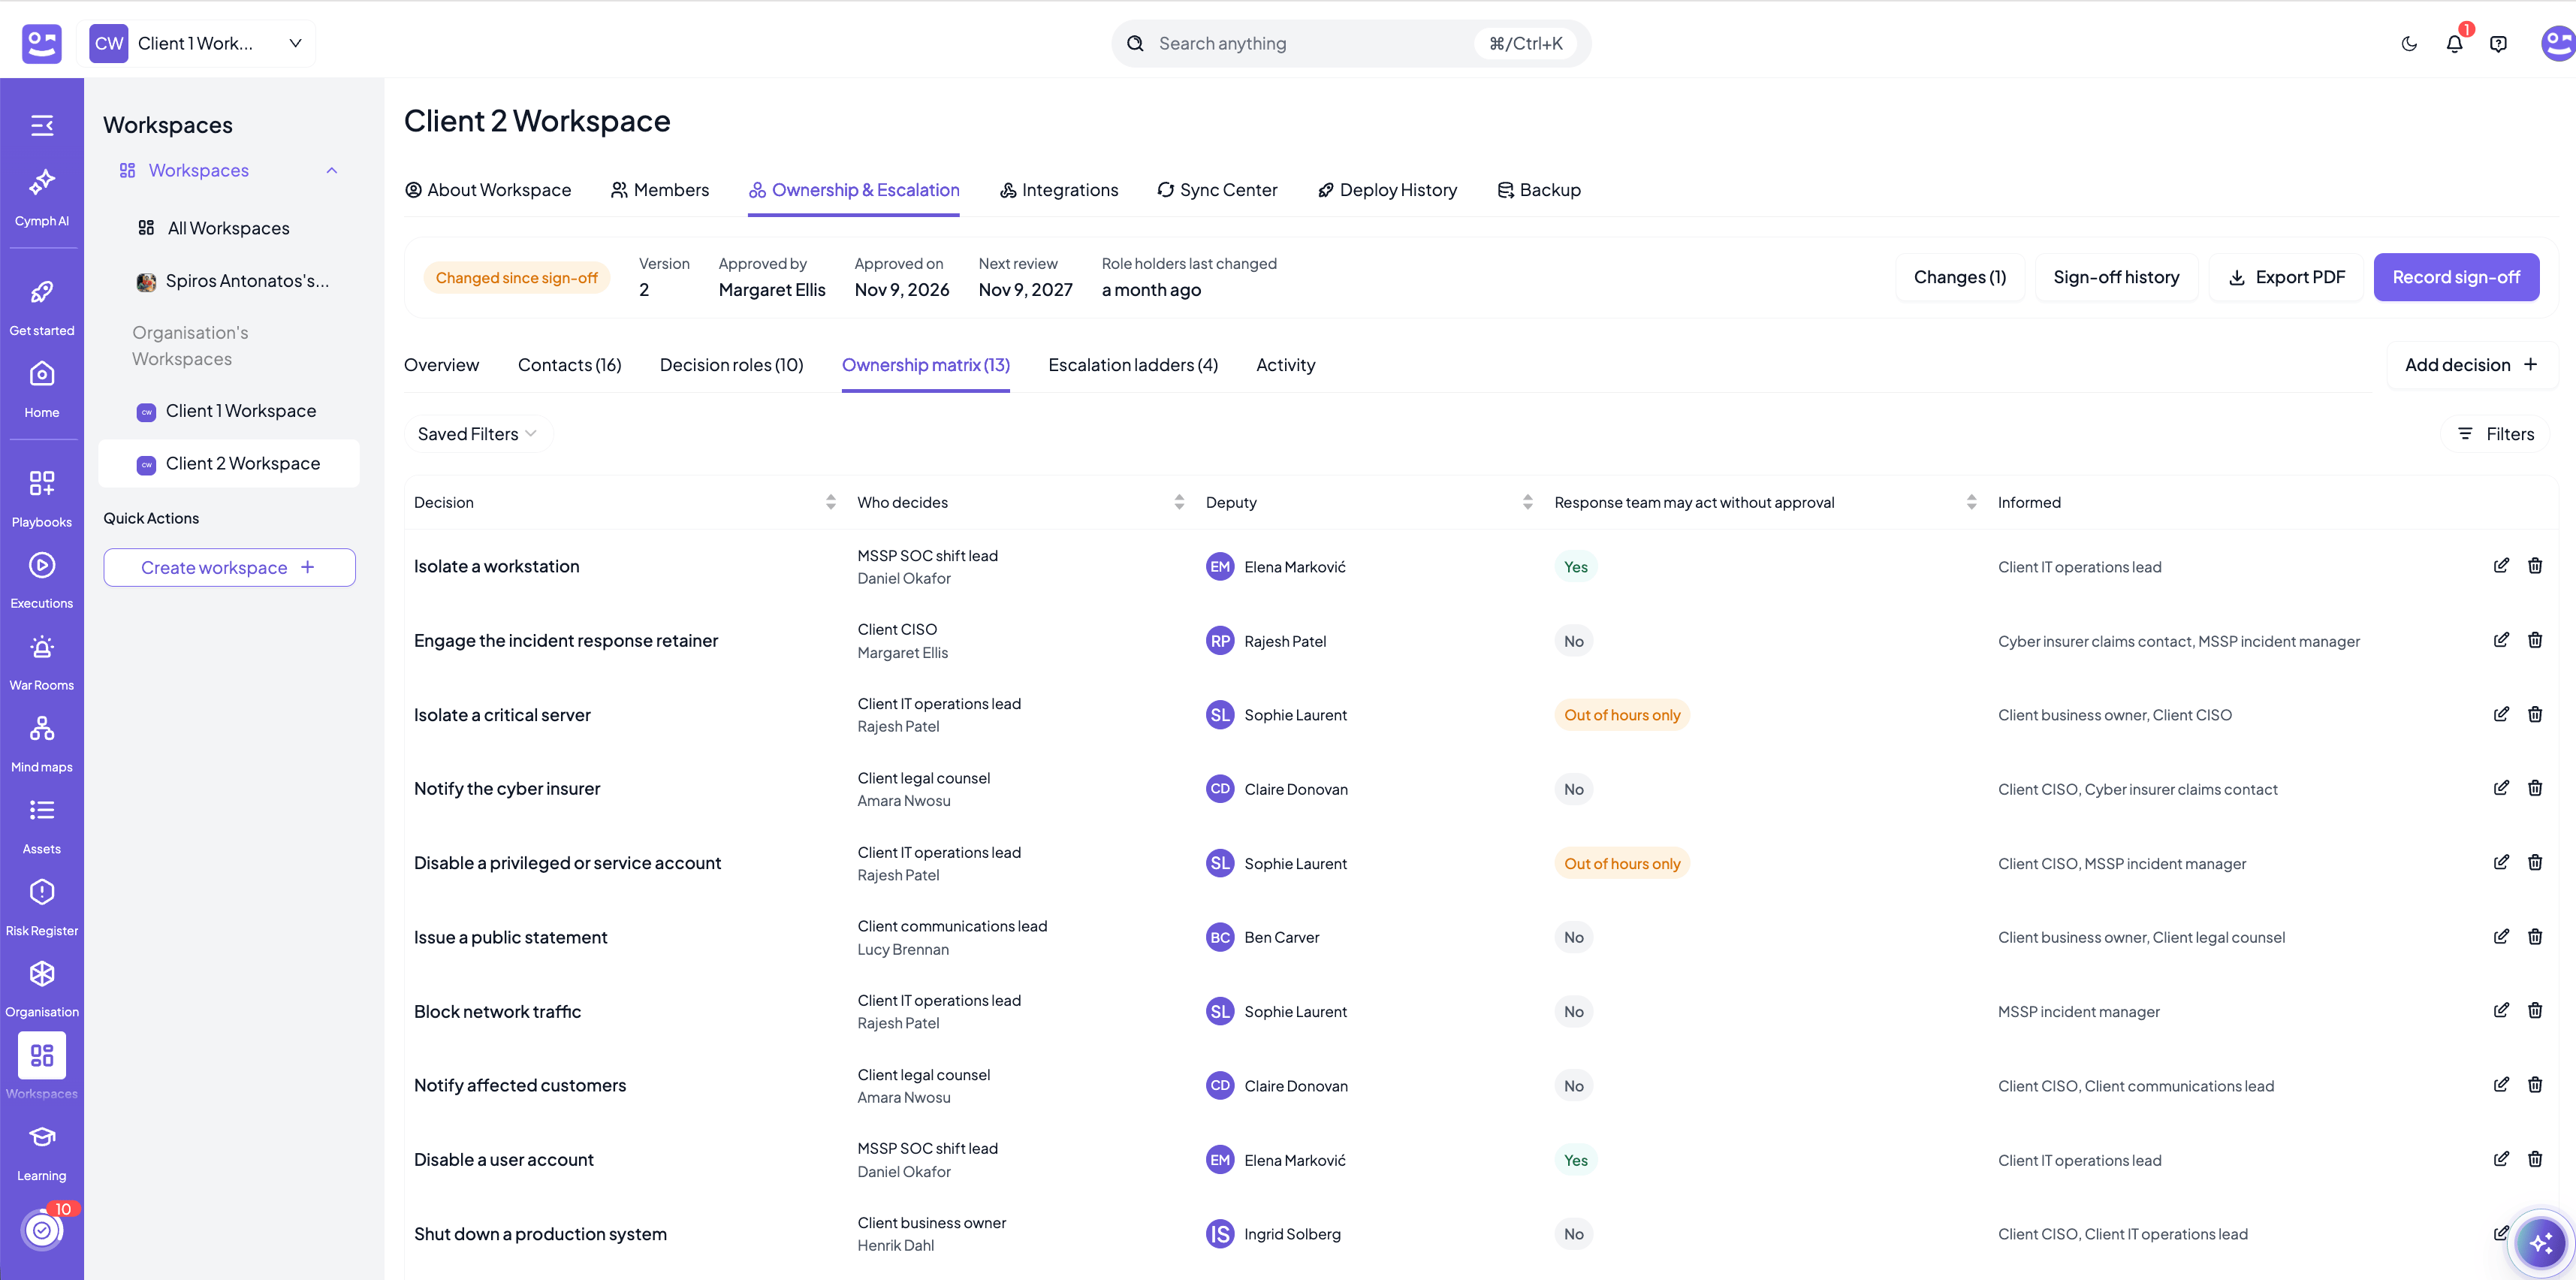
- Not signed off: no sign-off has been recorded yet.
- Signed off: the rules are exactly the ones of the latest sign-off.
- Changed since sign-off: a role, a decision or a ladder was added, removed or edited after the latest sign-off.
Until the changes are approved, executions and war rooms keep following the rules of the latest sign-off. A decision that was added after it applies as it is now.
Reviewing what changed
When the status is Changed since sign-off, the Changes button shows how many roles, decisions and ladders differ. Press it to see each one with its previous and new value, which is exactly what the approver needs to look at.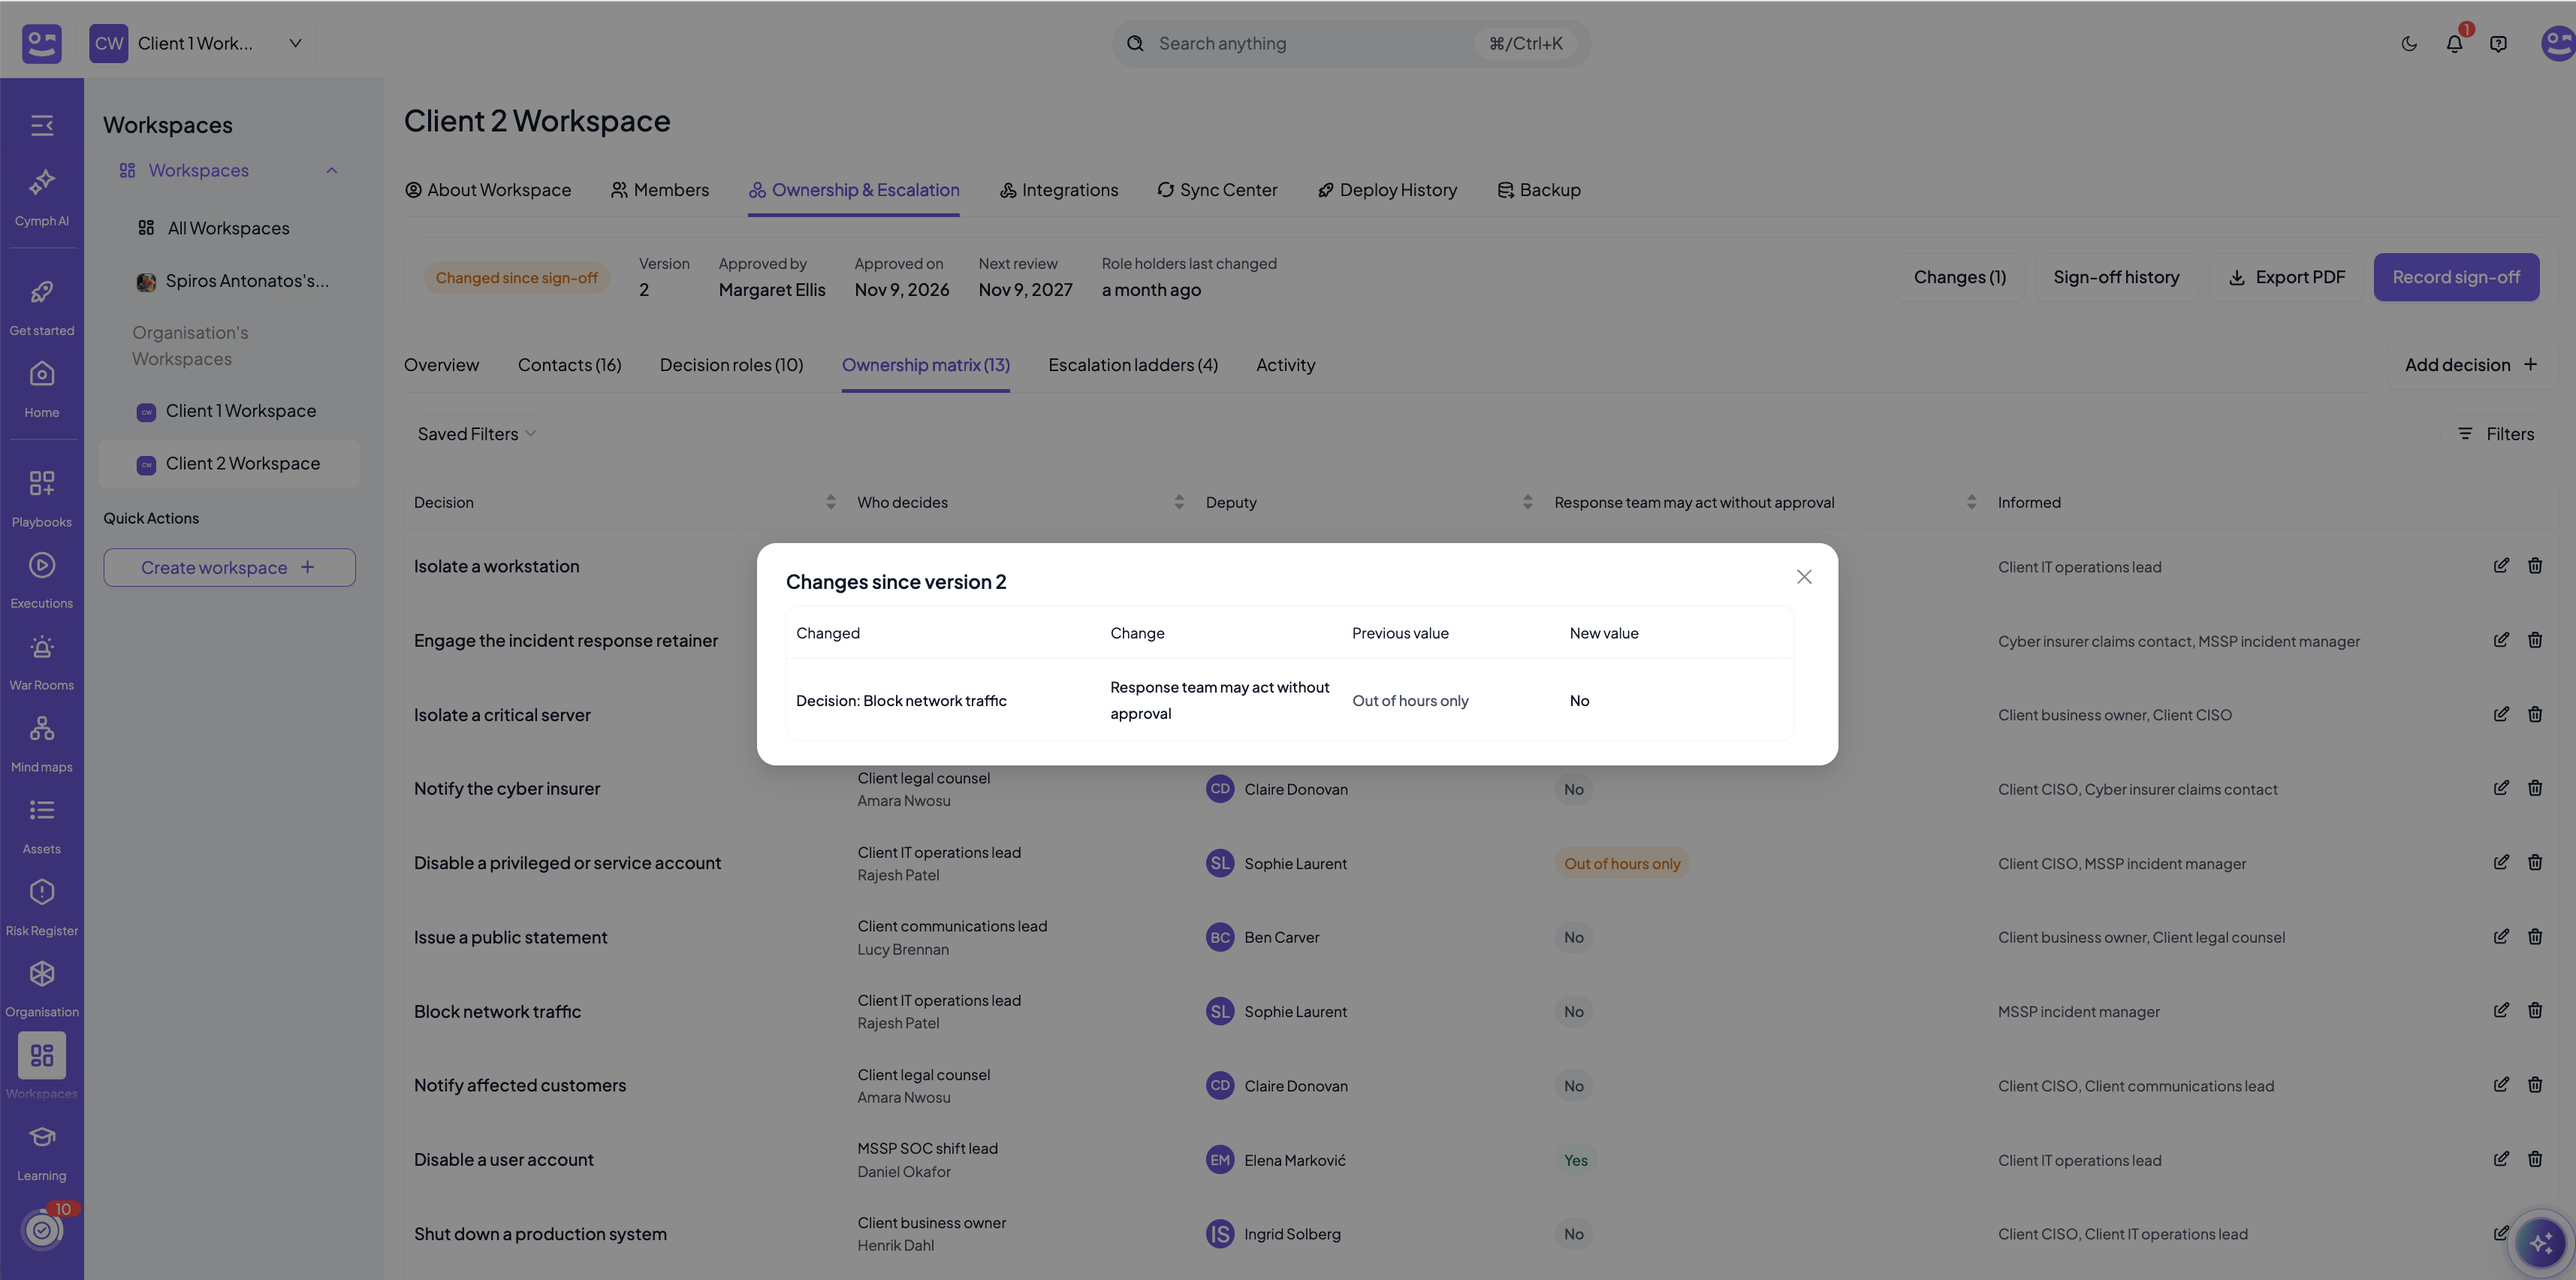
Getting the matrix approved
The approval itself happens outside Cymph, so it works the same on an isolated on-premises installation:- Press Export PDF. The export contains the decision roles, the ownership matrix and the escalation ladders, and ends with a signature block.
- Send the PDF to the approver and get it signed, or approved by e-mail.
- Press Record sign-off and fill in the dialog.
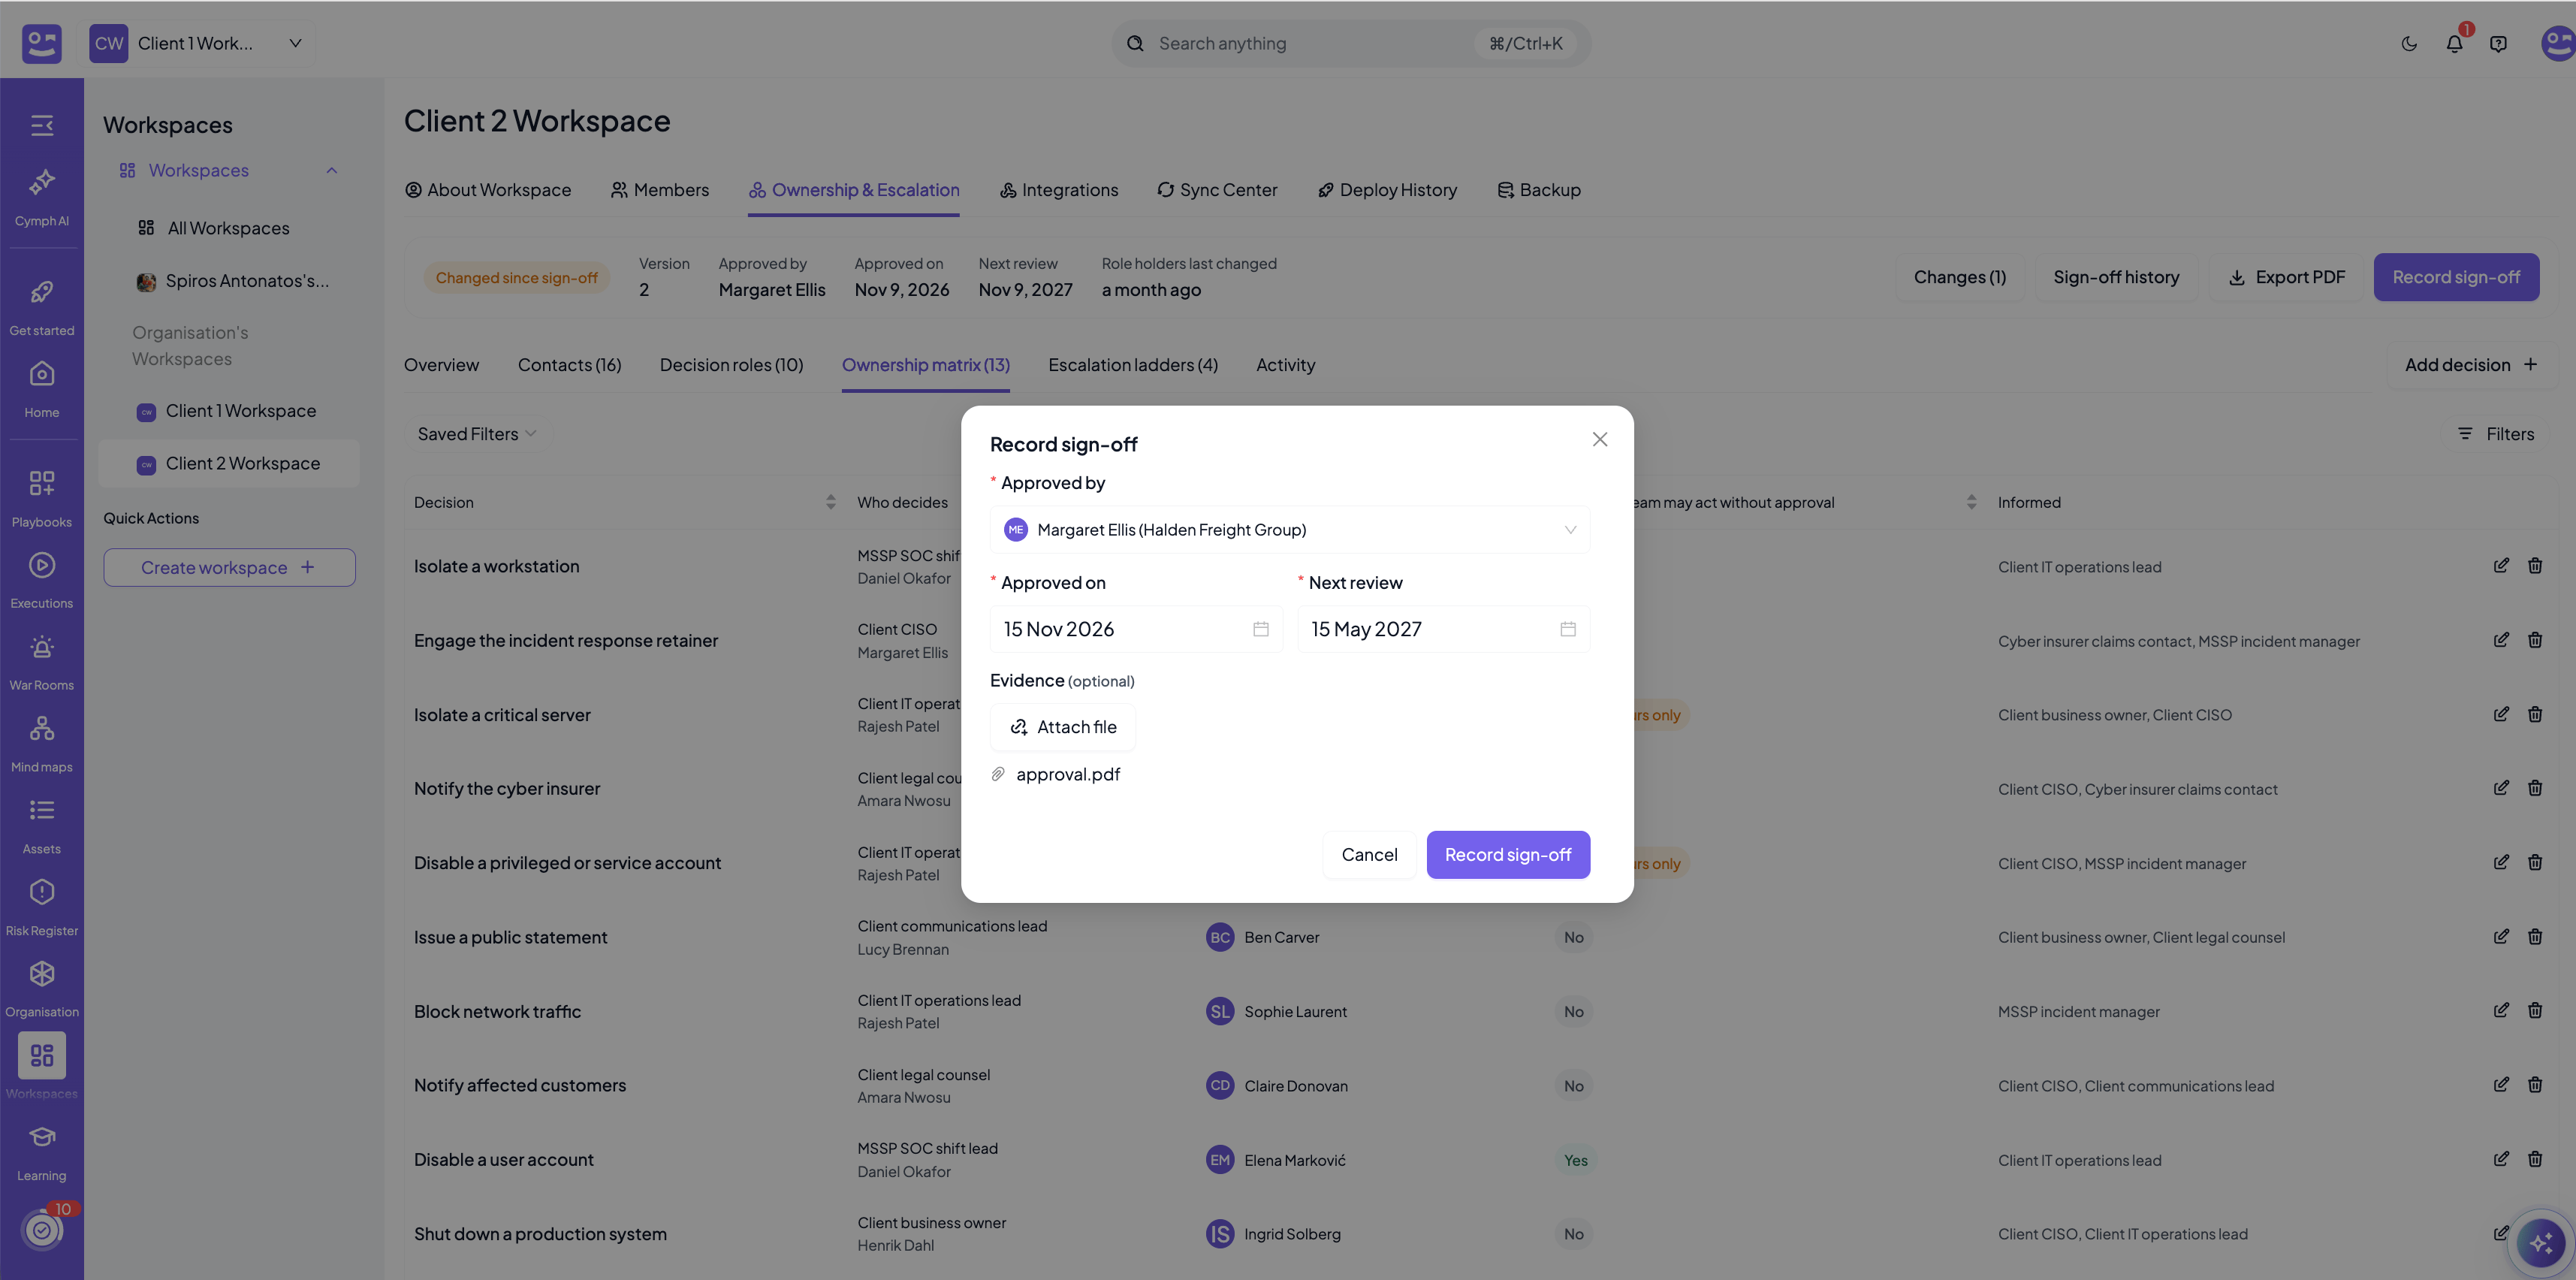
- Approved by: the contact who approved the matrix.
- Approved on: the day they approved it. It cannot be in the future.
- Next review: the day by which the matrix is to be reviewed again. It defaults to one year after the approval.
- Evidence (optional): the signed copy of the export or the e-mail that approves it, up to 20MB. A SHA-256 hash of the file is recorded with it.
Sign-off history
Sign-off history lists every sign-off recorded for the workspace, latest first, with its version, approver, approval date, review date, who recorded it and the evidence, which anyone with access to the workspace can download.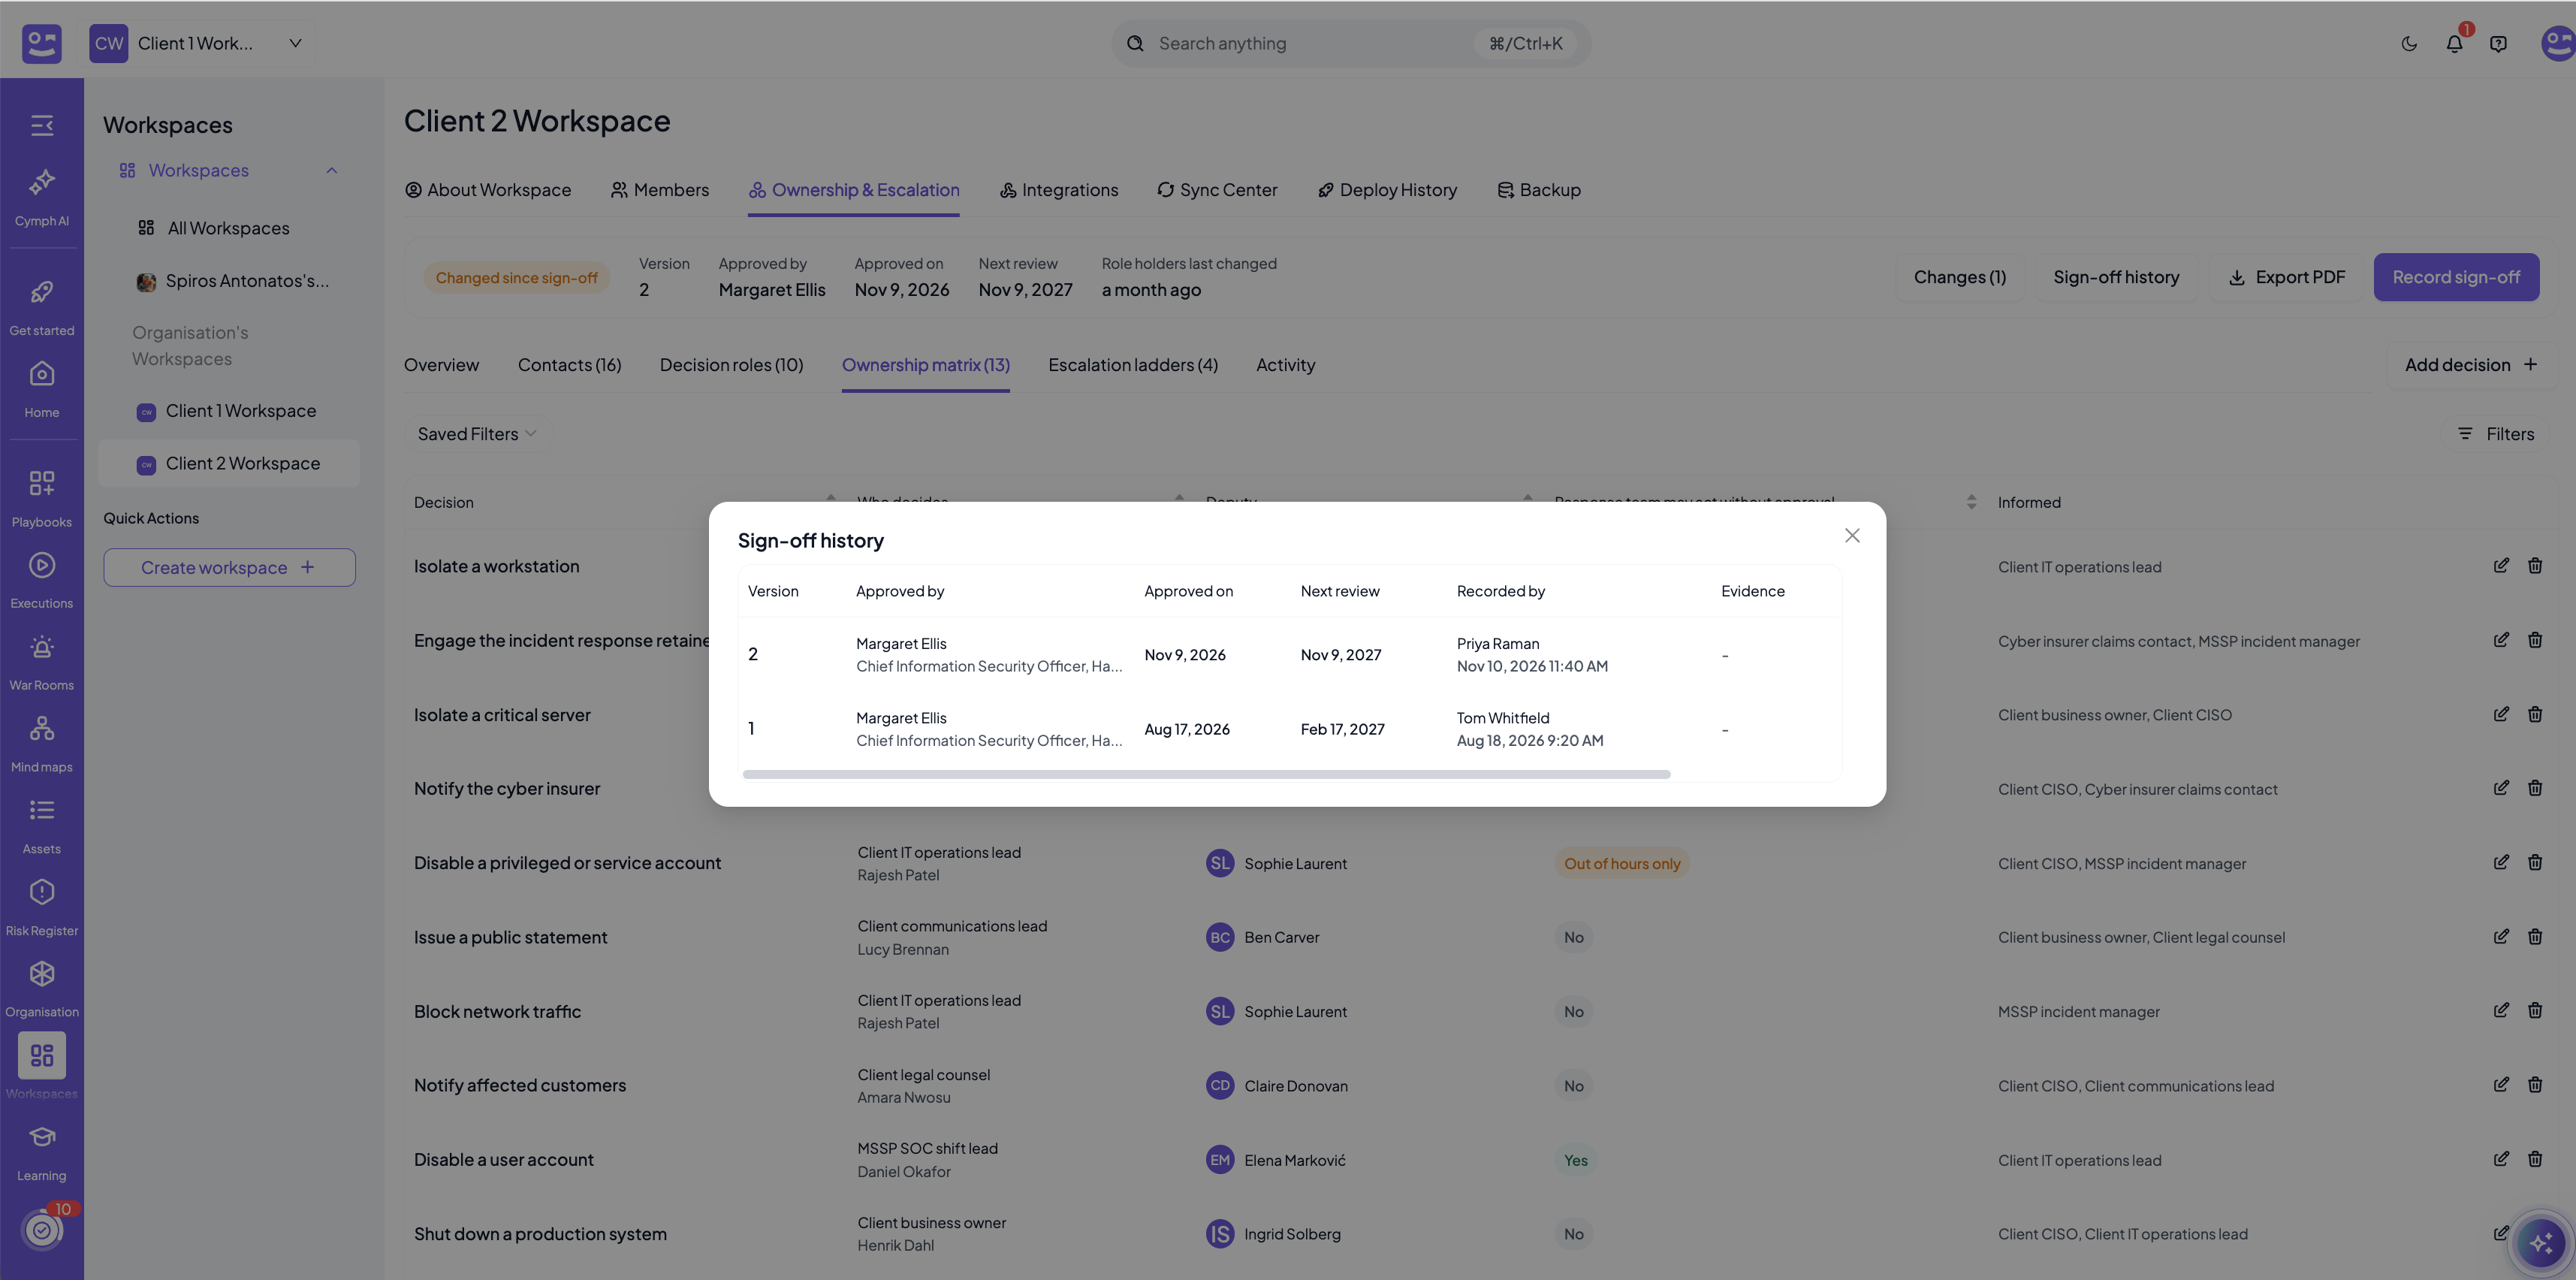
Activity
The Activity section is the history of the tab: every contact, decision role, decision and escalation ladder that was added, edited or removed, every contact that was verified and every sign-off that was recorded, newest first.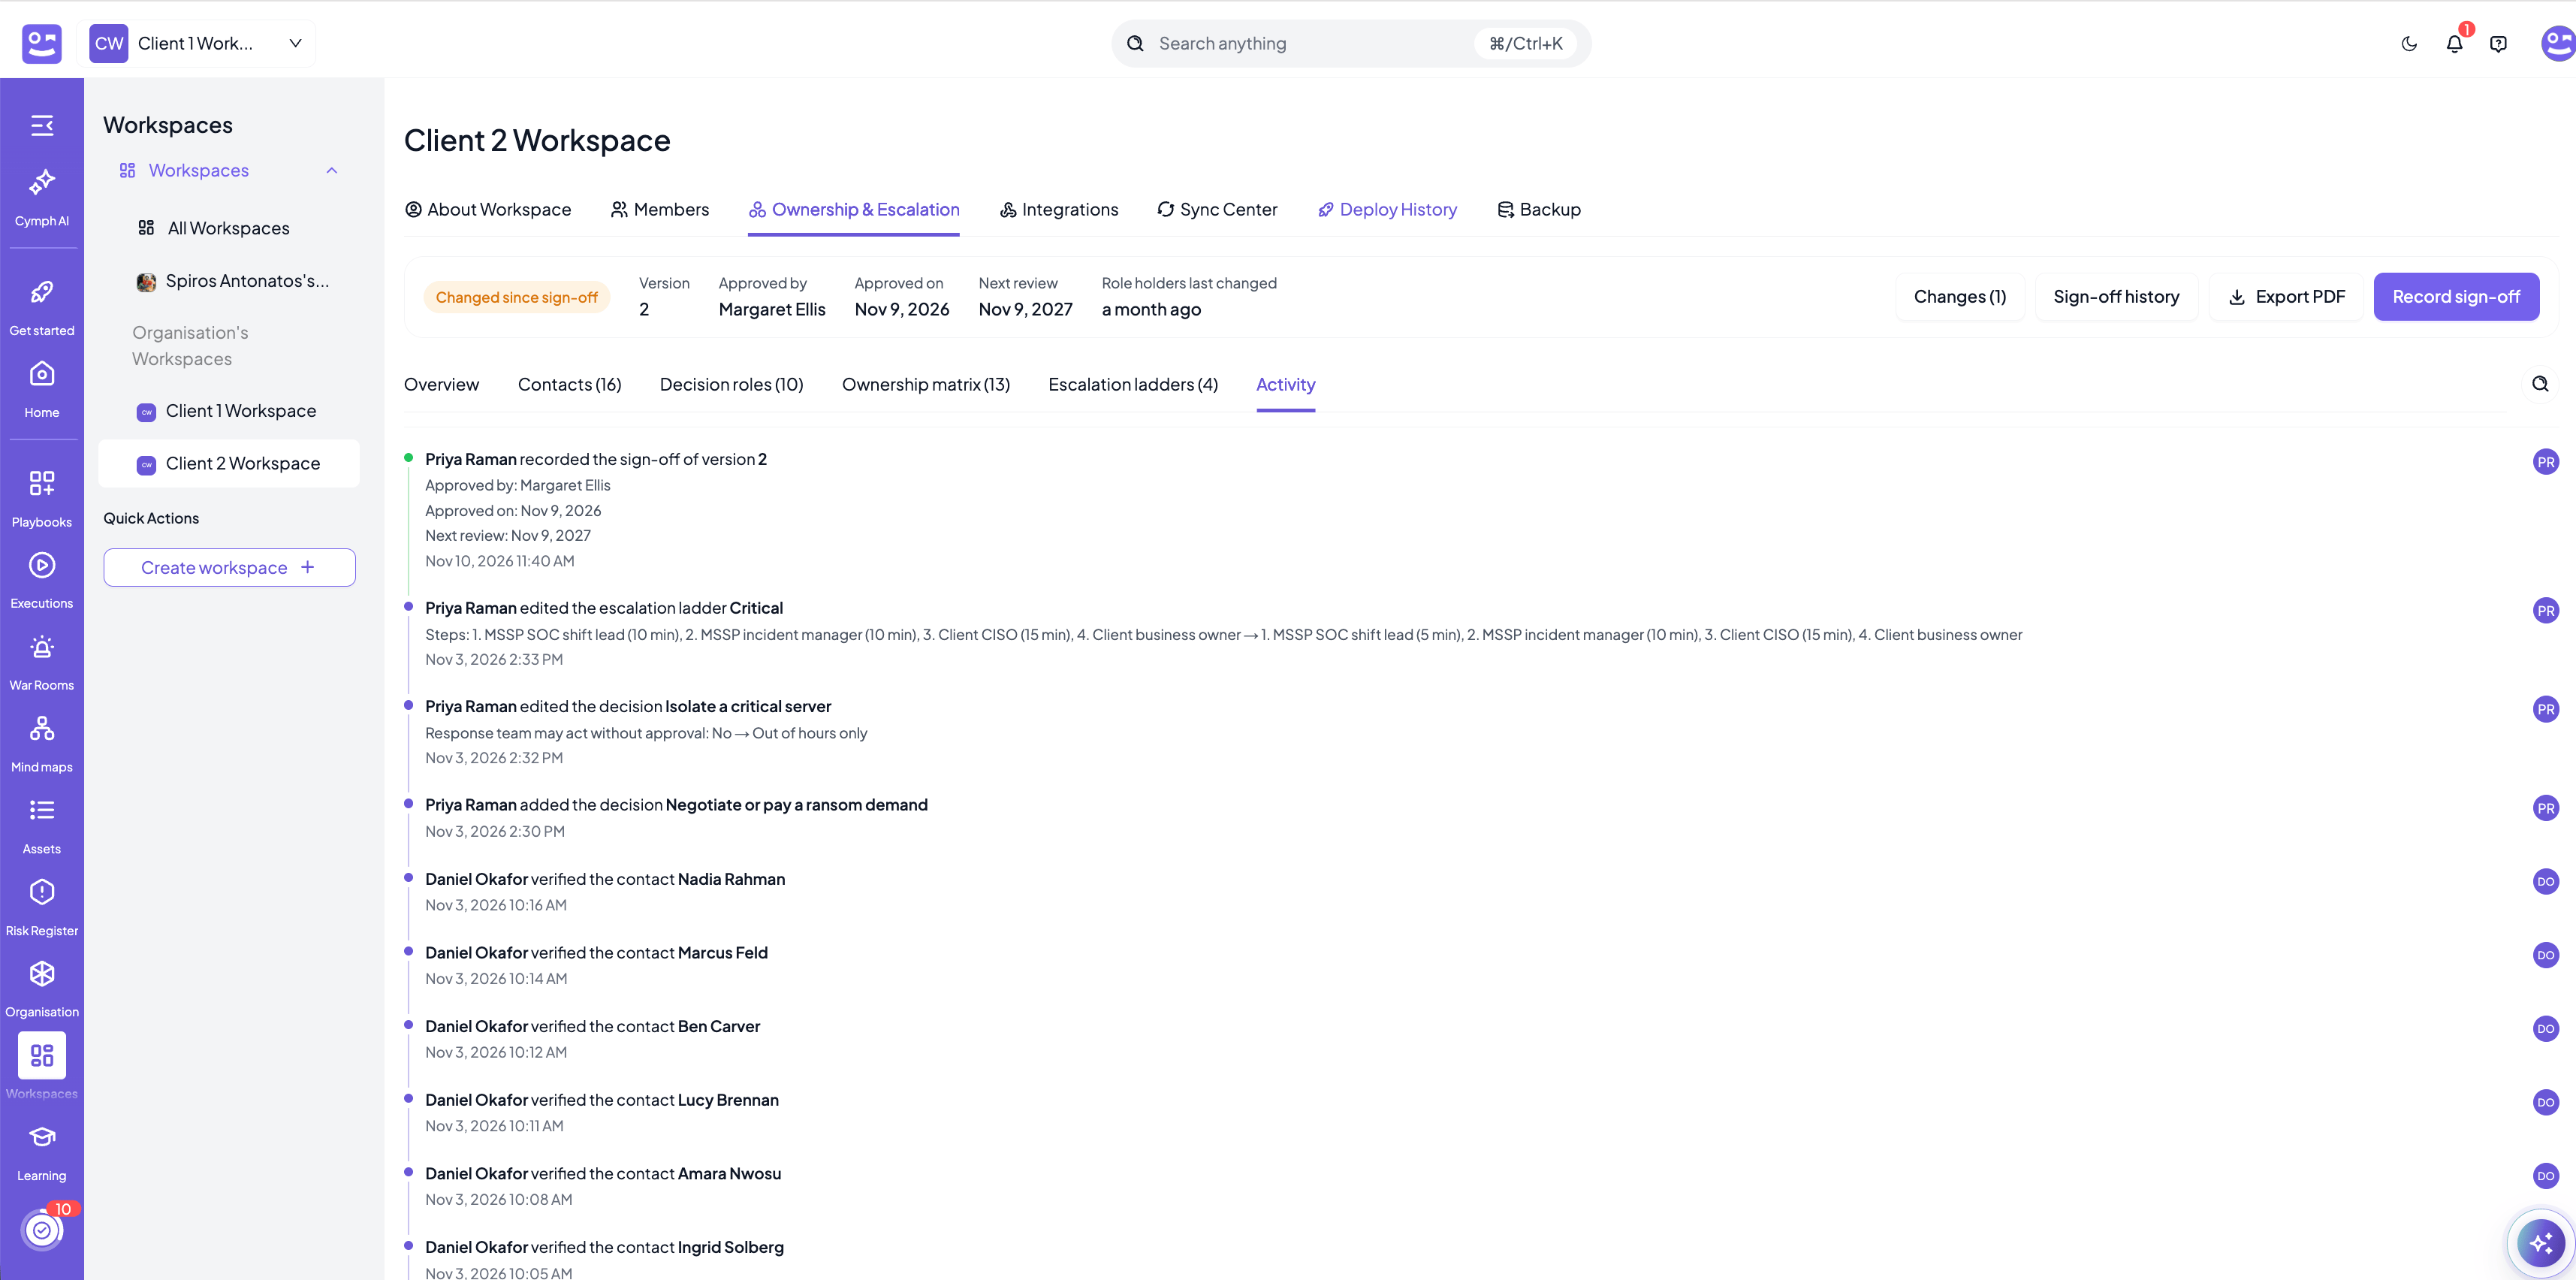
Risk signals
A matrix is only useful if it still holds on the day of the incident. Risk signals are the checks Cymph runs on it continuously: a role nobody holds, a contact nobody can call, a ladder that stops after one step, rules that changed after they were approved. They are worked out from the current state of the workspace every time the page is opened, so a signal clears by itself as soon as its cause is fixed. There is nothing to dismiss or acknowledge.Reading the risk signals
The Risk Signals card on the Overview section lists them.- Each signal has a severity. Critical means part of the matrix cannot work during an incident, for example a decision nobody owns. Warning means it works but is fragile or out of date.
- The number next to a signal is how many contacts, roles, decisions or ladders raise it.
- Hover over the information icon to read what is wrong and what to do about it.
- Signals are sorted most severe first; the Sort by control reverses the order.
- The card shows the first three signals. Show More shows them all, including the ones that are clear, which have a count of zero.
Acting on a signal
A signal that is raised has a button: Take an action now on a critical signal and Review on a warning. It opens the section the signal is about, with the filter bar already set to the entries that raise it. For example, Decision roles without a deputy opens the Decision roles section showing only the roles with no deputy. Fix the entries there; when the last one is fixed the signal is clear. Signals about escalation ladders open the Escalation ladders section and signals about the sign-off open the Ownership matrix section, without a filter.Where risk signals are shown
- On the Overview section of the workspace’s Ownership & Escalation tab.
- On the home page, in the Ownership & Escalation Risk Signals block of the Readiness Overview, under the playbook risk signals. They are the signals of the workspace you currently have open, and their buttons open the workspace’s tab on the right section.
- In the Readiness Overview PDF report.
Risk signal reference
Contacts
Decision roles
Ownership matrix
Escalation ladders
Sign-off
Where the matrix is used
The matrix is not a document that sits in a drawer. Playbooks, executions and war rooms read it, so the agreed rules show up at the moment they matter.Decisions on playbook steps
In the playbook editor, every step except the start and end steps has an optional Decision field. Pick the decision of the ownership matrix that the step calls for, for example Isolate a critical server on the step that takes a server off the network. The picker lists the decisions of the workspace the playbook belongs to, each with the role that decides and who holds it.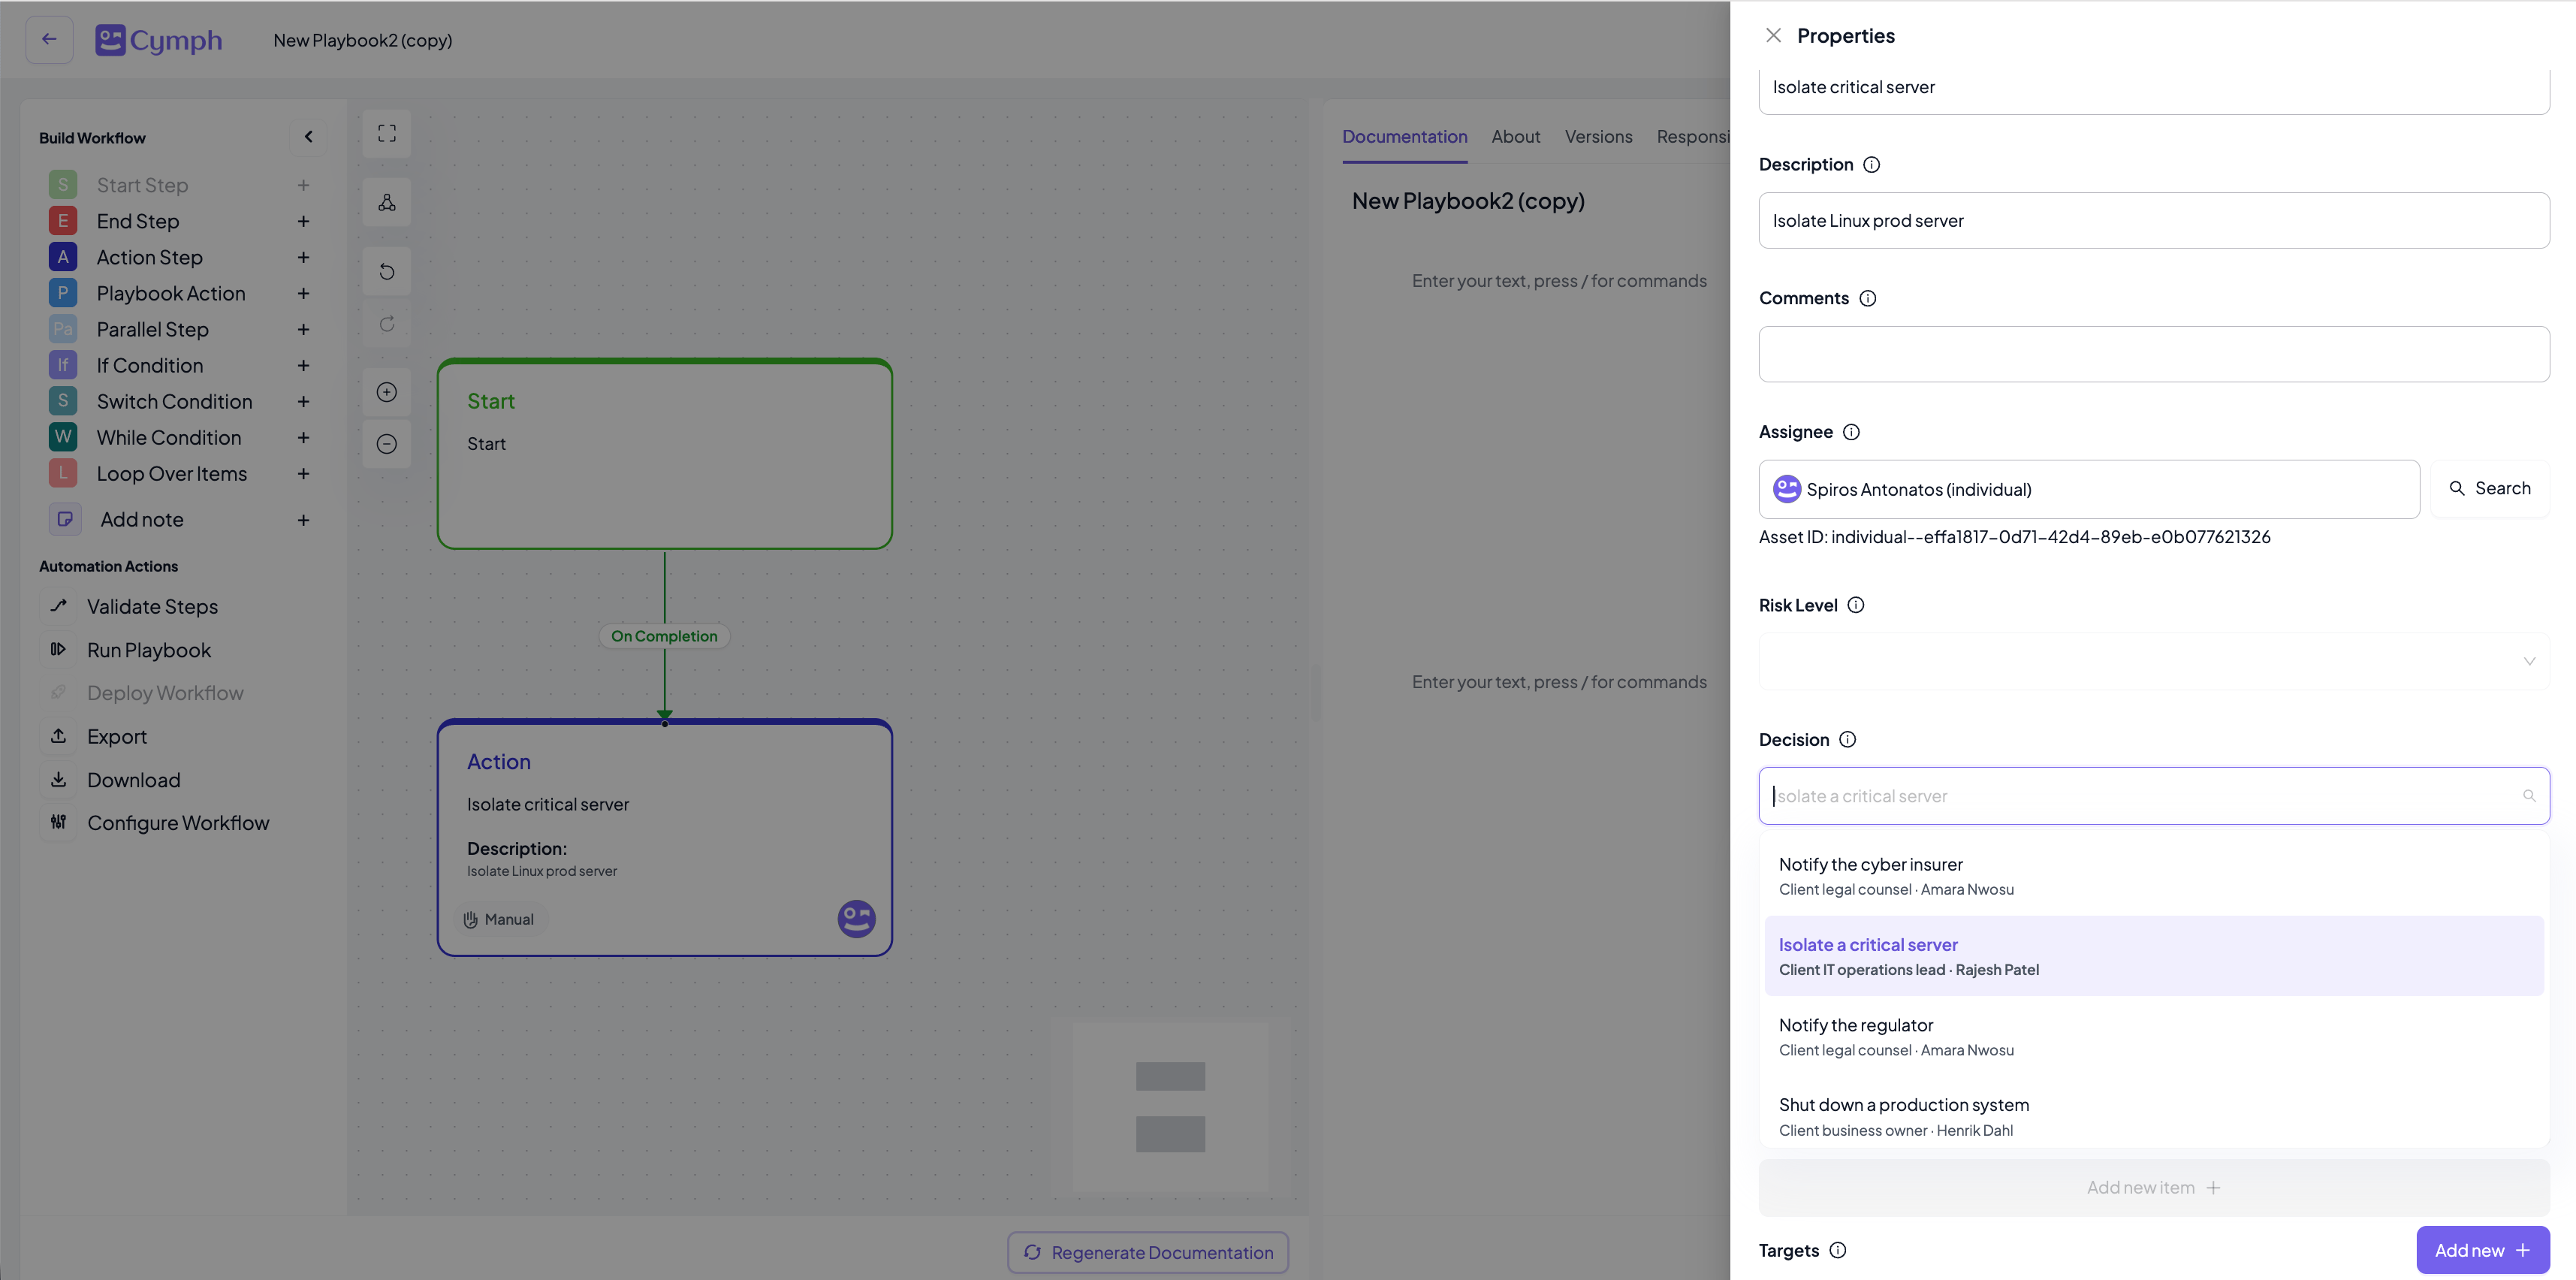
- When a playbook is duplicated or moved to another workspace, each step is pointed at the matching decision of that workspace. A step whose decision has no match there is left without one.
- When a decision is removed from the matrix, the steps that called for it show Decision removed in the editor until another decision is picked or the field is cleared.
Removing a decision that is in use
Before a decision is removed from the ownership matrix, the confirmation lists what would be affected: the playbooks with a step that calls for the decision, and the executions in progress that do. Review the list before confirming, because the steps of those playbooks lose their approval gate.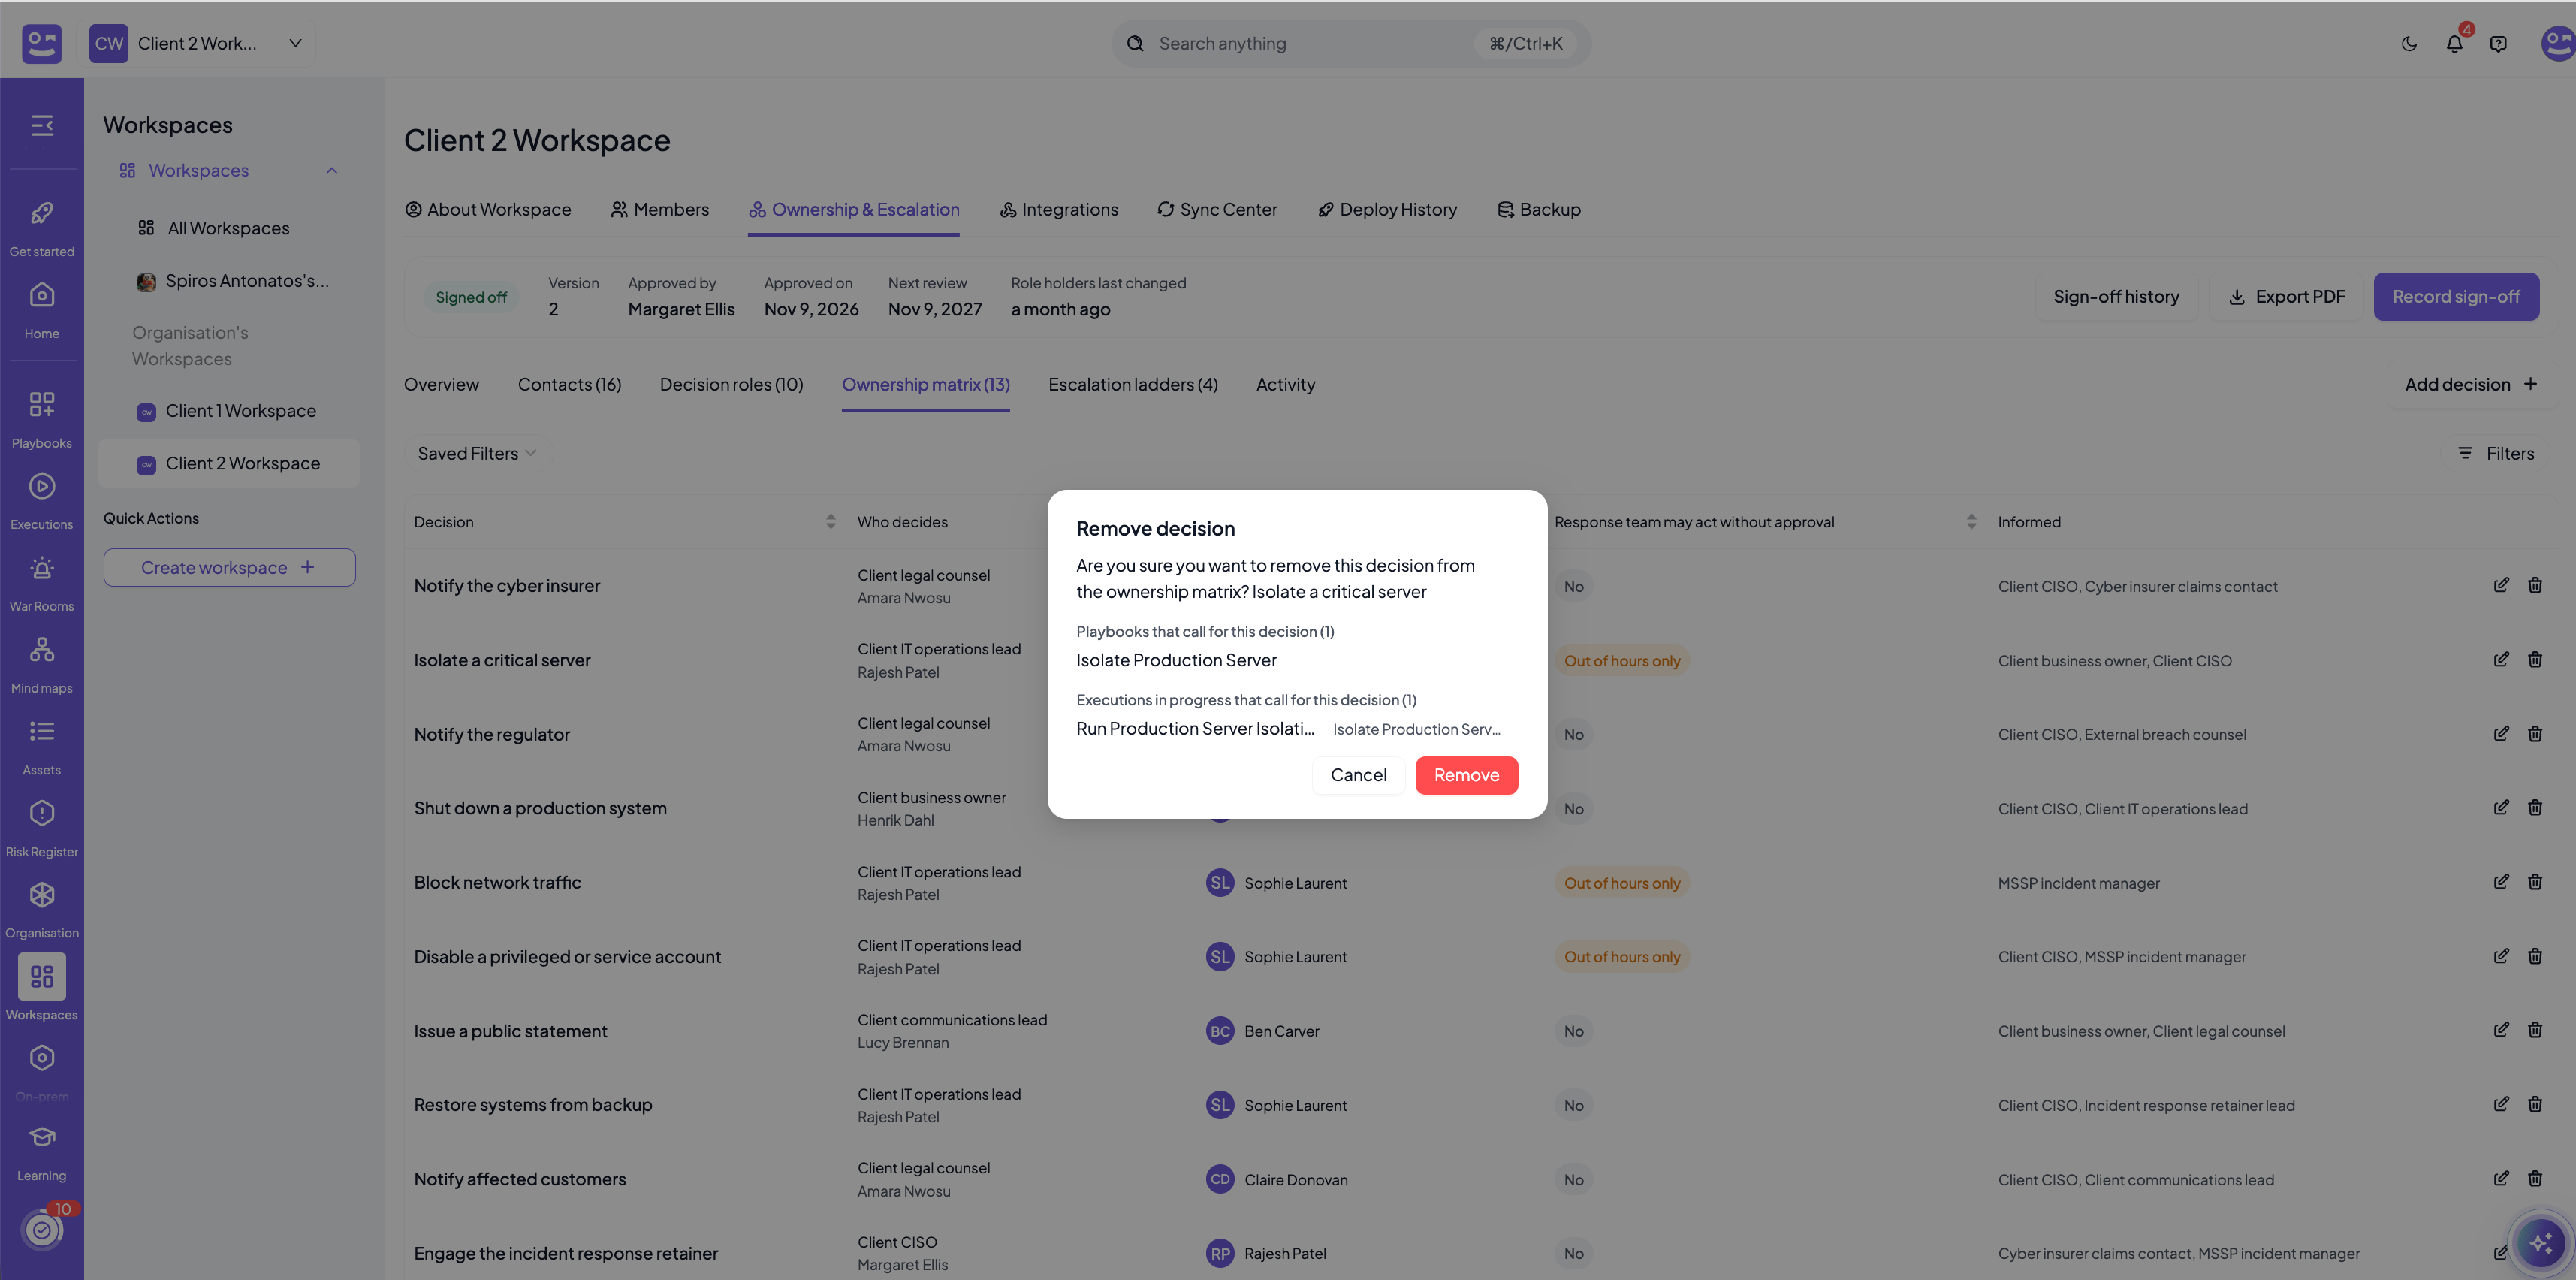
The approval gate in executions
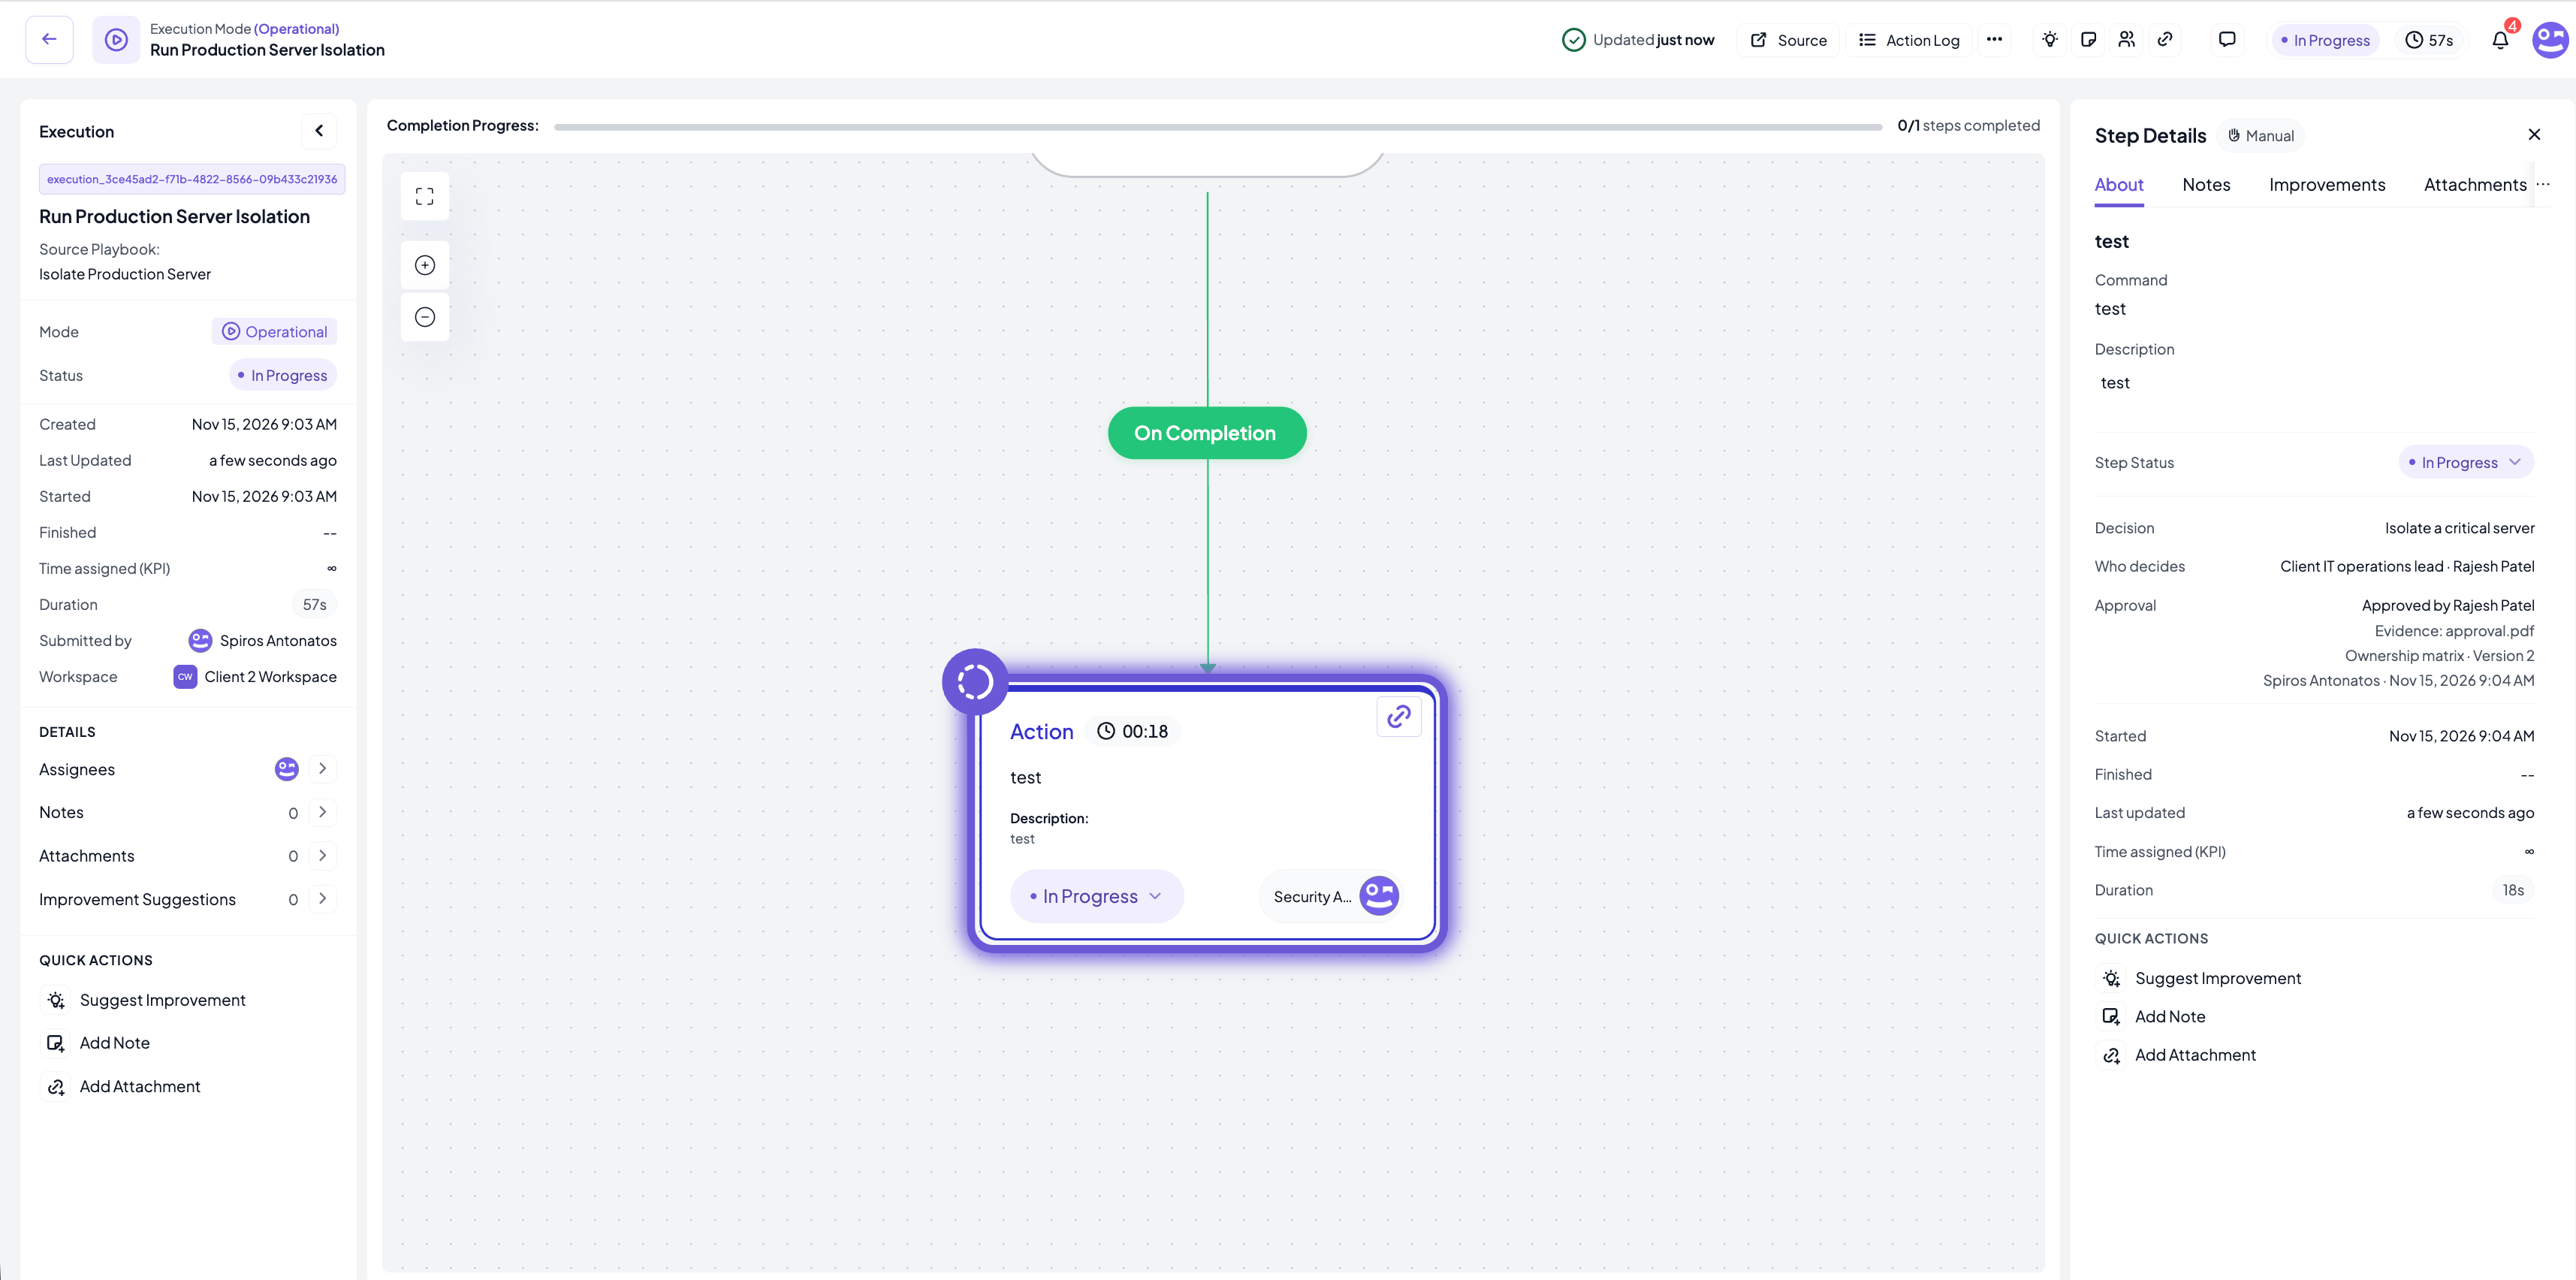
When a playbook is executed, each step that calls for a decision shows it in the step’s About panel, with Who decides: the role and the person who holds it today. Such a step passes an approval gate once. An action step is gated when it is started; a condition step is gated when its outcome is chosen. What happens at the gate depends on the pre-authorisation of the decision:- Yes: the step goes ahead and the execution records that it was pre-authorised. Nobody is asked.
- Out of hours only or No: the Approval required dialog opens.
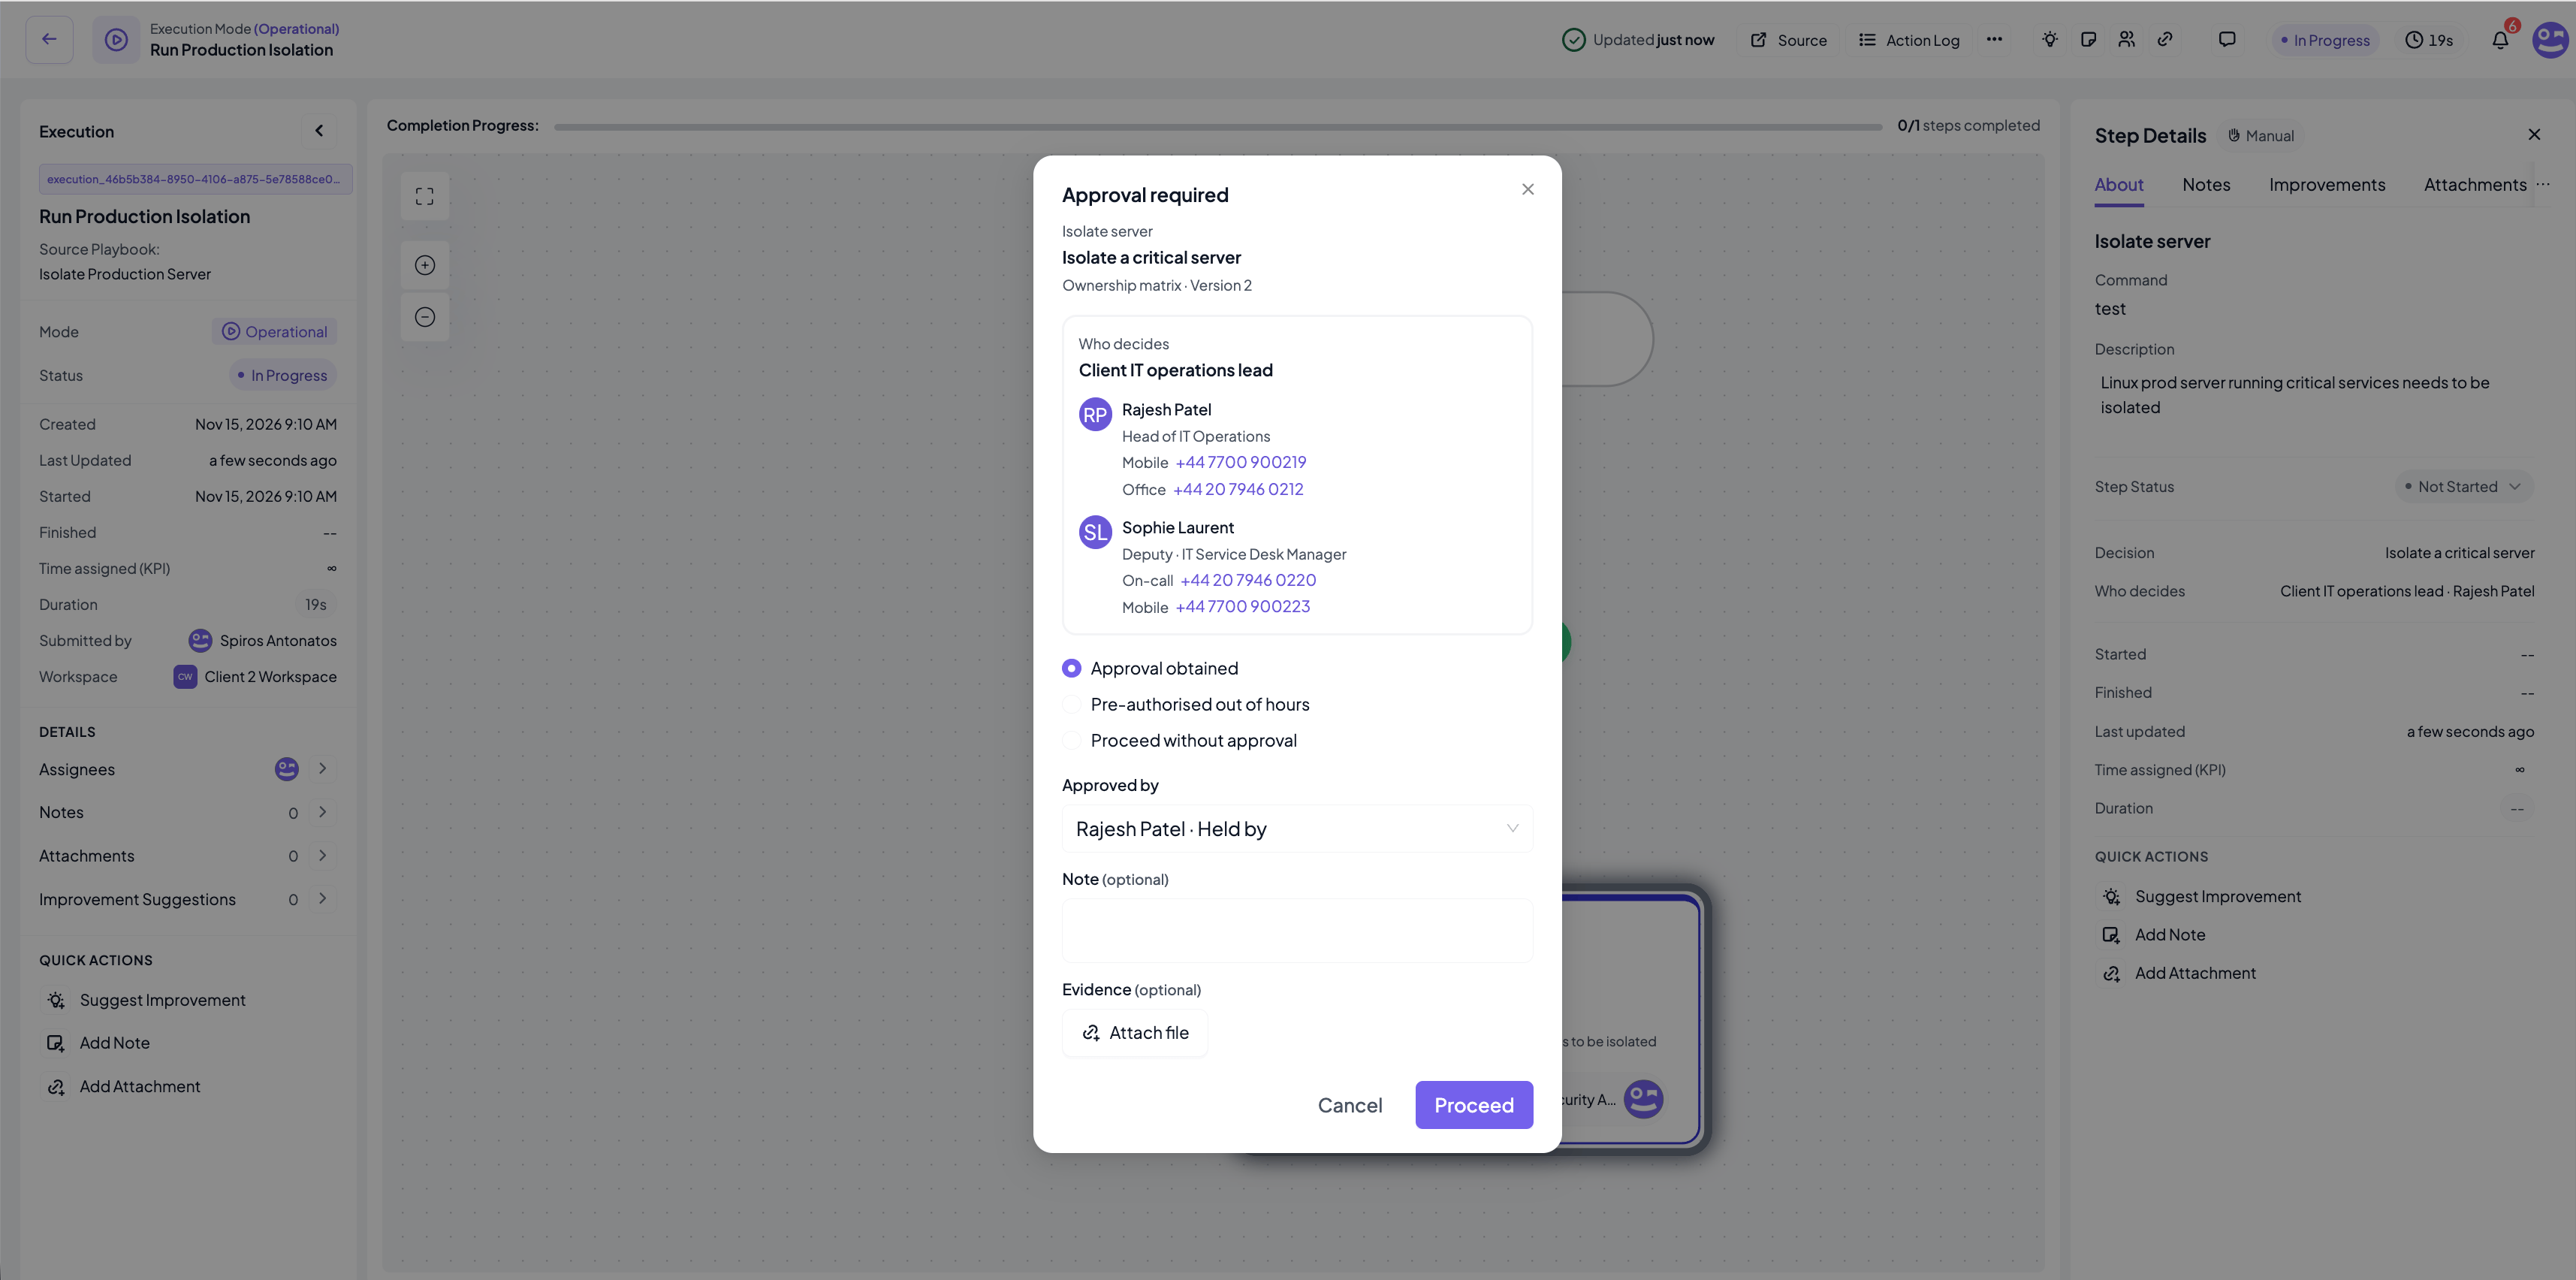
- Approval obtained: the holder or the deputy approved. Say which of the two under Approved by, and optionally add a note and attach a file as evidence (up to 20MB), such as the approving e-mail. This option is not available when the role has no holder and no deputy.
- Pre-authorised out of hours: offered only when the decision is pre-authorised out of hours. The person starting the step declares that it is out of hours.
- Proceed without approval: the step goes ahead without the owner’s approval. A reason is mandatory.
The gate is a soft gate. It never blocks the response: whoever may start the step may pass the gate. What it guarantees is that the authority the step went ahead on is always on record.
The escalation ladder in war rooms
In a war room, the Escalation ladder entry of the About War Room sidebar opens the ladder of the room’s workspace. It opens on the severity of the room, and the other severity levels are one click away.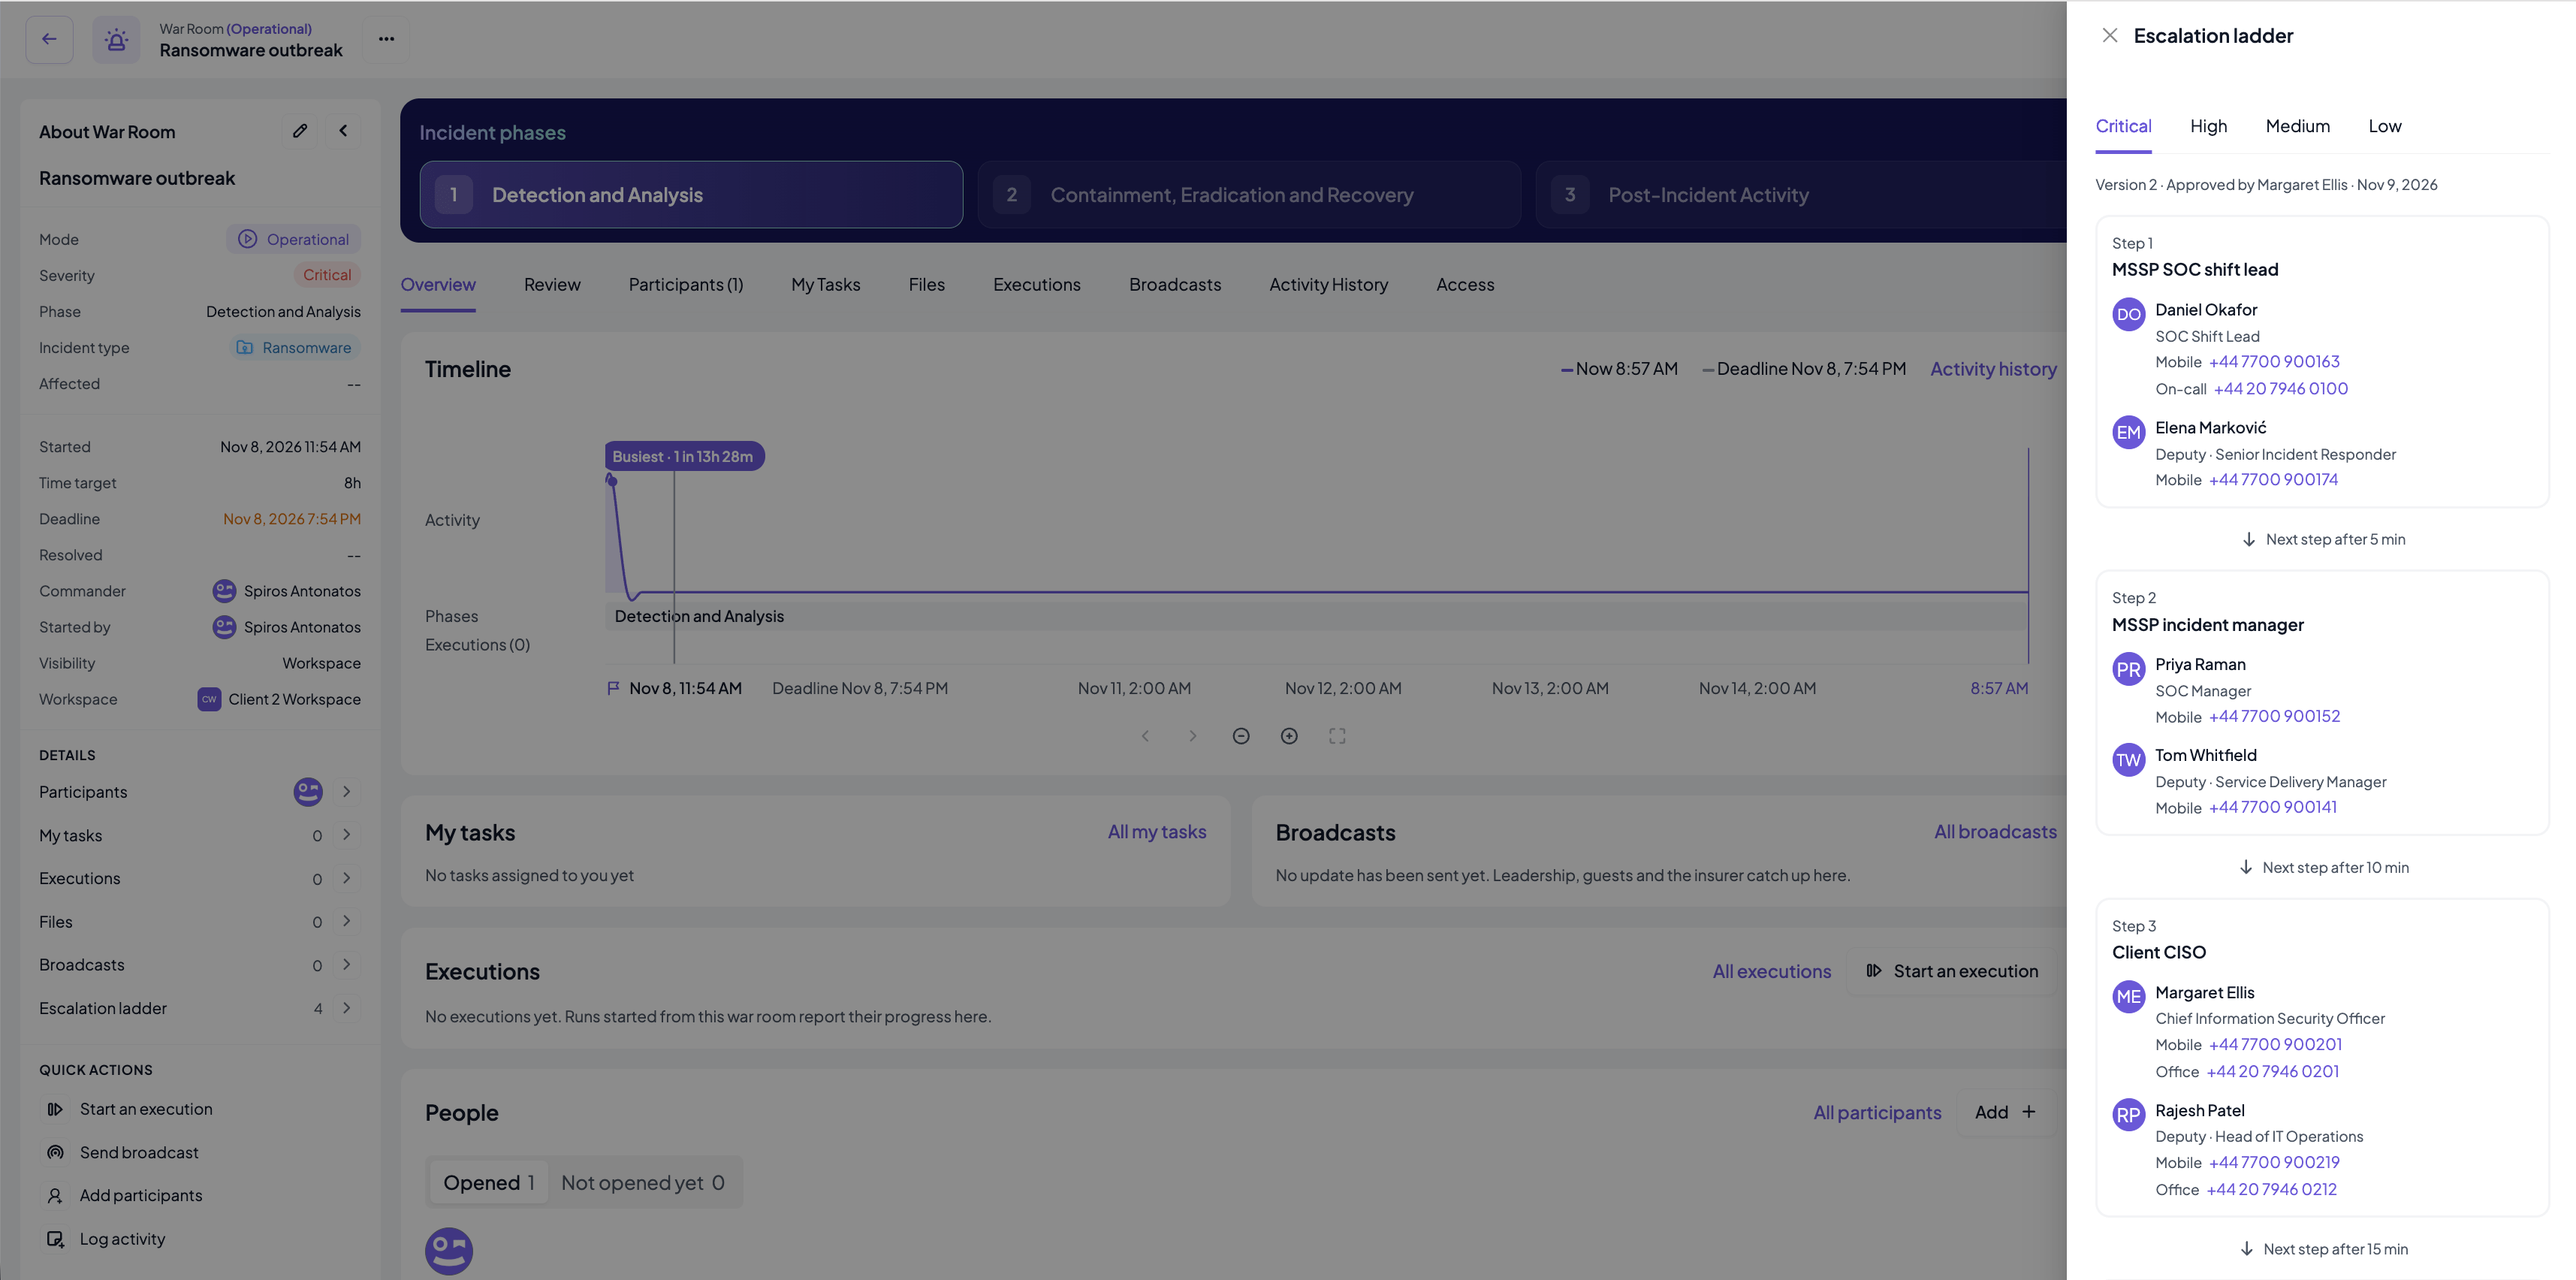
- The steps and waits are those of the latest sign-off. A warning shows when the matrix was changed since then or was never signed off.
- The people and phone numbers are always the current ones.
- When a room is started, its timeline records which version of the matrix is in force. An archived room keeps the version that was in force when it was archived; the export of the room includes its escalation ladders.
Readiness Overview
The risk signals of the workspace are also shown on the home page, in the Readiness Overview. See Where risk signals are shown.Organisation defaults
Building a matrix from an empty page for every workspace is slow, and it lets workspaces drift apart: one calls the role Client CISO, the next Customer security lead, and a third forgets the decision about notifying the regulator. An organisation can instead define its roles, decisions and escalation ladders once, and every workspace of the organisation takes them over with one click. This is what makes the feature practical for an MSSP with one workspace per customer, or an enterprise with one workspace per business unit:- A new workspace starts from the organisation’s agreed set, so onboarding a customer comes down to naming who holds each role and adjusting what is specific to that customer.
- Every workspace uses the same role names and the same wording for the same decisions, so analysts who work across customers read every matrix the same way.
- Nothing is forced on a workspace. It takes the defaults when it wants them and is free to change its copy.
Defining the defaults
Open Organisation, then Settings, and choose the Ownership & Escalation tab. The page has three blocks, built in this order because each one uses the one before it:- Default decision roles: the name of each role, for example Client CISO. A default role has no holder or deputy: who fills a role is different in every workspace and is named there.
- Default decisions: each with the role that decides, the pre-authorisation and the roles informed, exactly as in a workspace. Add standard decisions adds ten common incident decisions in one go, ready to be given an owner:
- Isolate a workstation
- Isolate a critical server
- Disable a user account
- Disable a privileged or service account
- Block network traffic
- Shut down a production system
- Restore systems from backup
- Notify the regulator
- Notify affected customers
- Issue a public statement
- Default escalation ladders: one per severity level, built from the default roles, with the wait between steps.
Managing the defaults is for the admins, editors and collaborators of the organisation. Everyone else sees the page with its actions greyed out.
Taking the defaults over in a workspace
In the workspace’s Ownership & Escalation tab, the Add organisation defaults button appears in the Decision roles, Ownership matrix and Escalation ladders sections whenever the organisation has defaults that the workspace does not have yet. The number on the button is how many are waiting.- In Decision roles, it adds the missing default roles, with nobody holding them.
- In Ownership matrix, it adds the missing default decisions with their owner role, pre-authorisation and informed roles. The roles those decisions name are added with them, so the matrix can be taken over in a single step.
- In Escalation ladders, it adds the default ladder of every severity level that has no ladder in the workspace, again with the roles it names.
How copies behave
A workspace copies the defaults; it does not stay linked to them.- A copy belongs to the workspace from then on. The workspace can rename it, change its owner or pre-authorisation, or remove it.
- Changing or removing a default later does not reach the workspaces that already took it over. Their approved rules never change behind their back, so a sign-off stays valid.
- A new default shows up in every workspace as one more on the Add organisation defaults button, for the workspace to take over when it chooses.
- The defaults never create duplicates. A workspace that already has a role or a decision with the same name as a default keeps its own, and is not offered that default again.
- Taking defaults over changes the rules of the workspace, so the sign-off bar shows Changed since sign-off until the result is approved.