> ## Documentation Index
> Fetch the complete documentation index at: https://docs.cymph.io/llms.txt
> Use this file to discover all available pages before exploring further.
# Manage integrations
> Create, test, edit, and delete integrations in a workspace.
## How to create an integration
1. Go to the workspace you want to add an integration for
* From Workspace menu, select the workspace from the navigator
2. Go to the **Integrations** tab.
* Select the Manage from the navigation menu and the **Integrations**
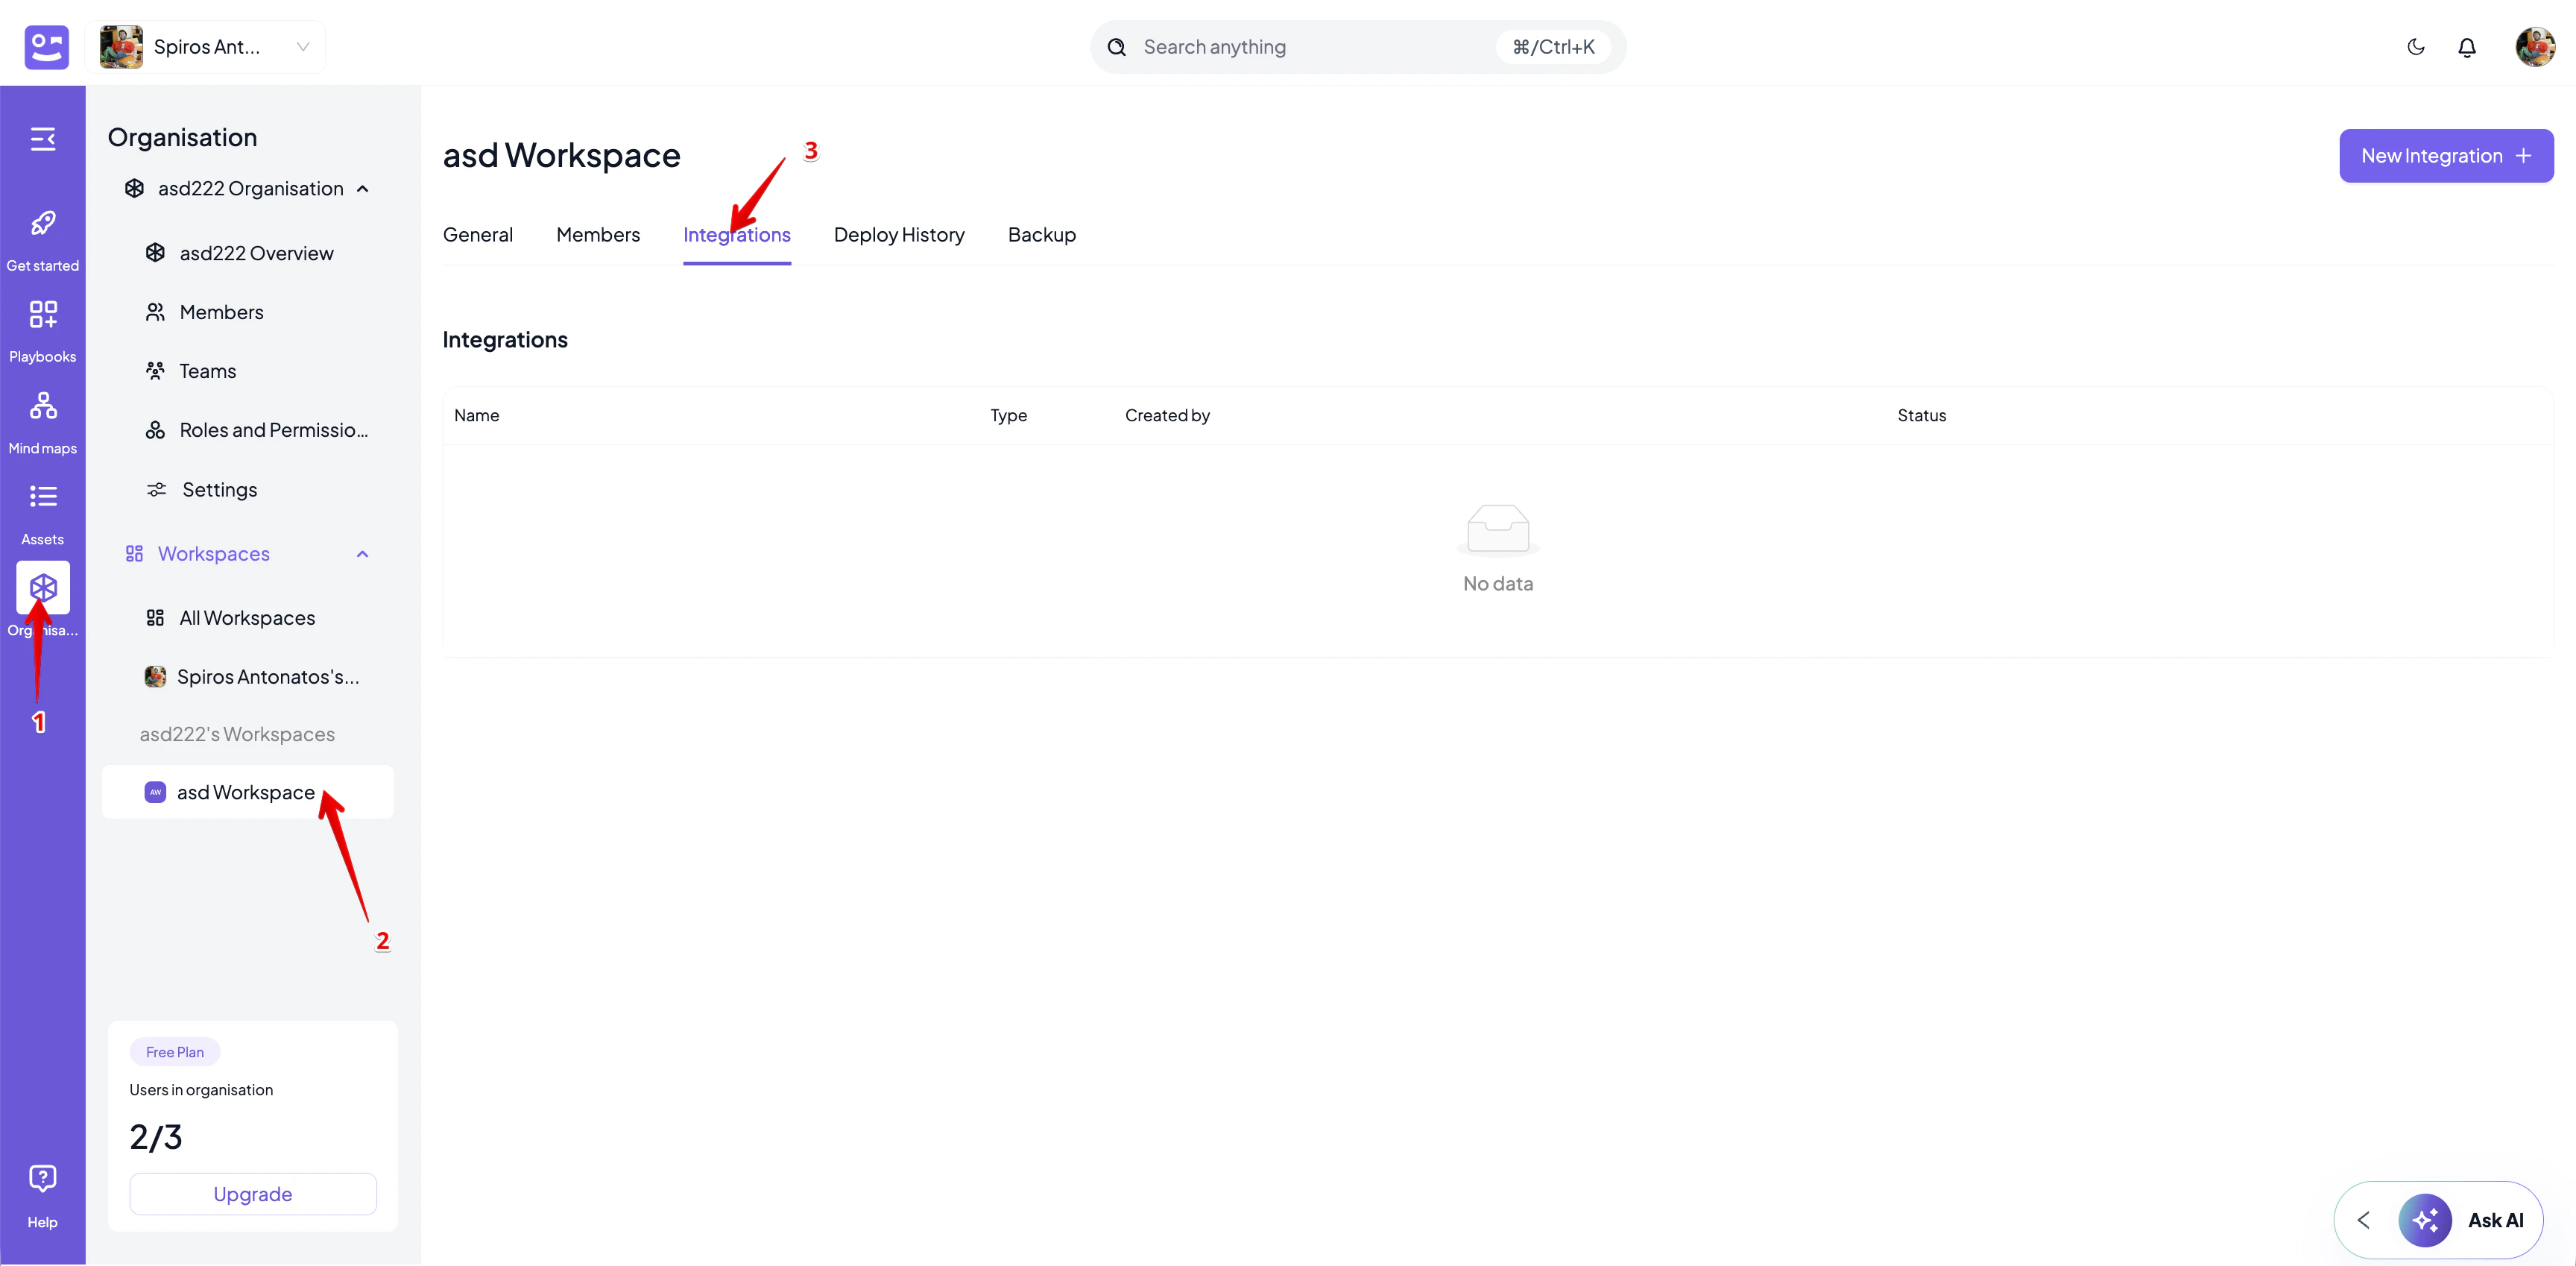 3. Click on **New Integration** from the top right corner
4. Select your integration type. The following types are available:
* [Cortex XSOAR](/integrations/automation/cortex-xsoar)
* [n8n](/integrations/automation/n8n)
* [Microsoft Sentinel](/integrations/detection/microsoft-sentinel)
* [Wazuh](/integrations/detection/wazuh)
* [Splunk Enterprise Security](/integrations/detection/splunk-es)
* [Splunk SOAR](/integrations/automation/splunk-soar)
* [StackStorm](/integrations/automation/stackstorm)
* [Confluence](/integrations/content/confluence)
* [JIRA](/integrations/ticketing/jira)
* [ServiceNow](/integrations/ticketing/servicenow)
* [GitHub](/integrations/content/github)
* [GitLab](/integrations/content/gitlab)
* [GitBook](/integrations/content/gitbook)
* [SharePoint](/integrations/content/sharepoint)
* [DFIR-IRIS](/integrations/ticketing/dfir-iris)
* [Azure](/integrations/cloud/azure)
* [AWS](/integrations/cloud/aws)
* [Slack](/integrations/notifications/slack)
3. Click on **New Integration** from the top right corner
4. Select your integration type. The following types are available:
* [Cortex XSOAR](/integrations/automation/cortex-xsoar)
* [n8n](/integrations/automation/n8n)
* [Microsoft Sentinel](/integrations/detection/microsoft-sentinel)
* [Wazuh](/integrations/detection/wazuh)
* [Splunk Enterprise Security](/integrations/detection/splunk-es)
* [Splunk SOAR](/integrations/automation/splunk-soar)
* [StackStorm](/integrations/automation/stackstorm)
* [Confluence](/integrations/content/confluence)
* [JIRA](/integrations/ticketing/jira)
* [ServiceNow](/integrations/ticketing/servicenow)
* [GitHub](/integrations/content/github)
* [GitLab](/integrations/content/gitlab)
* [GitBook](/integrations/content/gitbook)
* [SharePoint](/integrations/content/sharepoint)
* [DFIR-IRIS](/integrations/ticketing/dfir-iris)
* [Azure](/integrations/cloud/azure)
* [AWS](/integrations/cloud/aws)
* [Slack](/integrations/notifications/slack)
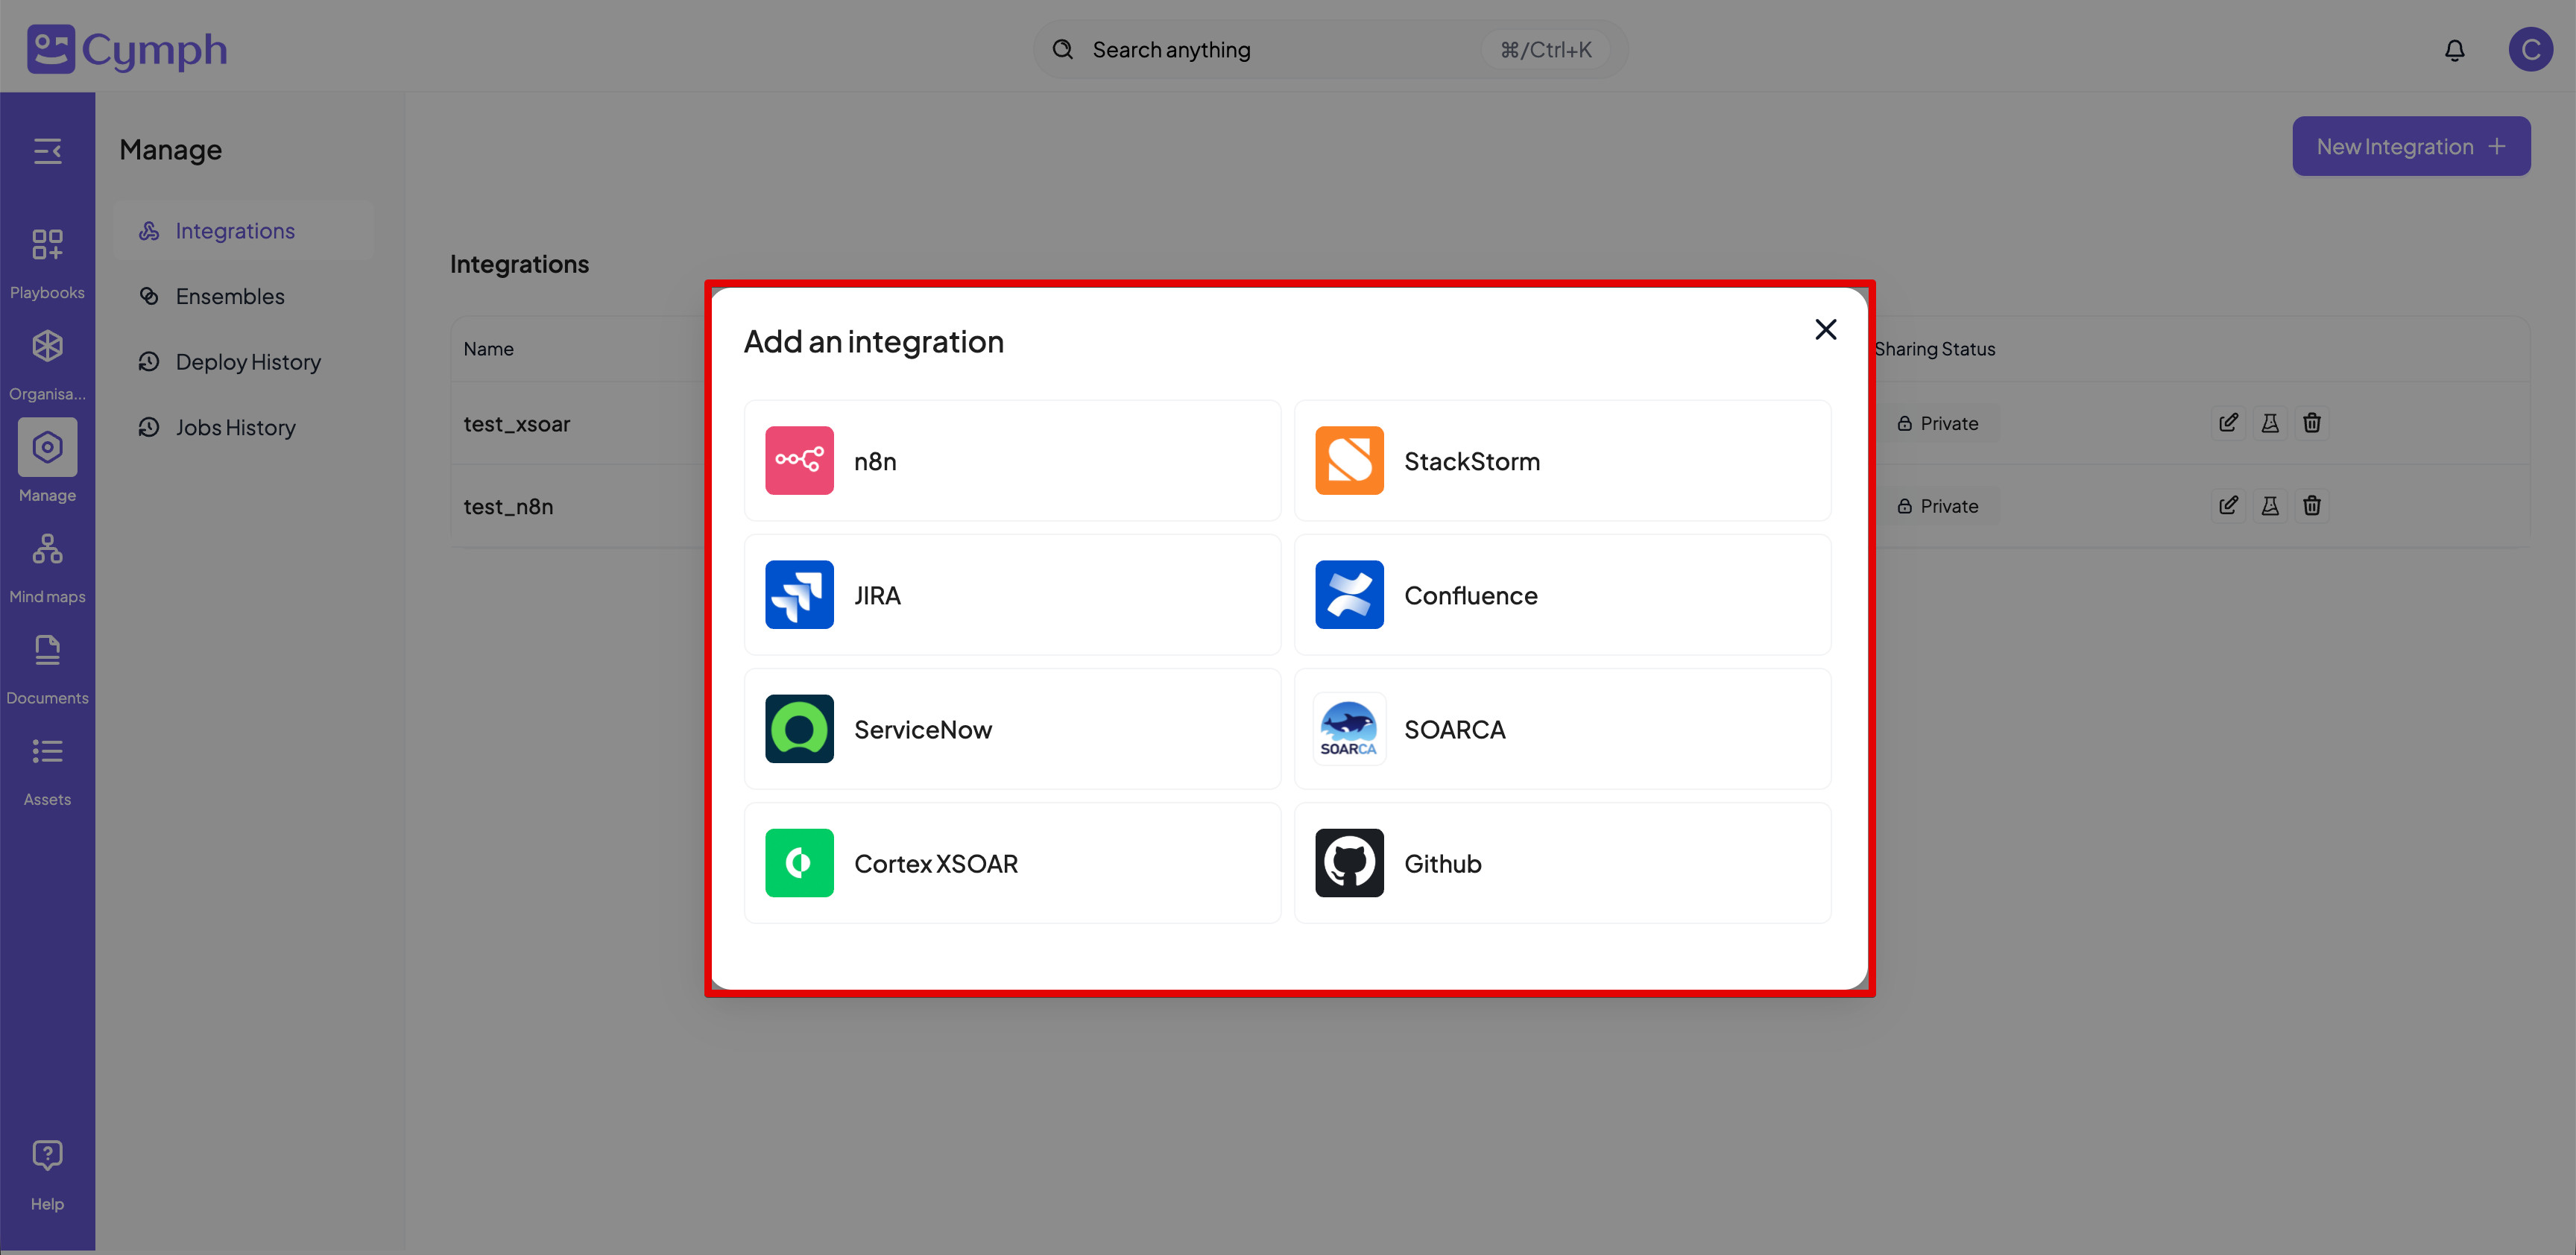 5. Fill in the details for your integration. In the screenshot below, you see an example for n8n. Common to all integration setups is the option to share the instance with the rest of your organisation.
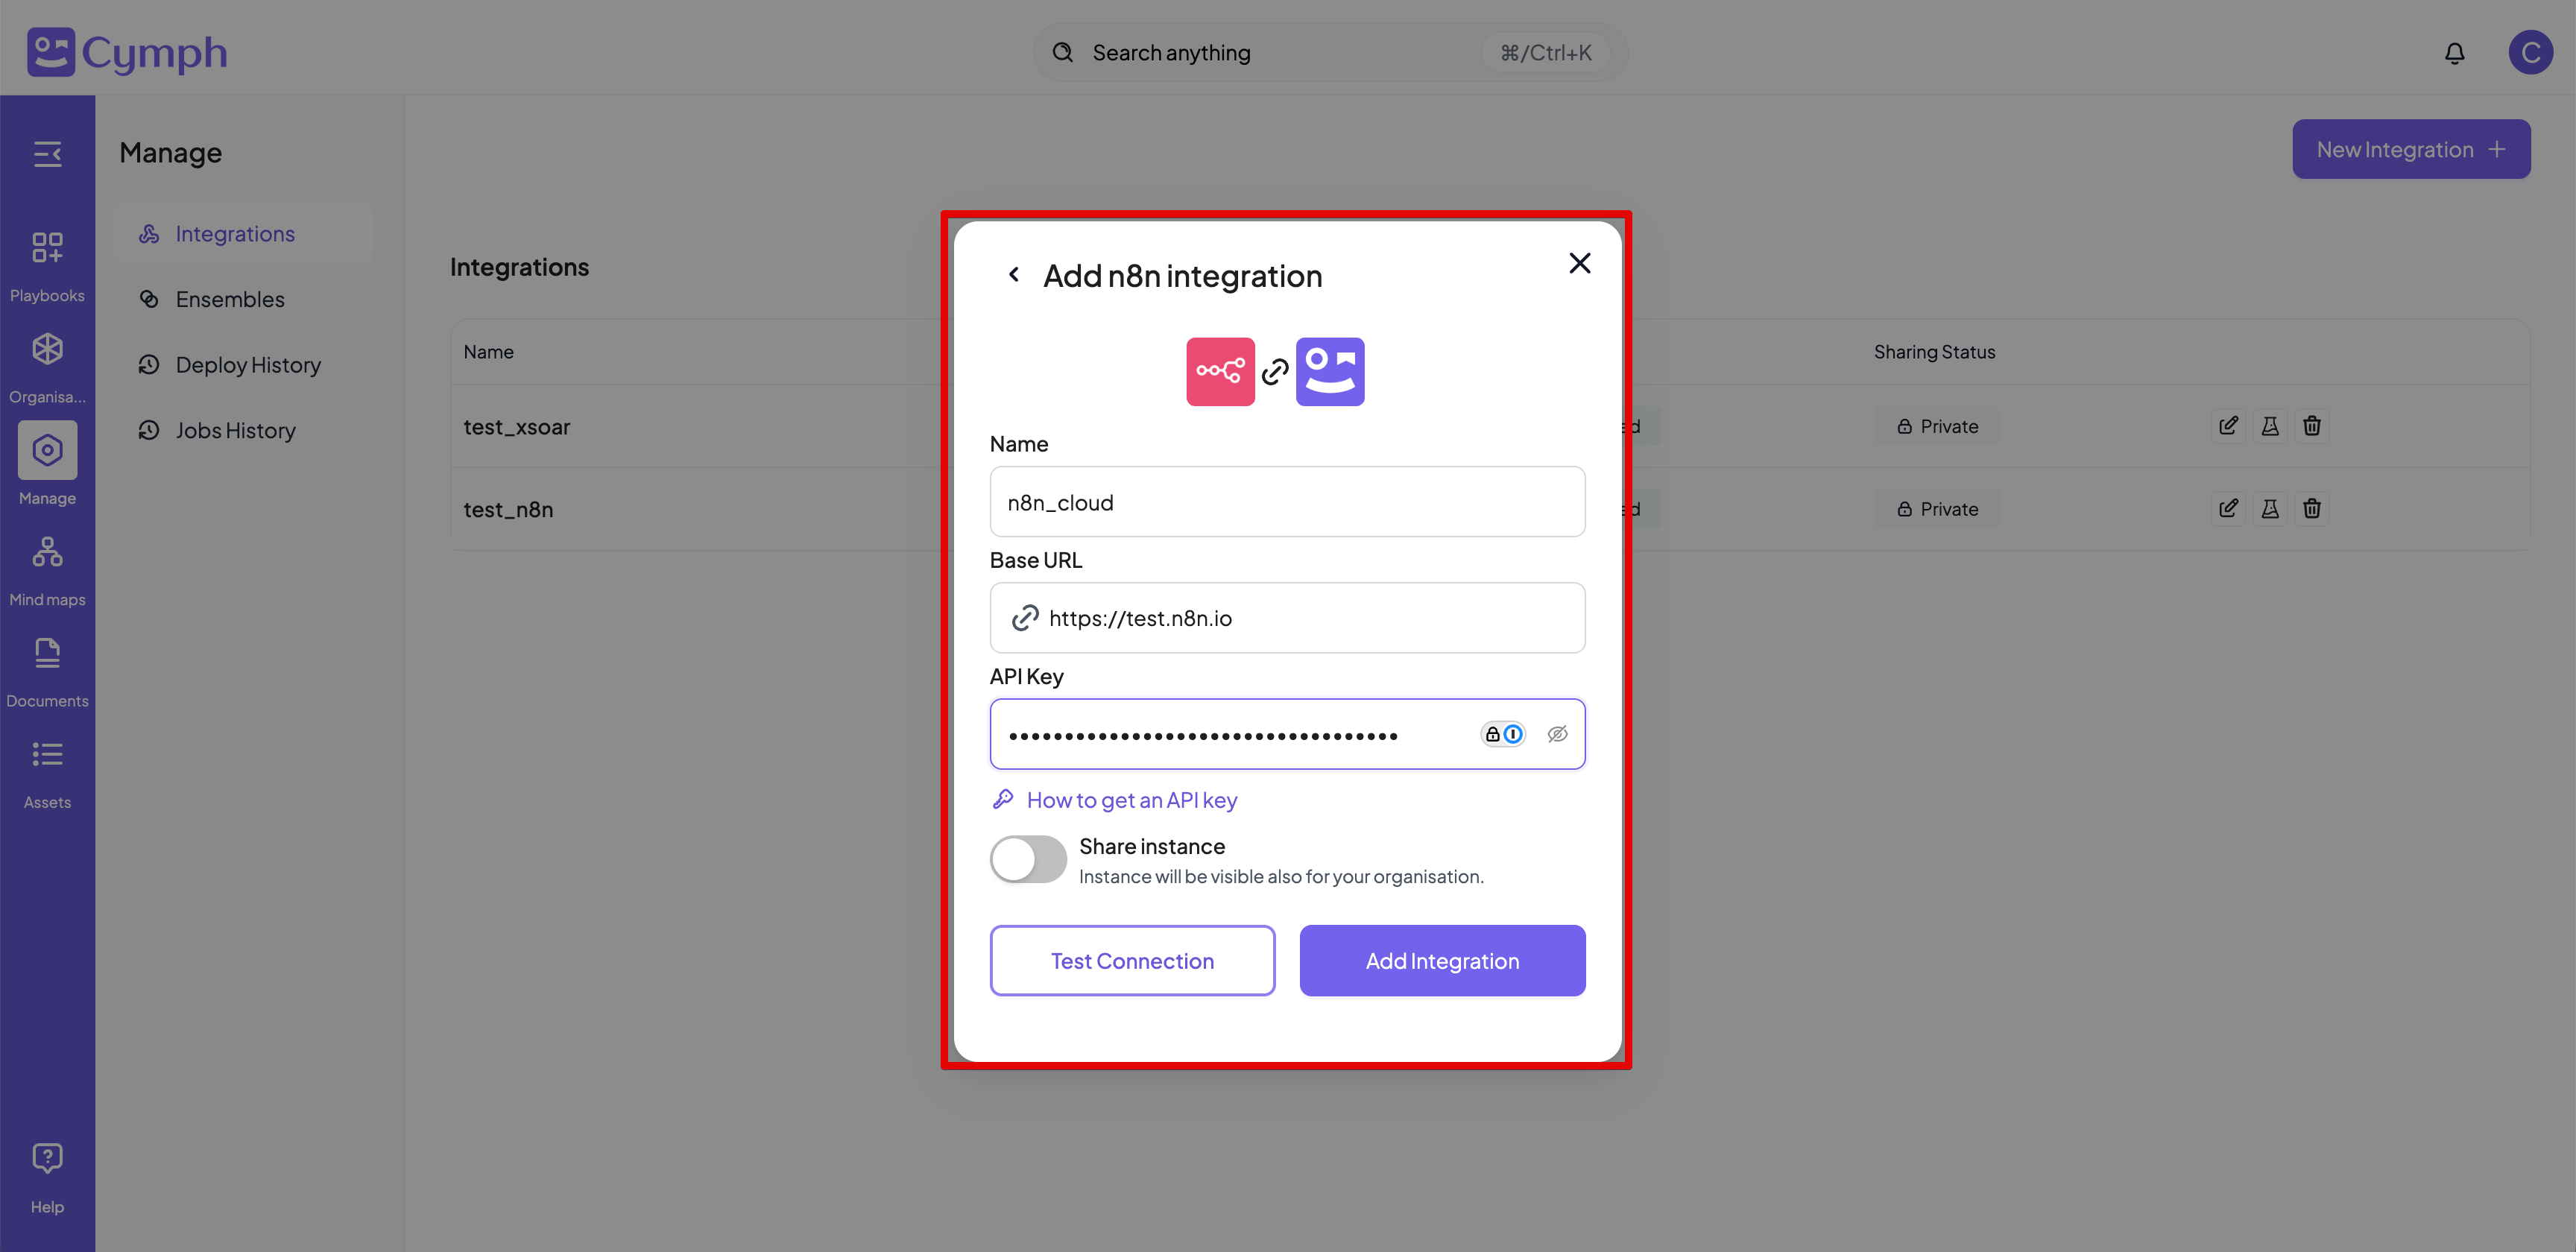 6. Before adding the integration, you can test the settings via **Test Connection**
7. Click on **Add Integration** to add your integration
* Integrations should have unique name per type.
* When testing an integration, the backend will give up testing after 5 seconds of trying to connect to the integration instance
* Depending on the integration type, you might see different options for the integration
The credentials and permissions each type needs are documented on its own page — see the [integrations overview](/integrations/overview) for the full list.
## How to update an integration
1. Go to the **Integrations** tab of the workspace.
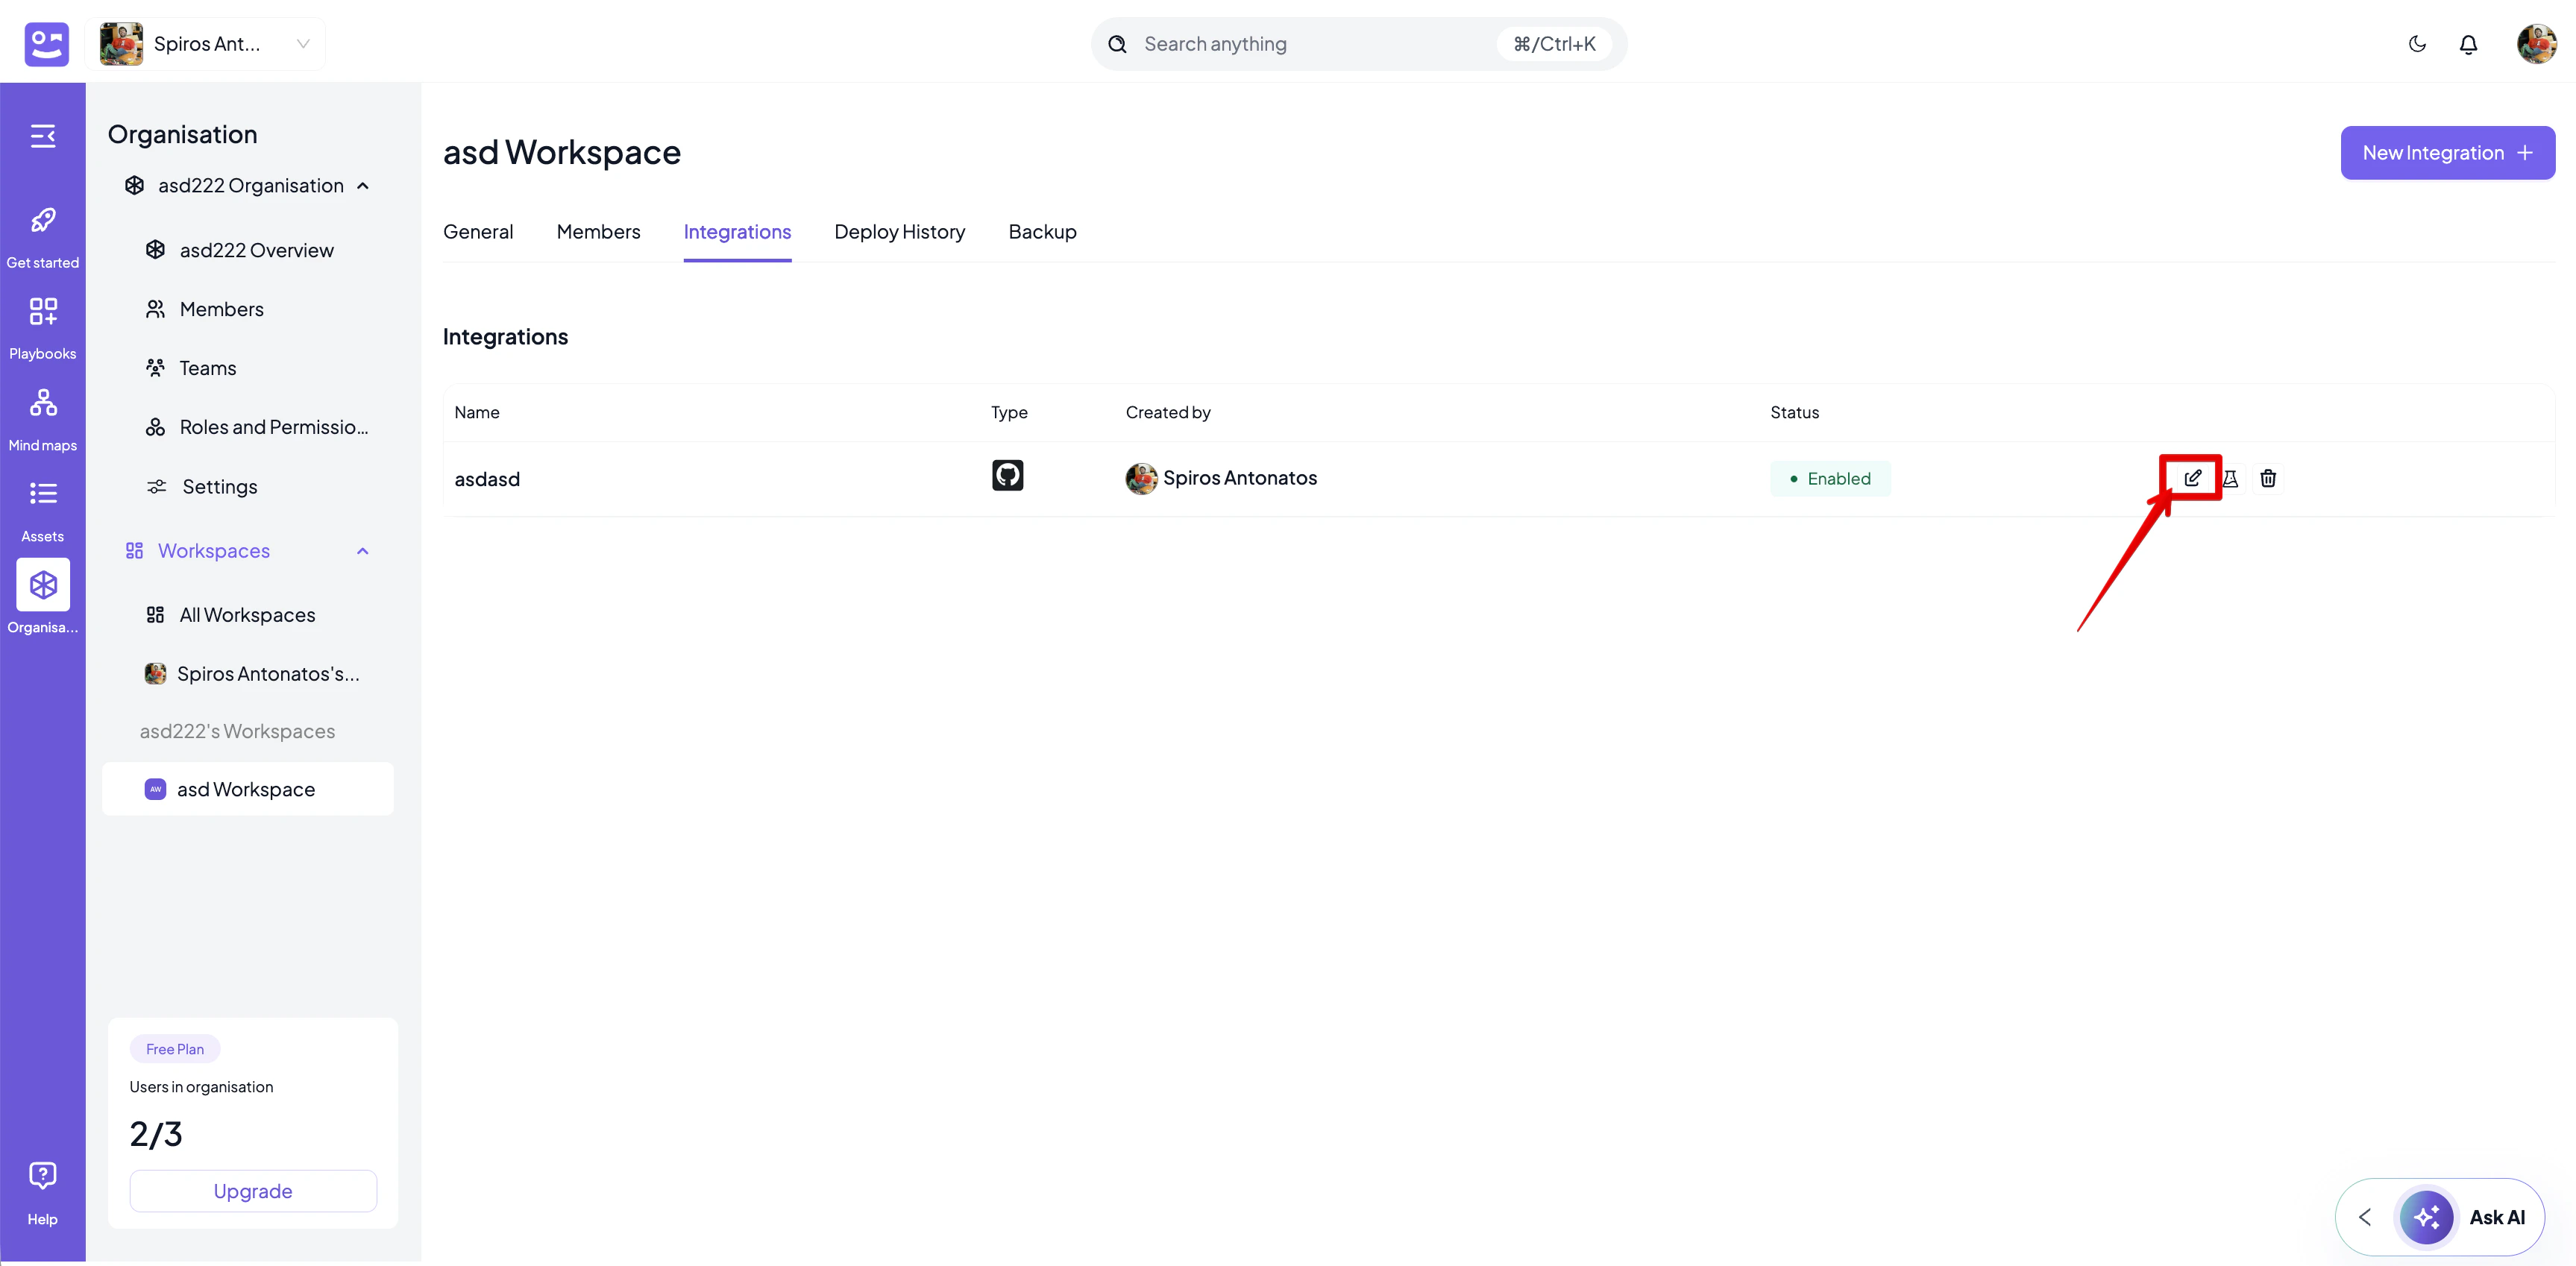
2. Edit the integration.
* Select the **Edit** icon next to the integration you want to edit.
6. Before adding the integration, you can test the settings via **Test Connection**
7. Click on **Add Integration** to add your integration
* Integrations should have unique name per type.
* When testing an integration, the backend will give up testing after 5 seconds of trying to connect to the integration instance
* Depending on the integration type, you might see different options for the integration
The credentials and permissions each type needs are documented on its own page — see the [integrations overview](/integrations/overview) for the full list.
## How to update an integration
1. Go to the **Integrations** tab of the workspace.
2. Edit the integration.
* Select the **Edit** icon next to the integration you want to edit.
 3. Edit the integration details.
* Provide a new name for the integration (optional).
* Modify the URL of the integration endpoint (optional).
4. Test the integration (optional).
* Click the **Test Connection** button.
* If the integration is valid, a message will appear that the integration is tested successfully. Differently, a message containing the test error will appear.
5. Update the integration.
* Click the **Update Integration** button.
6. The list of integrations will be updated automatically to reflect the new changes.
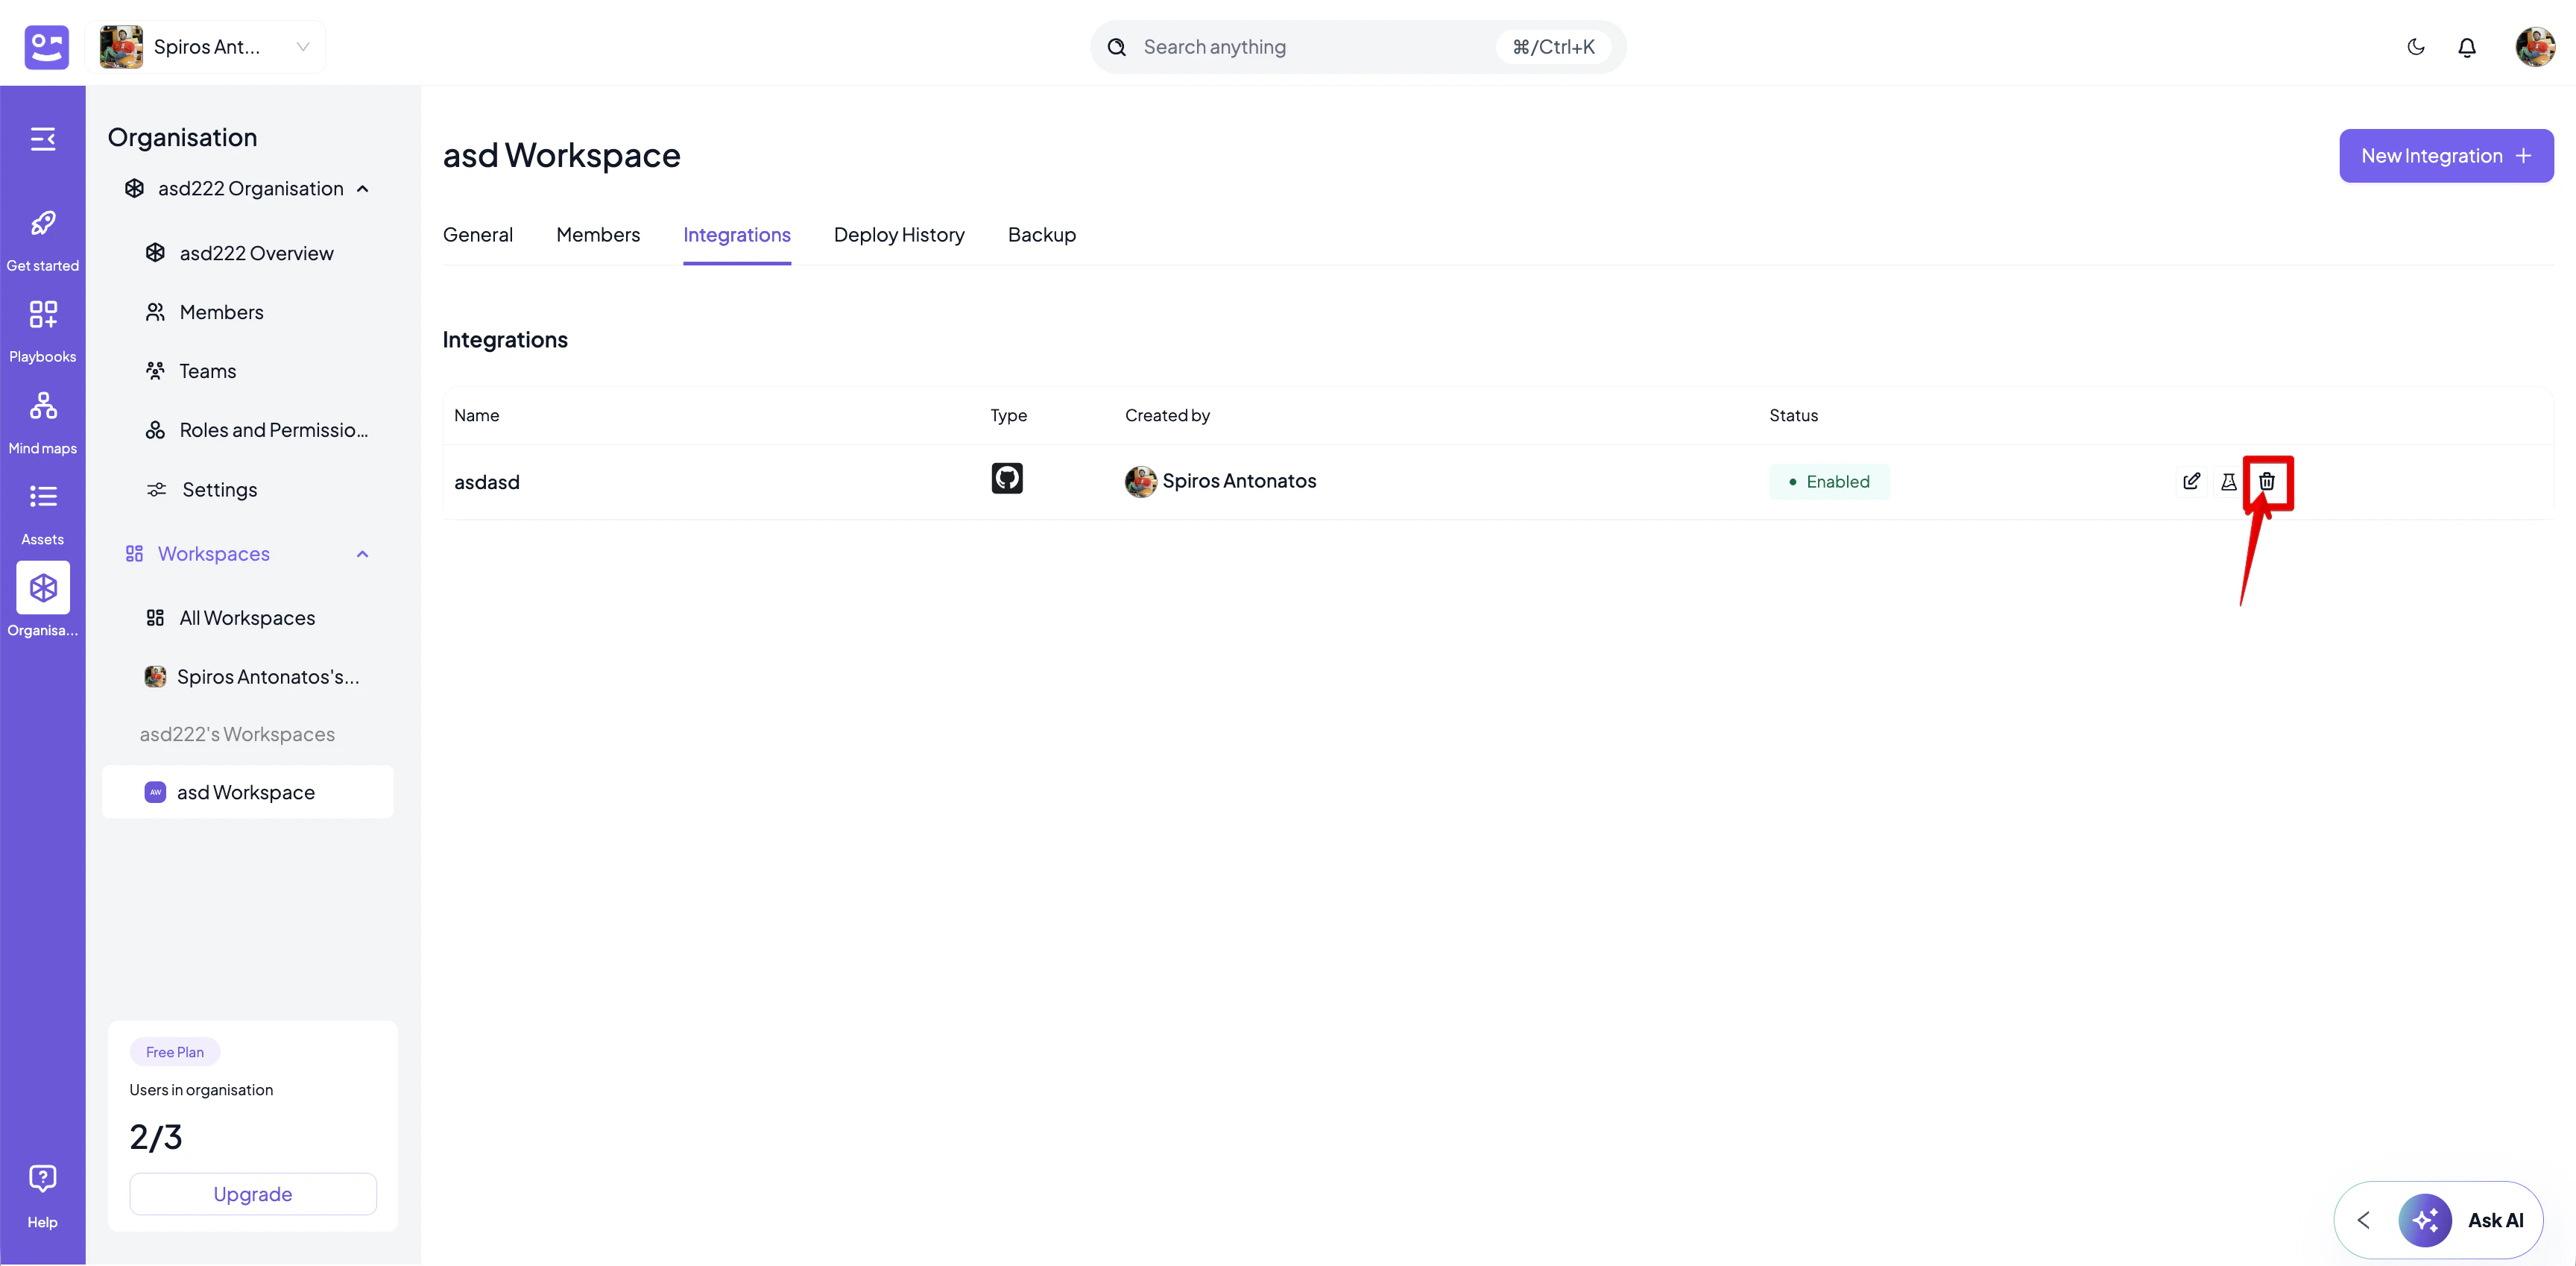
## How to delete an integration
1. Go to the **Integrations** tab of the workspace.
2. Delete the integration.
* Select the **Delete** icon next to the integration you want to delete.
* Confirm the deletion by clicking the **Delete** button on the confirmation dialog that appears.
3. The list of integrations will be updated automatically to reflect the new changes.
3. Edit the integration details.
* Provide a new name for the integration (optional).
* Modify the URL of the integration endpoint (optional).
4. Test the integration (optional).
* Click the **Test Connection** button.
* If the integration is valid, a message will appear that the integration is tested successfully. Differently, a message containing the test error will appear.
5. Update the integration.
* Click the **Update Integration** button.
6. The list of integrations will be updated automatically to reflect the new changes.
## How to delete an integration
1. Go to the **Integrations** tab of the workspace.
2. Delete the integration.
* Select the **Delete** icon next to the integration you want to delete.
* Confirm the deletion by clicking the **Delete** button on the confirmation dialog that appears.
3. The list of integrations will be updated automatically to reflect the new changes.
 ## Egress control
Several integrations require Cymph to make **outbound** connections to an endpoint you operate — SIEM APIs (Wazuh, Microsoft Sentinel), SOAR platforms, ticketing systems, and similar. When that endpoint sits behind a firewall or a **source-IP allowlist** (standard practice in financial and government environments), the connection is refused unless Cymph's egress address is permitted.
Symptoms of a missing allowlist entry:
* **Test Connection** fails with `403` or a connection timeout.
* A previously working integration goes dead while its status still shows **Enabled** — the only clue is the `403`s in your own endpoint's access logs.
How you allowlist depends on which deployment model you run: a self-hosted deployment egresses from your own network, while a managed cloud tenant egresses from a published set of AWS addresses.
The addresses to allowlist, and the notice policy for changing them, are in [Networking](/deployment/networking#egress-control) — that is the page to hand to a network or firewall team.
## Egress control
Several integrations require Cymph to make **outbound** connections to an endpoint you operate — SIEM APIs (Wazuh, Microsoft Sentinel), SOAR platforms, ticketing systems, and similar. When that endpoint sits behind a firewall or a **source-IP allowlist** (standard practice in financial and government environments), the connection is refused unless Cymph's egress address is permitted.
Symptoms of a missing allowlist entry:
* **Test Connection** fails with `403` or a connection timeout.
* A previously working integration goes dead while its status still shows **Enabled** — the only clue is the `403`s in your own endpoint's access logs.
How you allowlist depends on which deployment model you run: a self-hosted deployment egresses from your own network, while a managed cloud tenant egresses from a published set of AWS addresses.
The addresses to allowlist, and the notice policy for changing them, are in [Networking](/deployment/networking#egress-control) — that is the page to hand to a network or firewall team.